
JavaScript has steadily been among the most popular programming languages in the recent years. Numerous frameworks and development for popular platforms have secured the success and erased the memories of the nasty clichés of the past. The language grows, develops and becomes more logical, which certainly pleases many thousands of its fans.
In 2014 JavaScript attracted the attention of some serious guys from Apple. At WWDC 2014 conference, a new technology was announced; it is called JavaScript Automation and allows you to create applications for OS X in this popular programming language. Let’s try to learn more about the new product and understand it through to real-life examples: is it worth it?
A blast from the past
Any normal operating system has tools for automation. Most often, they are hardcore tools. Let’s take the nix, for example. Powerful bash rules here, and it is capable of solving the most sophisticated tasks. The problem is only that it’s so complicated. Not every user will dare to start a creative alliance with this Swiss Army knife. It turns out that there is a tool, but only a few most advanced people use it.
The situation is similar with Windows, which has its own interpreter in the form of CMD. It is simpler, but also less functional, so it cannot compete with bash. The result is the same: the tool is available, but we do not want to work with it.
Just for such users, all sorts of interfaces and alternatives were invented. For example, in Windows everyone can write JavaScript (and this option has been around for a very long time) or VBS. Later on, PowerShell emerged as a powerful tool that enables more easily accessible automation.
The OS X world faced a similar situation. Like it or not, but this OS has always been based on BSD. That means that its automation tools basically follow the traditional UNIX way: bash or any other programming language.
There is only one difference. Unlike its ancestors, OS X is trying to simplify users life as much as possible. Their average user is not a hardcore geek and does not need 100,500 obscure features and impressive language great passages. Its main priorities are usability and simplicity — and the simpler, the better.
More experienced users should remember that the option of writing automated scripts was introduced on JS as far back as in 2001. Alas, it did not become popular back then, and a few years later it was replaced by AppleScript, which became the standard for many years that followed. It was not just “another programming language” but a new perspective on programming for ordinary people. Instead of the usual syntax that experienced developers are used to, AppleScript communicated in a way that was similar to human language.
Apple’s marketing efforts and rosy reviews by ordinary users turned AppleScript into the object of adoration, which became even more revered when Automator, a visual tool for automation, was released.
That is to say that JavaScript (JS OSA) was created by Apple long ago, but due to bad luck and because of its young age, it was unjustly put on the back burner. And this situation can be easily understood if we remember that in the beginning of 2000s JS was more a hooligan tool for bullying the browser than a universal programming language…
JavaScript for Automation
If JavaScript programming for OS X is theoretically possible for over ten years, then what’s so special about the announcement, which is much talked about? Is Apple now ready for a belated marketing campaign?
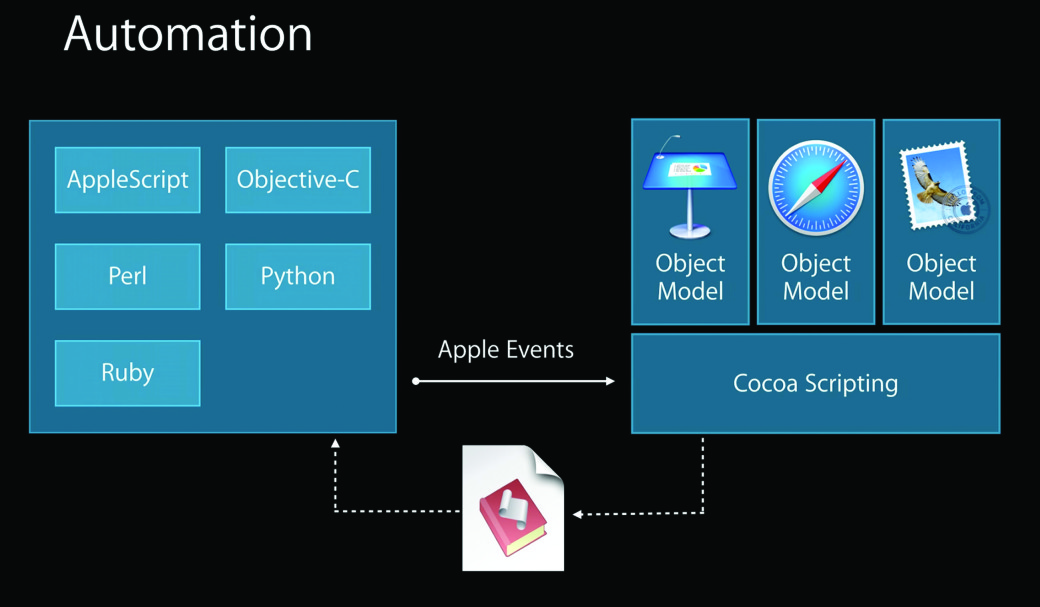
A lot of work was done on the latest version of OS X (Yosemite) to enable it to interact with the system closer. This is not even about JavaScript, it’s about the emergence of a whole range of API, libraries, which in the future will allow us to use not only JavaScript, but also other programming languages for automation. If we do not focus on the technical specifics, this thing can be compared to .NET (forgive me for this crude comparison). That means that we have at our disposal the software kernel which works with other programming languages equally well.
Here, one may reasonably ask: why was JavaScript rather than anything else chosen to be the pioneer? Hardly anyone can give a precise answer, as there is no official information. It seems to me that one of the arguments for in respect of this issue, and not the least important one, was its popularity. Today, this language is booming, and the army of developers using it is growing steadily. It would be a shame not to take advantage of such a happy coincidence.
And now I’ll give you some technical details.
Close integration with the system
It is not about simple automation in the style of “opened the program -> clicked the button.” Advanced users get an opportunity to work with native frameworks and libraries. The feature used to be available to AppleScript connoisseurs, and now it has been expanded and given to all JavaScripters. Due to the access to Cocoa API, developers can create applications with the native interface directly in JS. Moreover, in most cases there will be no substantial speed loss in comparison with the use of Objective C.
Simple dialogue with applications
The interaction with applications is reduced to filling properties and methods of implementation of the corresponding objects. There are no sophisticated and monstrous names! Everything is intended for intermediate level programmers, so to say.
Being good friends with Automator
Automator (a visual tool for automation) was not forgotten, and it was immediately made compatible with JavaScript. Now, in addition to visual “bricks” with AppleScript logic we can actually use a true code on JS.
The documents
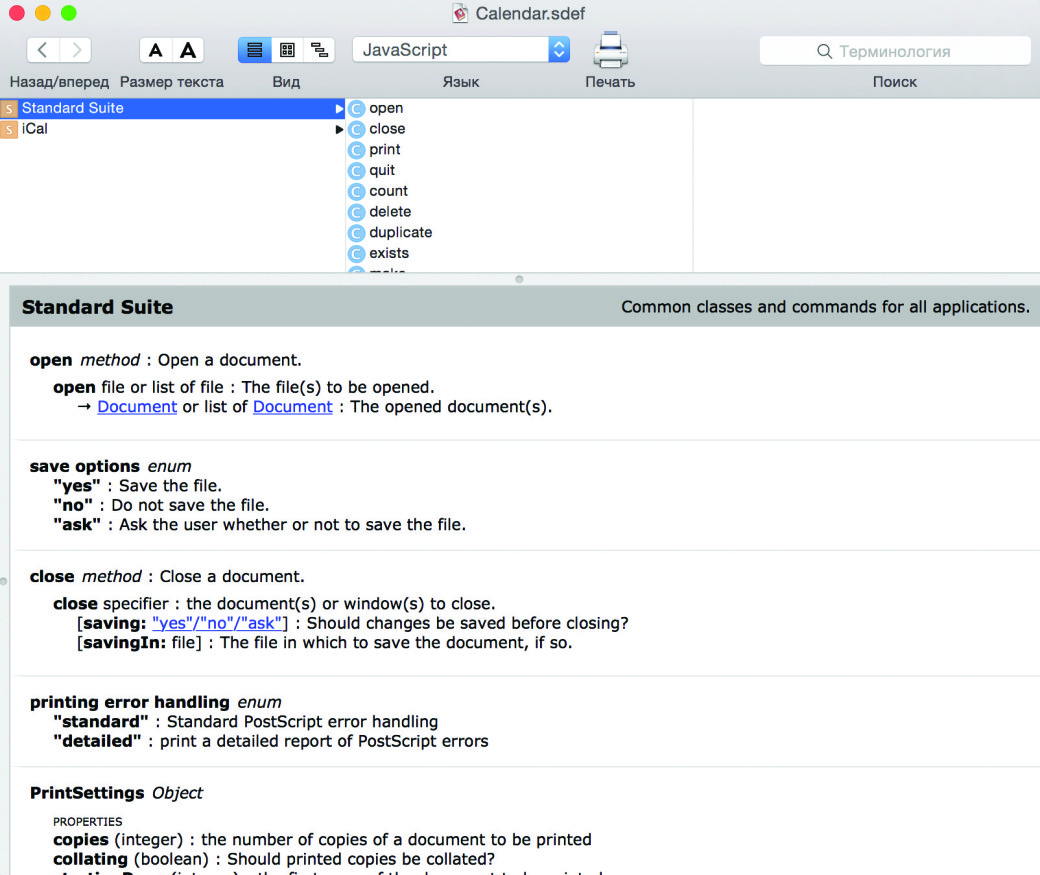
The presentation tells us about good documentation, but, in my opinion, it is not so perfect. And yes, the library with the descriptions of the properties and methods of stock applications is well made. There is a description of all the built-in applications, and in about 15 minutes you can act like a guru of OS X automation (if you have programming experience, of course). But when it comes to closer interaction with the system, there are some gaps. However, I am sure that this is just a matter of time.
Preparing our tools
Let’s start with the code editor. Generally speaking, a code can be written in any program. My standard editor lately has been Brackets, a free editor. However, if it is the first time you try JavaScript Automation, you’d better use a standard script editor. It is located in “Programs -> Utilities.”
In my opinion, a standard editor looks defective, as it does not have the usual tools that developers are used to. Even the elementary feature of line numbering is absent. Its main advantage is the simplicity of the launch of the code. We make a few lines of code and press one button to execute the test run.
We can achieve similar behavior with any other editor, but then we’ll have to invest a lot of time into setting it. I have not bothered to do that, but I think there will be no major problems. In any case, osascript utility (I am going to tell you about it a little later) covers all the needs in respect of running scripts from the console.
When writing the code, you will find Event Log, a built-in script editor (Window -> Event Viewer), to be extremely useful. It gives a JXA-developer information that is required for debugging. At first, you will often have to look there, as even your experience in JavaScript development does not prepare you for some surprises that JXA includes.
Now let’s take a look at another tool which you can’t do without if you want to write a serious a script: this is “library.” The library stores information about the methods and properties of standard applications. Whenever you want to automate something, have a look there (Window -> Library).
Now we will try to check it all in practice by creating a simple script. Let it be the traditional Hello, World, but this greeting to the world will be pronounced with a voice. First, in the window of the script editor, we change the programming language to JavaScript. Then we’ll type in three lines and run the script:
App = Application.currentApplication();
App.includeStandardAdditions = true;
App.say("Hello, World!");
If everything is entered correctly, a pleasant female voice (it all depends on the system settings) will deliver the hoary line familiar to any programmer.
Ruling the browser
There are always dozens of open tabs in my favorite browser. You see something interesting but have no time to read it. You leave the tab open and promise to yourself: “I’ll read that a little later.” But “later” never happens, and the tabs mount up chaotically. Entropy increases, and eventually it eats up all the available memory. After some time you do not feel like sorting out all that trash, and you just close all the open tabs at once.
I had been struggling with the above problem for a long time before I finally came, through trial and error, to the use of OneTab extension. Now I’ll show you how to do nearly the same thing with JXA tools. This will also provide us with a real example that shows the nuances of the interaction with popular applications, Goolge Chrome and TextEdit. Let’s make a new script and include the code from Listing 1 (Oh, I remember Nikita Kislitsyn was enraged with Igor’s “Listings”, he even banned using the word “listing” in the magazine :). — editor’s note.).
# Listing 1. Grabbing links from tabs

    var googleChrome = Application("Google Chrome");
    var textEdit = Application("TextEdit");
    var newDoc = textEdit.Document().make();
    var content = "";

    newDoc.name = "pagesFromBrowser.txt";

   for (j = 0; j <= googleChrome.windows.length-1; j++) {

    var window = googleChrome.windows[j];

    for (var i = 0; i <= window.tabs.length-1; i++) {
        content = content + window.tabs[i].url() + "    " + window.tabs[i].name() + "\n";
    }

    textEdit.documents["pagesFromBrowser.txt"].text = content;
   }
This scenario will save the links to all tabs open in browser windows. For clarity, the address of the website is separated from the header of the page with the tab symbol. Now we’ll focus on the code, just a little bit.
The first step is to establish the connection with the desired application. In my case these were Google Chrome and TextEdit. We want to create an object for further interaction. To do this, we execute the global method of Application. As a parameter, we must include the name of the application (ID process, the path to the application). If there are no problems, you can get down to work.
After you receive a sample object, you should immediately open the library and view available properties/methods for the application you selected. I chose Google Chrome deliberately, as its description is not available in the library. What should we do? I did not find any official comments, so I took a chance and copied the names of the methods from the section about Safari. The code worked fine.
It was the same with TextEdit: we establish a connection and create a new document. We get descriptions of all methods and properties from the documentation.
Since the browser can open multiple windows and have many tabs in them, you must go through each one. To do this, we go through the collection of windows, and then in each following window we sort out all the tabs. Then there are the standard features of JS, which do not require any additional comments.
The idea described here is easy to develop by adding the code that will open links from the file. It will be nice, really! A similar function was once even implemented in Opera browser, which perished (I mean its original engine). Well, of course, we have to ensure that it is supported in different browsers. Right now, let’s look at the example of opening a new tab in Google Chrome:
window = googleChrome.windows[0];
newTab = googleChrome.Tab ({url: “http://iantonov.me”})
window.tabs.push(newTab);
Writing standard letters
Now let’s look at the built-in e-mail client (mail) from the point of view of JXA. Let’s try to connect to the application and create a new letter. This example is often given by bloggers, but they do not go beyond the creation of a new message with the subject line and the text. It seems that there is nothing to prevent us from following up on the example, but it always turns out to be challenging (Stack Overflow may serve as the proof). In the second listing I gave a full code of the script that allows you to compose a new message, add multiple recipients and attach any file.
#Listing 2. Working with email
myMailApp = Application("Mail");

bodyTxt = "Hi man! This is an example of sending a message by using JS from OS X.\n\n"
        + "Everything is very simple and clear.";

newMessage = myMailApp.OutgoingMessage().make();
newMessage.visible = true;
newMessage.content = bodyTxt;
newMessage.subject = "Good luck letter";
newMessage.visible = true;

newMessage.toRecipients.push(myMailApp.Recipient({address: "a@iantonov.me", name: "Igor Antonov"}));
newMessage.toRecipients.push(myMailApp.Recipient({address: "info@iantonov.me", name: "bot"}));

newMessage.attachments.push(myMailApp.Attachment({ fileName: "/Users/spider_net/Downloads/[rutracker.org].t4878348.torrent"}));

myMailApp.outgoingMessages.push(newMessage);
myMailApp.activate();
Here we take the familiar path: we establish a connection with the application and begin to fill in its properties. The names of properties and methods used are described in the accompanying documents. One only has to pay attention to the style of filling the object that contains the letter.
Theoretically, there is nothing unusual: initialize the appropriate object and fill in the properties. However, there is a nuance that I encountered when I first tried JXA. Look. In theory, we could write all the code in the traditional style of JS:
 myMessage = Mail.OutgoingMessage({
subject: “subject”,
content: “”,
visible: true,
toRecipients: [
myMailApp.Recipient({
address: "a@iantonov.me", name: "Igor Antonov"
}),
]
...
    });
The code looks more elegant, the syntax is absolutely correct… but it will not work properly with the given example. The new message will be created, but the line with the beneficiaries and the list of attachments will be empty. It is worth paying attention to that from the very beginning, because there are several other situations where you will have to deal with the same thing.
In this example, the recipient has a hard code, but in real life his or her contacts are sure to be found in the address book. Teaching the code to work with the “Contacts” application is a matter of minutes:
var contactsApps = Application("Contacts");
 var recipientFromContacts = contactsApps.people[“Igor Antonov”];
var name = recipientFromContacts.name();
 var email = recipientFromContacts.emails[0].value();
The code is also quite logical, but special focus is required on getting the name and email. Remember: name () is a method, not a property. Therefore, do not forget about the brackets, otherwise we will have to spend a long time struggling with errors that emerge.
Commanding interactively
The opportunities of automation are not limited to writing scripts in a traditional style. JXA also allows you to execute code interactively, immediately seeing the result brought about by each line. This can be demonstrated with osascript utility. Let’s open the terminal and run it:
$ Osascript -l JavaScript -i
As the first key, we chose the programming language we are using (do not forget that all the same things can be done with the use of AppleScript). The second key indicates the desire to work in an interactive mode.
Upon the performance of this command, we’ll receive an invitation to enter (>>) JavaScript-code. As an example, let’s try to run Google Chrome browser and open several tabs in it. We type in the string and run it by pressing Enter.
$ osascript -l JavaScript -i
 >> Chrome = Application("Google Chrome")
 => Application("Google Chrome")
 >> window = Chrome.windows[0]
 => Application("Google Chrome").windows.at(0)
 >> newTab = Chrome.Tab({url:"http://xakep.ru"})
 => app.Tab({"url":"http://xakep.ru", "make":[function anonymous]})
 >> window.tabs.push(newTab)
 => 28
 >> newTab = Chrome.Tab({url:"http://iantonov.me"})
 => app.Tab({"url":"http://iantonov.me", "make":[function anonymous]})
 >> window.tabs.push(newTab)
Substituting JS for bash
With the help of the same osascript utility we can write traditional console scripts in bash style. And what does a typical console script do? As a rule, it performs some kind of long process (such as backup). For any serious script, it will be necessary to work with the parameters provided by the user. It is quite possible to implement this kind of thing on JXA. An example of a very simple first draft:
function run(argv) {
 console.log(JSON.stringify(argv))
 }
To test it, let’s run this script from the console, giving it a few parameters:
> $ osascript cli.js -firstArgument -twoArgument
 >> ["-firstArgument","-twoArgument"]
The profit is obvious — we add the processing of the required amount of parameters and make the script as flexible as possible.
By the way, if you want to create a small JavaScript code in the console right away, you do not need to create a separate script for that:
> osascript -l JavaScript -e 'Application("Safari").windows[0].name()'
 >> JavaScript for OS X — Google Documents
JavaScript vs. Objective-C
The first part of the article, with its numerous examples, may give the impression that JavaScript is truly cool. This is partly true, as working with stock applications is simple, but in fact this is not all that JXA is about.
Remember I talked about the possibility of using native frameworks? So, this is a truly powerful feature! “Now, we do not have to bother with that unmanageable Objective-C and write whole applications in our favorite language,” this is what the true fans of JS thought… Stop here, as I am also a fan, but you shouldn’t expect too much from it :). The opportunity to create applications on JS using native libraries is a feature, not a full-fledged replacement of ObjC. The deeper you study this topic, the more restrictions you notice.
Also, do not forget that Apple has recently introduced Swift, a new programming language. In the coming years it will come on the heels of Objective-C and, if the experiment succeeds, put competitive pressure on it or even force it out of the market. In this context, the prospects of JavaScript do not look too impressive.
All of the above is only my personal opinion and not some official information. During my years as a developer I learnt a simple rule: even the coolest and most impressive superstructures are not able to fully compete with native development tools.
We know that there is that cool HTML5 and plenty of frameworks/technologies to pack a web-technology into a mobile application, but the opportunities they give will always be inferior compared to native tools. That is why (as any statistics may confirm) 99% of hit applications were created on the Objective-C, and not with some magic superstructures.
I believe that the feature of development under OS X in JavaScript should be regarded the same way. It’s a good way to simplify your work without having to study the exotic AppleScript, but it is not in any case a silver bullet that could eliminate the need to use other technologies.
Despite all my grumbling, Objective-C Bridge is there, which means we should use it. I cannot provide full application code here, as I’m no expert in the development under OS X, so I will only create a typical window with native control elements (see Listing 3).
#Listing 3. Along the bridge to Objective-C
ObjC.import("Cocoa");
ObjC.import("Cocoa");

var styleMask = $.NSTitledWindowMask | $.NSClosableWindowMask | $.NSMiniaturizableWindowMask;
var windowHeight = 85;
var windowWidth = 400;

var window = $.NSWindow.alloc.initWithContentRectStyleMaskBackingDefer( $.NSMakeRect(0, 0, windowWidth, windowHeight), styleMask, $.NSBackingStoreBuffered, false );

var newLabel = $.NSTextField.alloc.initWithFrame($.NSMakeRect(25, (windowHeight - 40), 200, 24));

newLabel.stringValue = "Label";
newLabel.drawsBackground = false;
newLabel.editable = false;
newLabel.bezeled = false;
newLabel.selectable = true;
var newEdit = $.NSTextField.alloc.initWithFrame($.NSMakeRect(25, (windowHeight - 60), 205, 24));
 newEdit.editable = false;
var button = $.NSButton.alloc.initWithFrame($.NSMakeRect(230, (windowHeight - 62), 150, 25));
button.title = "Pimpa";
button.bezelStyle = $.NSRoundedBezelStyle;
button.buttonType = $.NSMomentaryLightButton;
window.contentView.addSubview(newLabel);
window.contentView.addSubview(newEdit);
window.contentView.addSubview(button);
window.title = "Window Title";
window.center;
window.makeKeyAndOrderFront(window);
It is not so simple
JXA is certainly an interesting solution, but it should be used with caution. From the point of view of simply the possibility of automation (interaction with stock applications), everything’s just great. JavaScript-developers are now free to create nice little products in their favorite format. As for the notorious bridge to native libraries, you can still use it, it’s no problem if you don’t forget about the restrictions I have described above. If you are planning a serious project, do it with native tools.
Hello, is it possible to call AppleScript or Automator from within a JavaScript file (written to work on Firefox)
Hi, Listing 3 causes Script Editor to crash. The first time I ran the script, I got a black dialog which changed to the correct colors when I clicked it.
Mac Mini 16GB/1TB SSD Macos 10.13.6
Same here. Although I didn’t get anything (ie. not even the dialog). Just crashed. @hackmag, Any fix?
Same here. Although I didn’t get anything (ie. not even the dialog). Just crashed. @hackmag, Any fix?
MBP 2017, 15 inch, maxed out 3.1GHz i7, 16GB, 2TB, macOS 10.15.4
Thanks for sharing the tips. I am using this to make others understand.