Game selection
My game of choice is AssaultCube, a free multiplayer first-person shooter based on the CUBE engine. Also, it uses the OpenGL graphics library.
warning
The use of cheats violates the user agreement and may result in legal prosecution. The cheat discussed in this article was created for educational purposes only. Neither the author, nor the Editorial Board can be held liable for potential consequences arising from the use and distribution of such software.
Searching for values
First, let’s run the game and select the windowed mode in its settings (since you need to see other stuff on the screen as well).
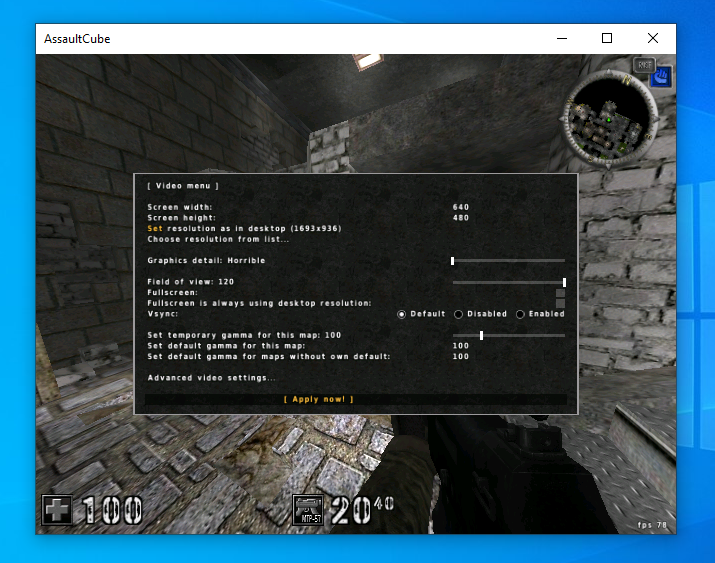
Also, you have to create a local server and configure it (namely, set the playing time so that the timer does not rush you). The path to the config is as follows:
C:Program Files (x86)AssaultCube 1.3.0.2configmaprot.cfg

Set the maximum time: 100 minutes.

Then start the server…

…and connect to it.
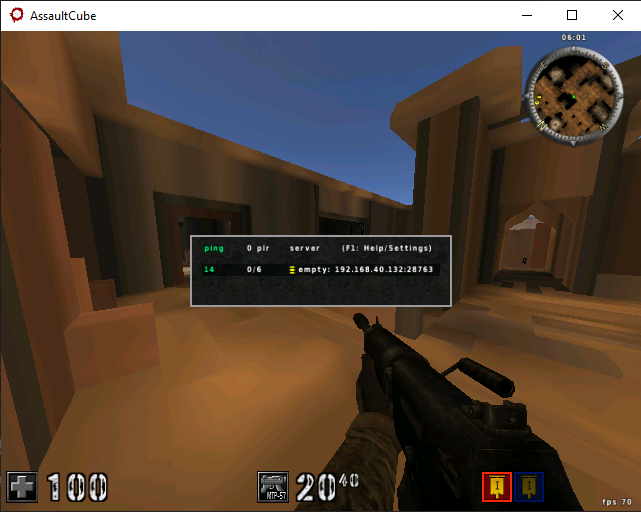
Run Cheat Engine and attach it to the game process.

Searching for the health variable
For testing purposes, you’ll need a second player. You can join the game from another device or, as I did, from a virtual PC. To find the health variable, set scanning parameters in Cheat Engine and use the second player to deal some damage to the first player. After that, you can start searching for HP in Cheat Engine.
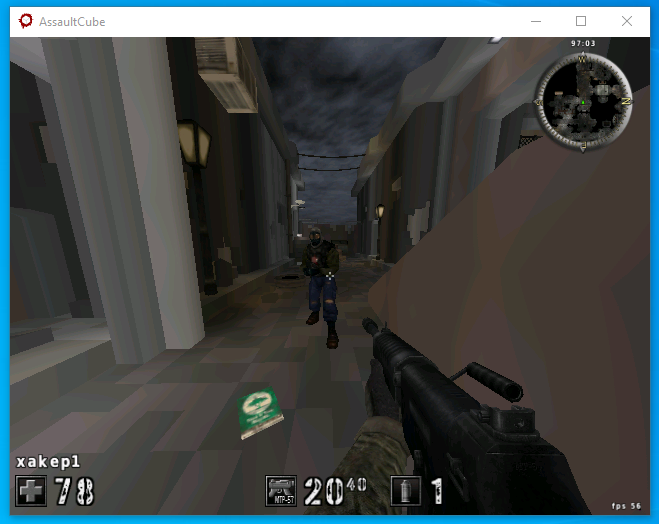
Continue dealing damage until you find the address where your player’s HP are stored.
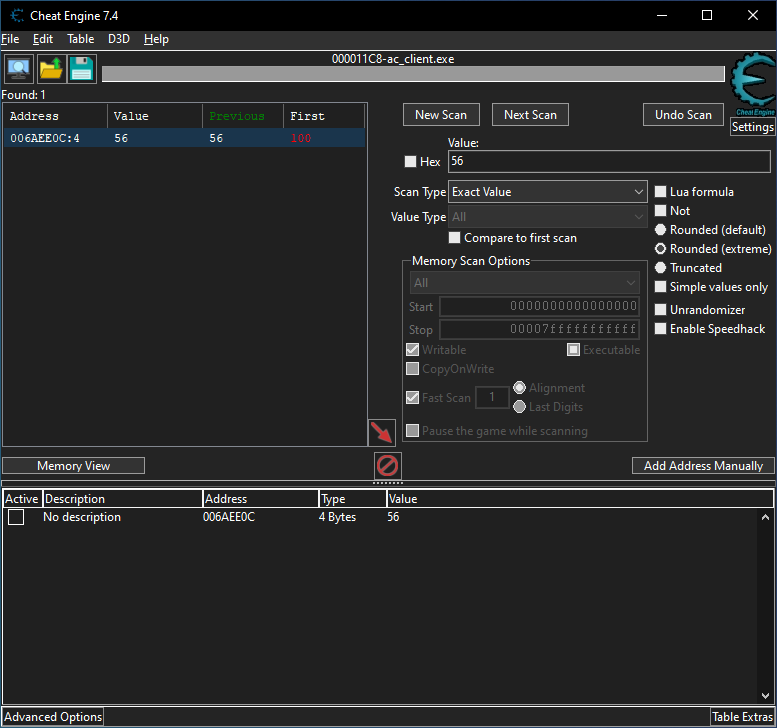
Your goal is to implement extrasensory perception and aimbot. To do this, you have to find out the player class and static address. To find out the class, right-click on your address and select “Find out what writes to this address” (or press F6).
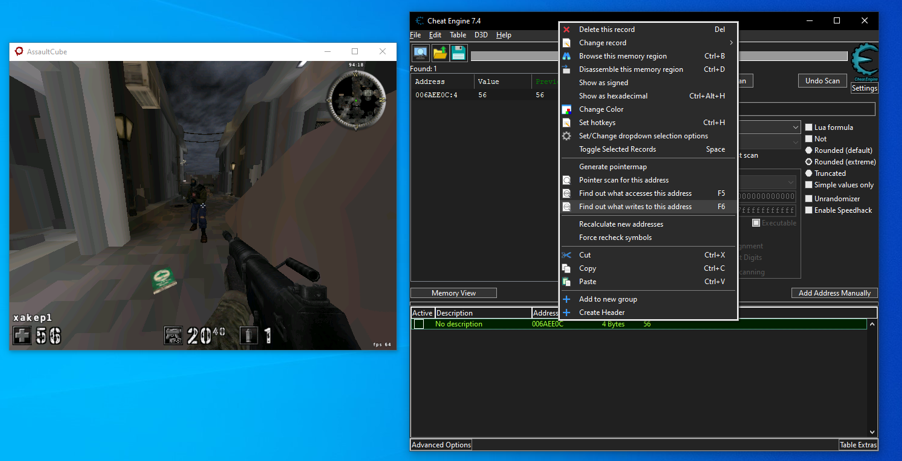
A new window pops-up: it will show opcodes that write data to the above address. To make them appear, use the second player to inflict damage to the first player again.
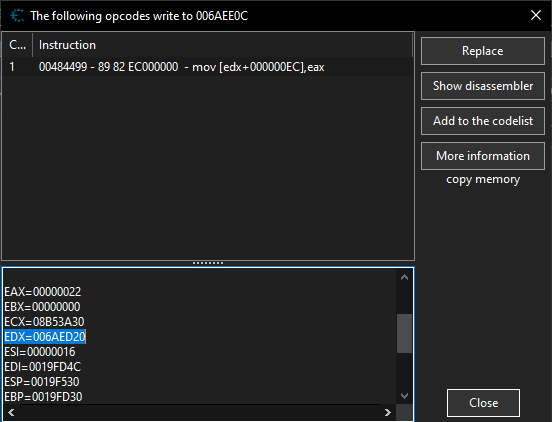
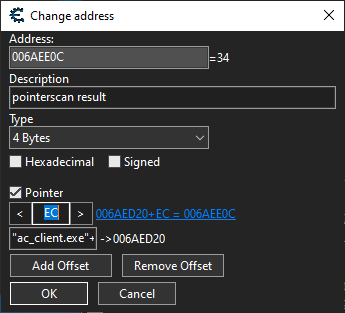
Only one instruction writes data to the health variable; it’s located at offset 0xEC. Accordingly, the value stored in the edx register is the address of the player class (although it’s a heap address, not a static one). So, let’s add it manually.
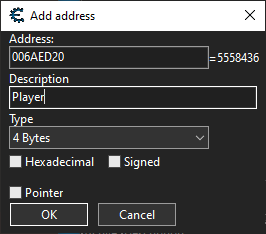
Static address of the player object
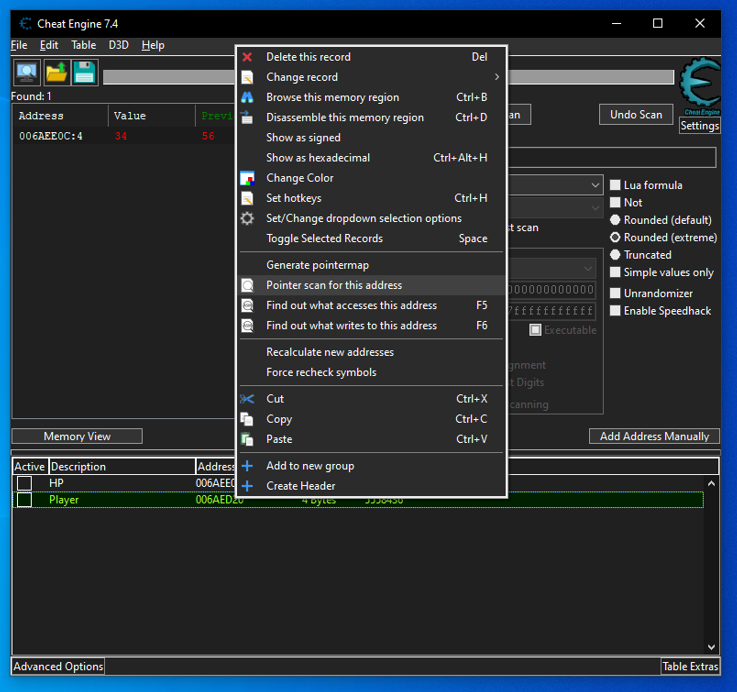
Cheat Engine can be used to find out the static address. Right-click on the previously added address 0x6AED20 and select “Pointer scan for this address.”
There are plenty of pointer scan parameters, but you are interested in Max level. Its value determines how many times your pointer (i.e. static address) will be dereferenced. And it will help you to find the desired address.

The executable file of the game is small and contains not much code. This indicates that the game features not many classes and structures, and the number of offsets won’t be large. Therefore, let’s limit the search depth to one.
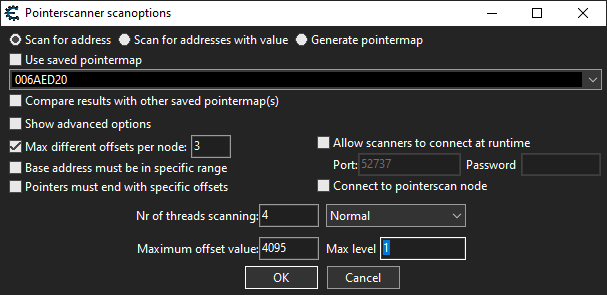
The scan results are shown below. You are interested in addresses displayed in the format "ac_client.; while addresses in the format "THREADSTACKX"-YYYYYYYY indicate that the desired address was found on the stack.
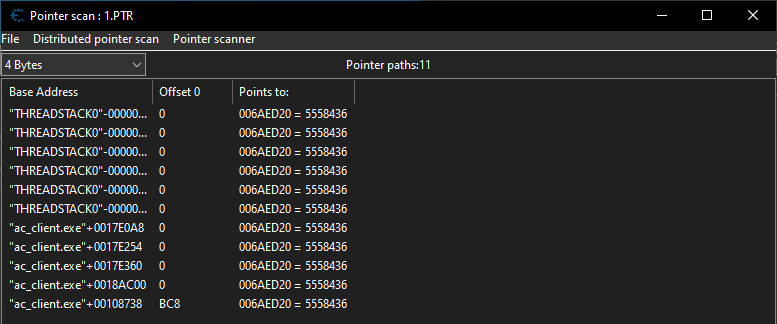
Let’s add the five found addresses to the list.
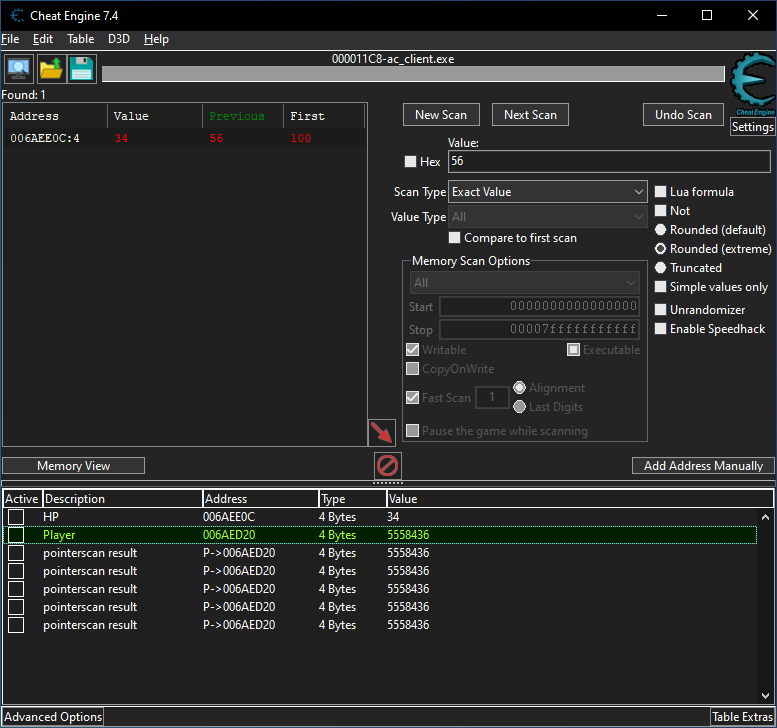
And set an offset to the health variable for each address.
Now restart the game, and Cheat Engine will suggest to save your addresses. Follow this advice so that you can load them when you attach again.

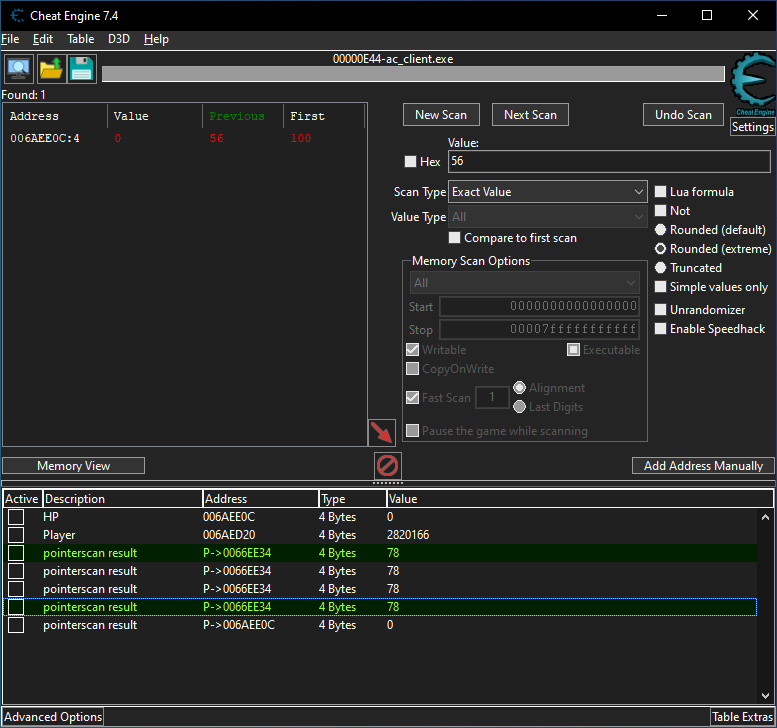
After reattaching to the game, you see that only two addresses on the list point to the health variable: "ac_client. and "ac_client..
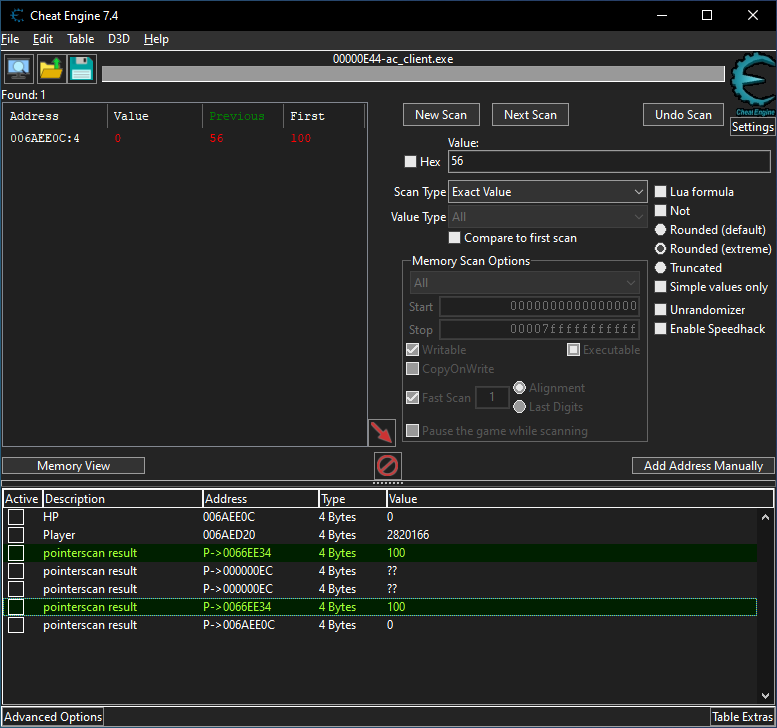
Let’s take some damage again and see what happens to other addresses. As can be seen, the health variable appears in two more addresses. This means only the two above-mentioned addresses should be left on the list.
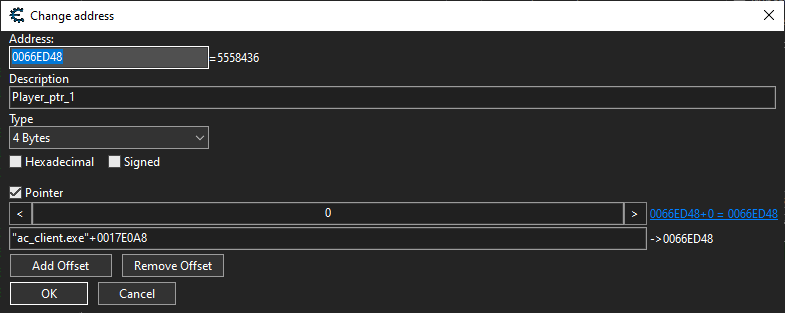
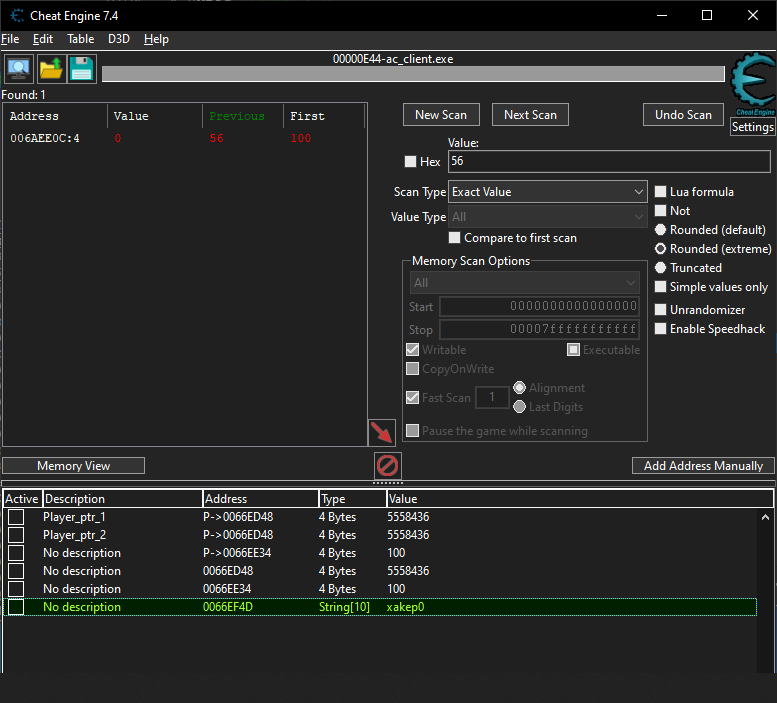
Add the static address "ac_client. under the name Player_ptr_1…
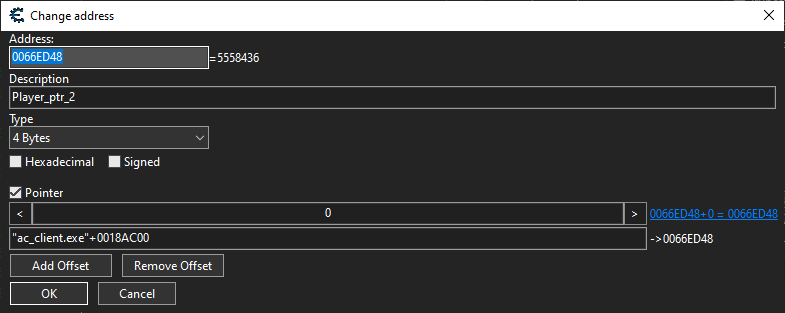
…and the static address "ac_client., under the name Player_ptr_2.
Player class
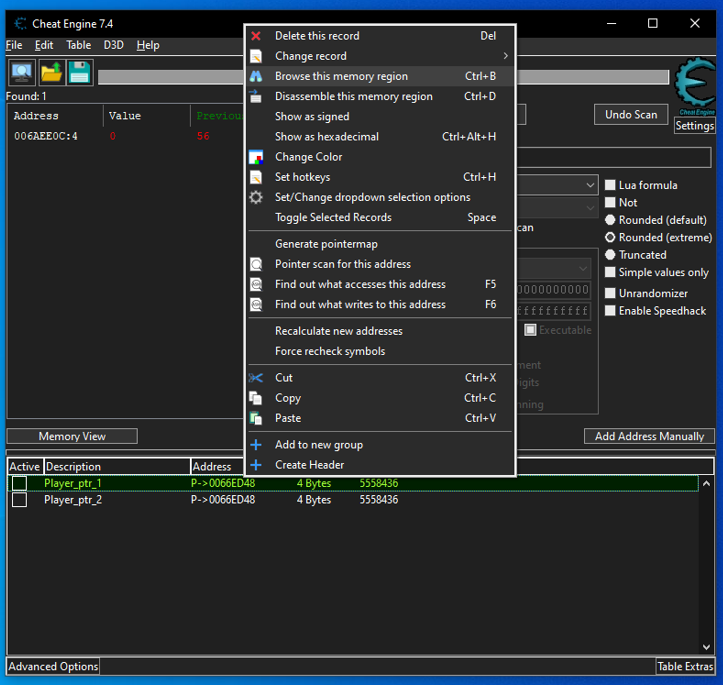
Let’s assume that the static address Player_ptr_1 is what you are looking for (in fact, this is not true; the correct static address is Player_ptr_2, but you’ll find this out later). To view the player class in memory, right-click on the address and select “Browse this memory region” (or press Ctrl-B).
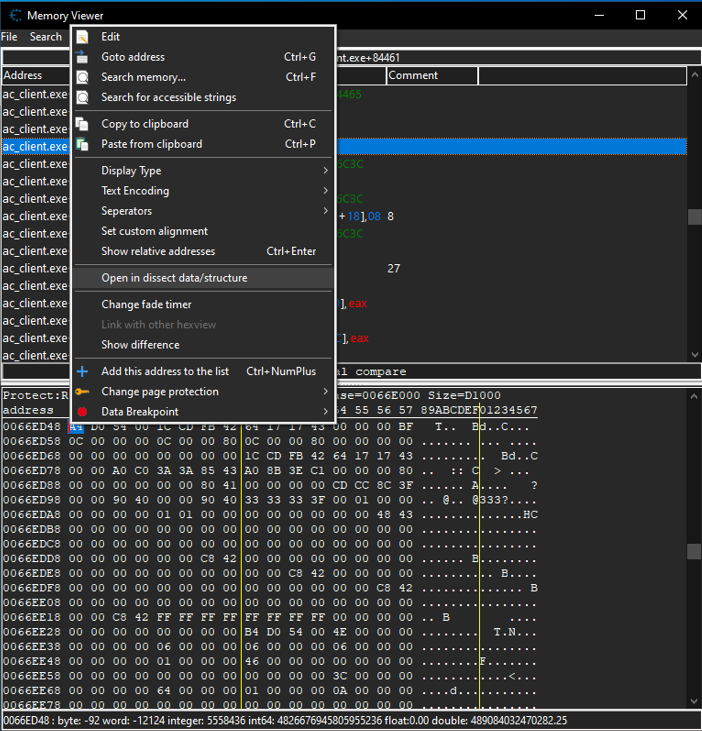
Good news is that Cheat Engine includes a tool making it possible to visualize memory structures instead of examining bytes in the dump. Right-click on the selected byte and select “Open in dissect data/structure.”
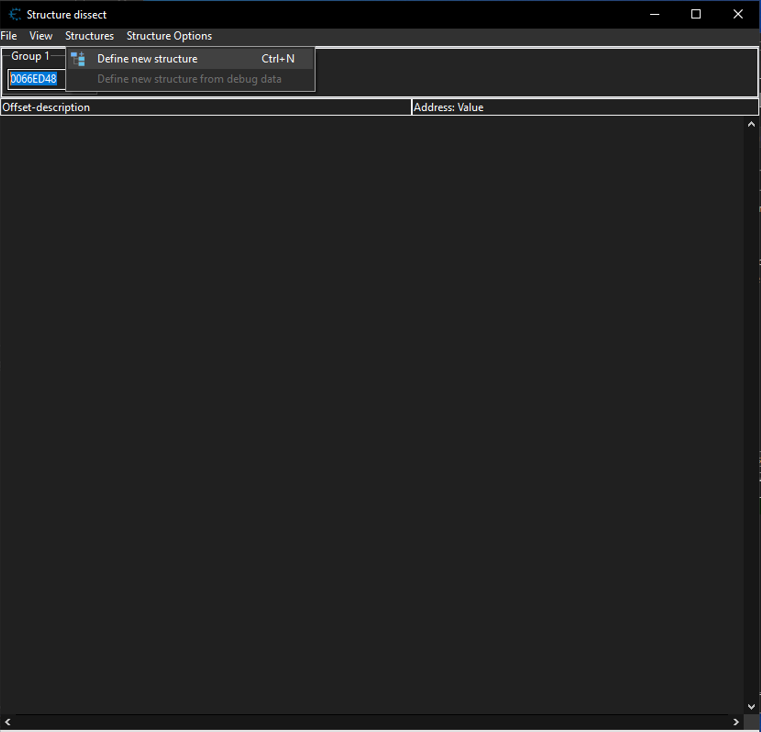
A new window with the address of the selected byte will open. Press “Structures” and then “Define new structure” (or Ctrl-N).
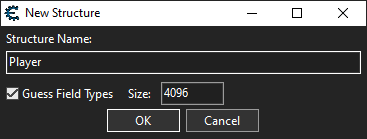
Let’s call this structure Player and leave the default remaining settings (i.e. Guessed Field Type and Structure Size (4096)).
Since you left the “Guess Field Types” box checked, Cheat Engine has successfully performed this task.
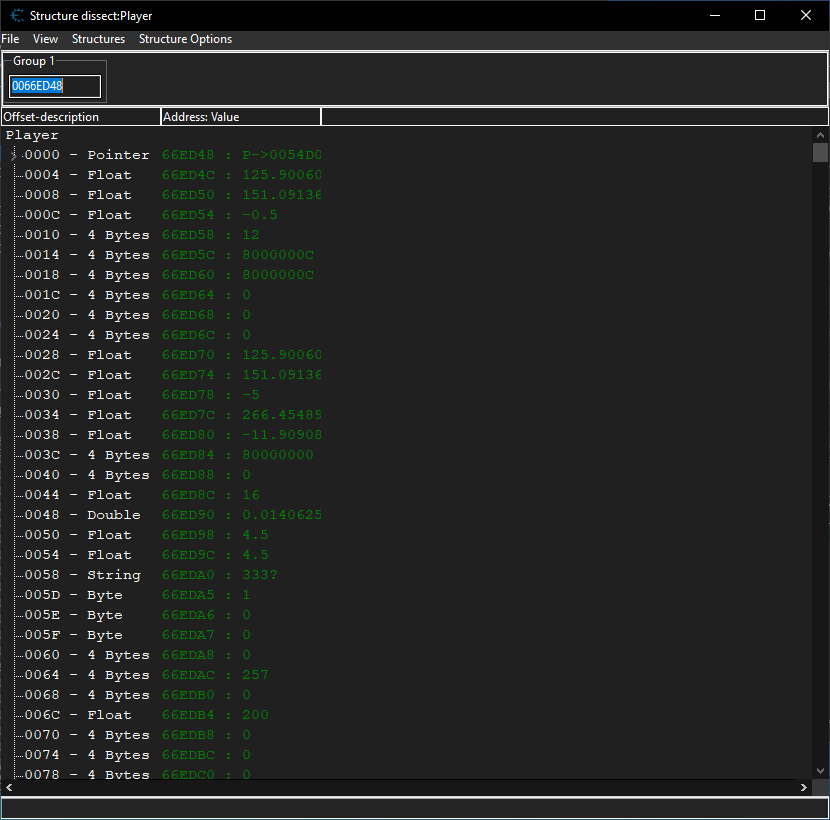
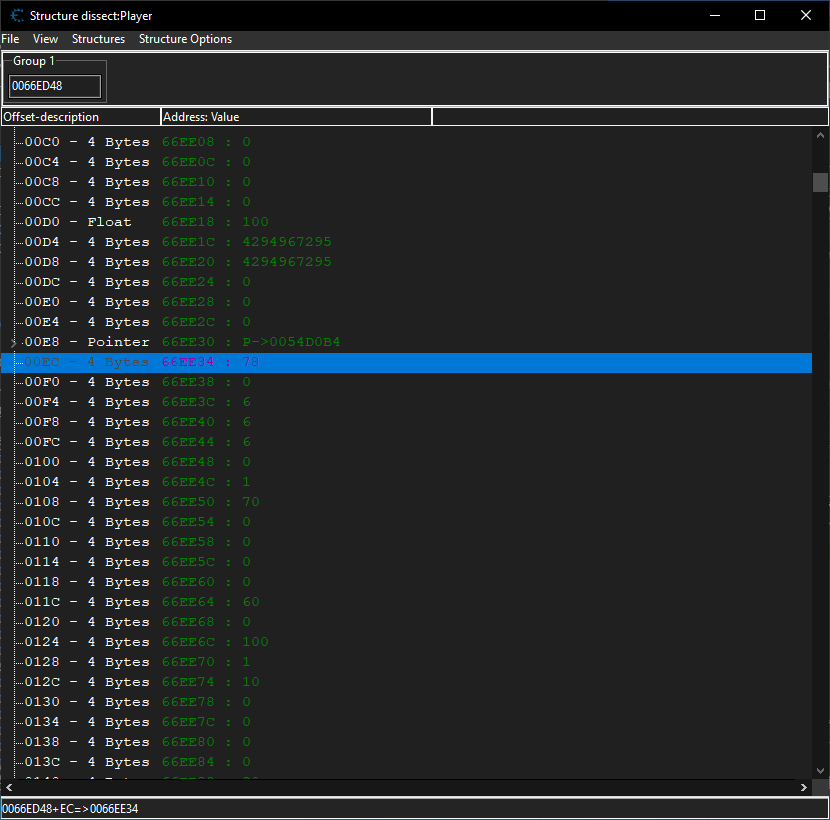
Now go to offset 0xEC to make sure that your player’s health is located there.
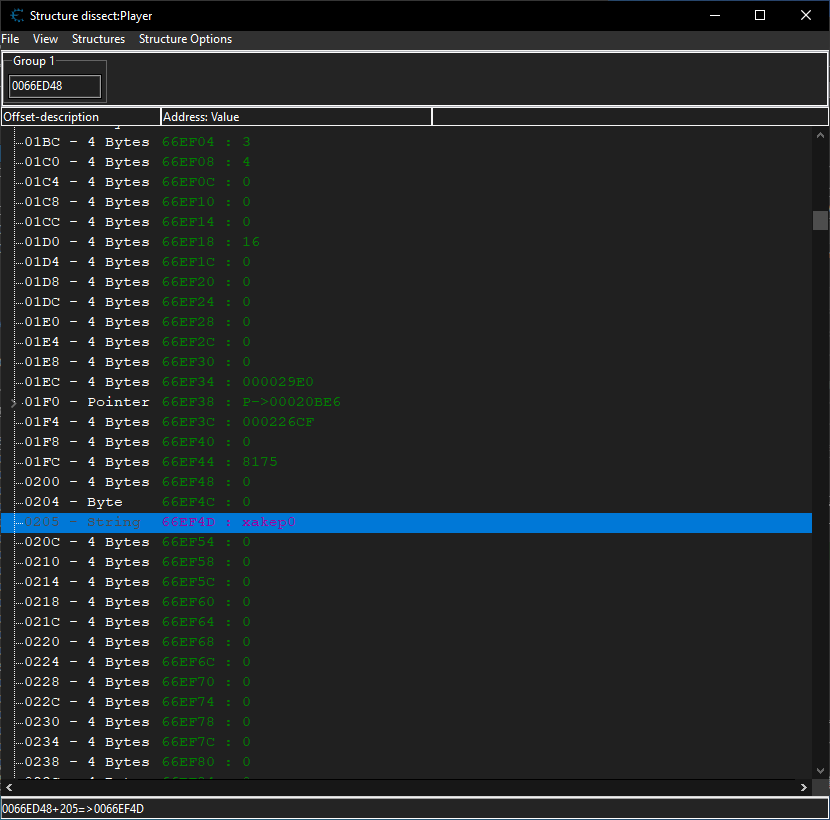
Also, you can find the player’s name at offset 0x205.
You’ll need this class in the future; however, Cheat Engine doesn’t allow to export such structures, while doing it manually would be a nightmare. Fortunately, there is a ready-made tool called ReClass.NET. It enables you to directly export this structure in the form of C++ code. So, you download it, install, and attach to the game process.
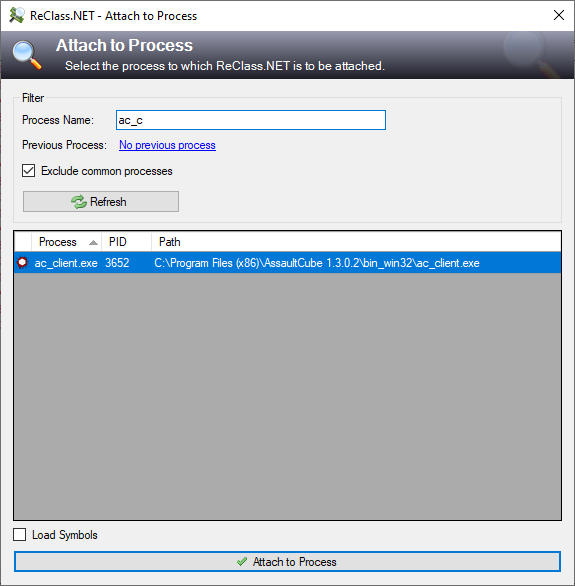
After attaching to the process, a class is created at base address 400000; it’s name is N0000004E. Double-click on the address and specify the one you need: 0066ED48. In a similar way, you change the class name to Player and add 4096 more bytes to be displayed.
In this context, Cheat Engine treats the displayed number of bytes as the class you are exporting. If the size of your class is larger than the standard number of displayed bytes, then you have to increase this number manually.
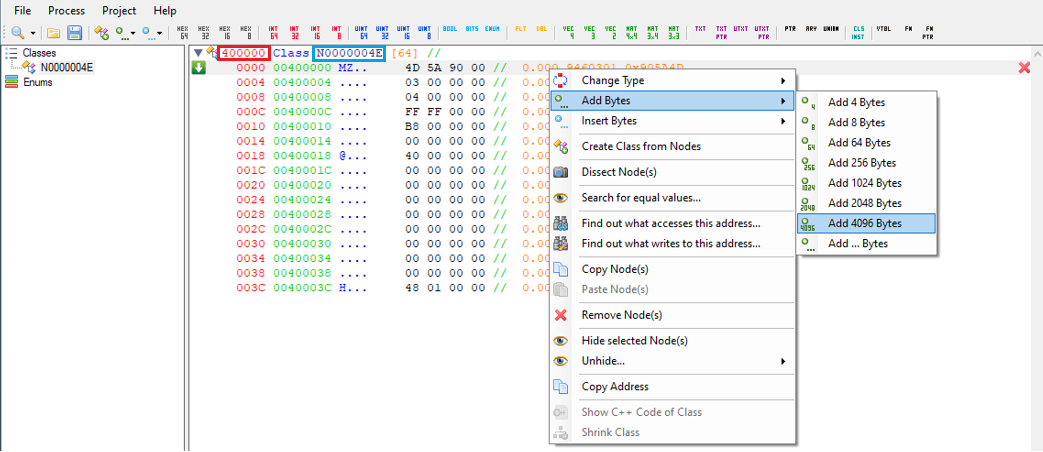
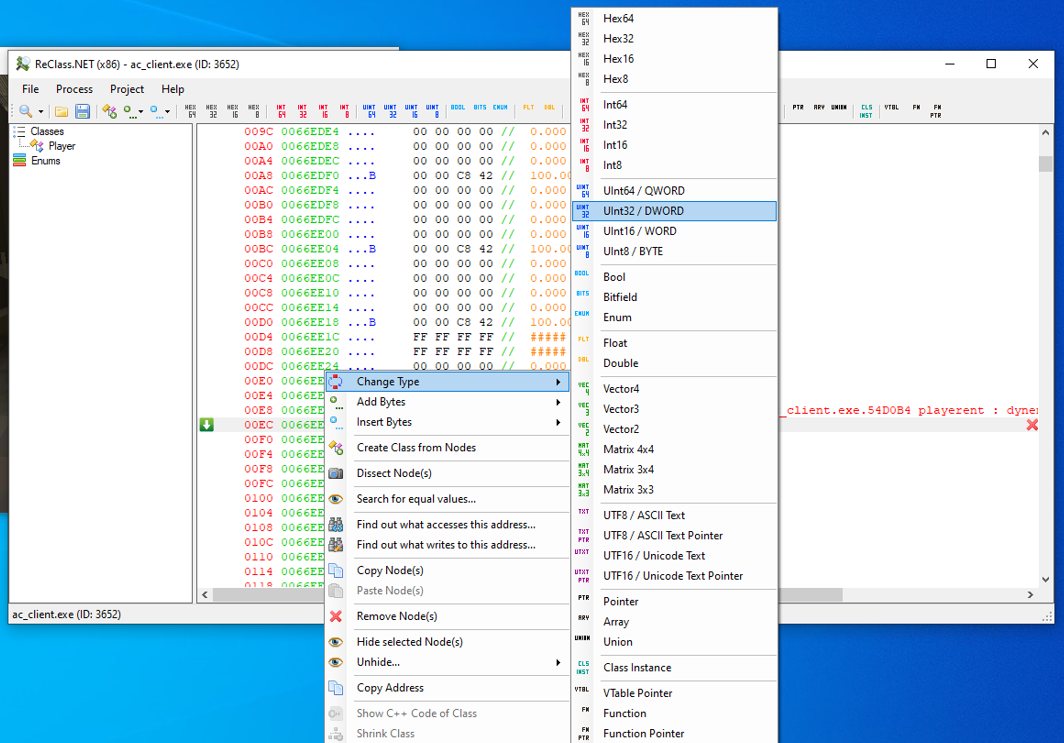
Now go to offset 0xEC (i.e. to the health variable). Change the field type value to DWORD (you have to set values of types for offsets to be able to export the class with required fields).
Searching for coordinates
Now you have to find values required to implement ESP and aimbot. For ESP, you need coordinates of the player and player’s head in three-dimensional space.
To implement aimbot, you need pitch, yaw, and roll values. You have no idea about such things, right? No problem, I will explain them using the Godot game engine as an example.
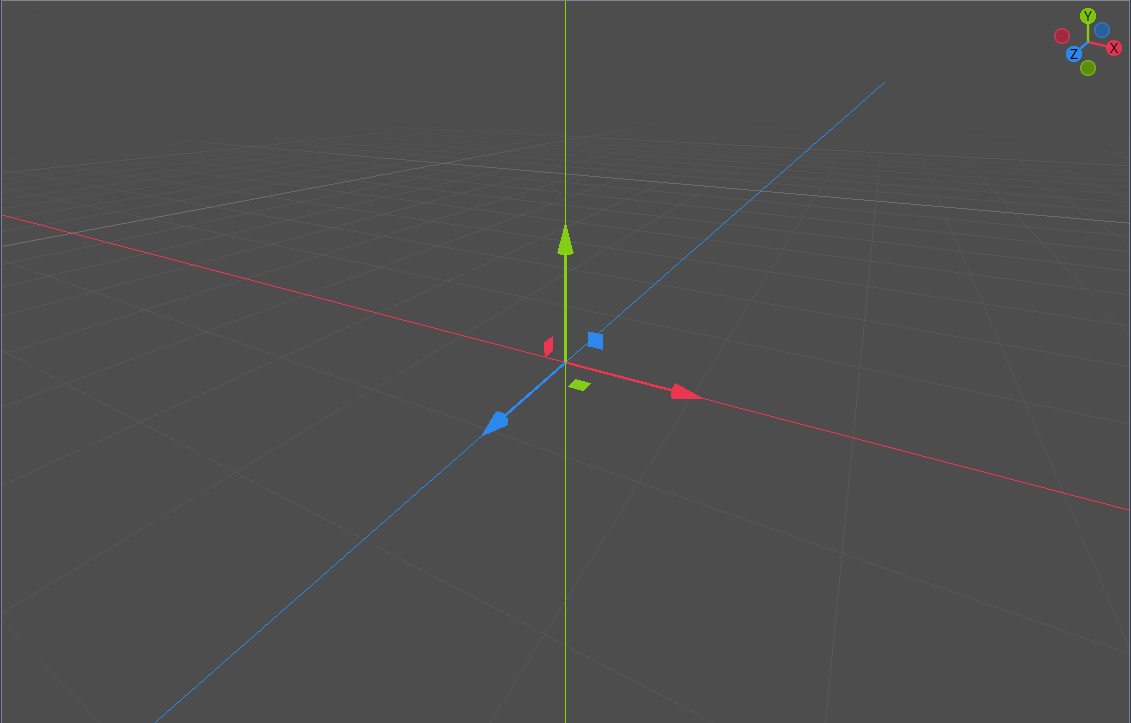
Depending on the engine, coordinates can be presented in different formats. For instance, directions of some axes and the axis taken as height often differ.

For demonstration purposes, let’s take a ready-made character on GitHub and see how it moves when you change its coordinates.
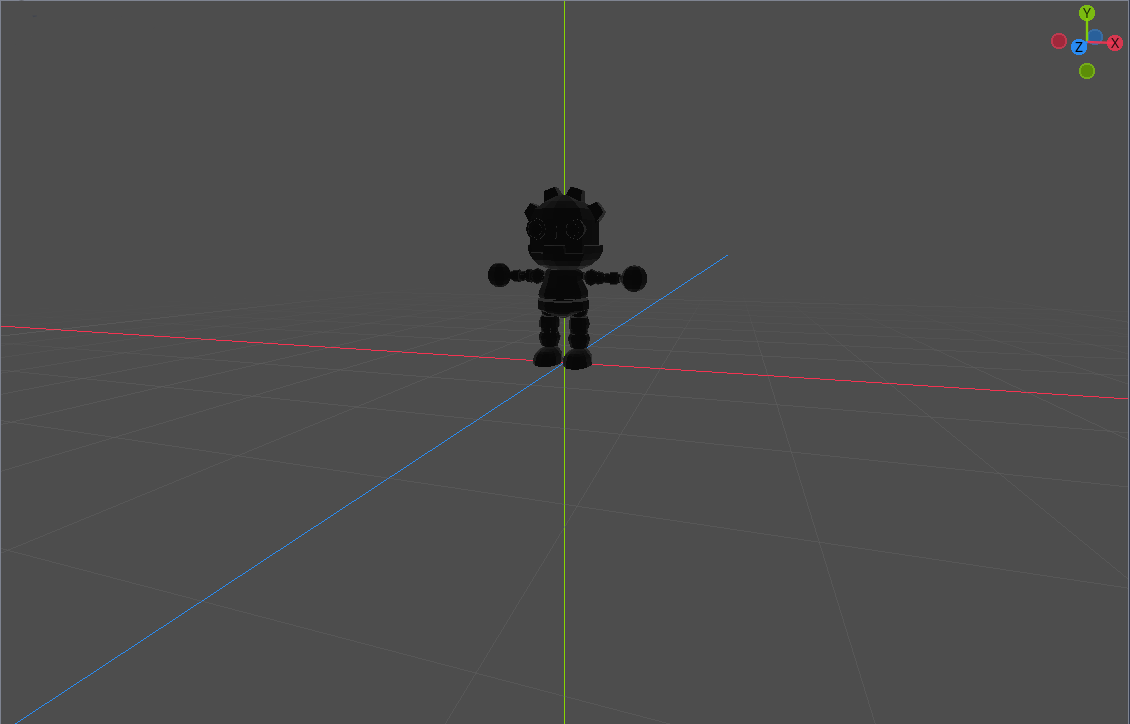
Pitch represents character movements along the X axis. The lower arrow shows the actual character movement at the present moment; while the upper one represents the alternative movement option.
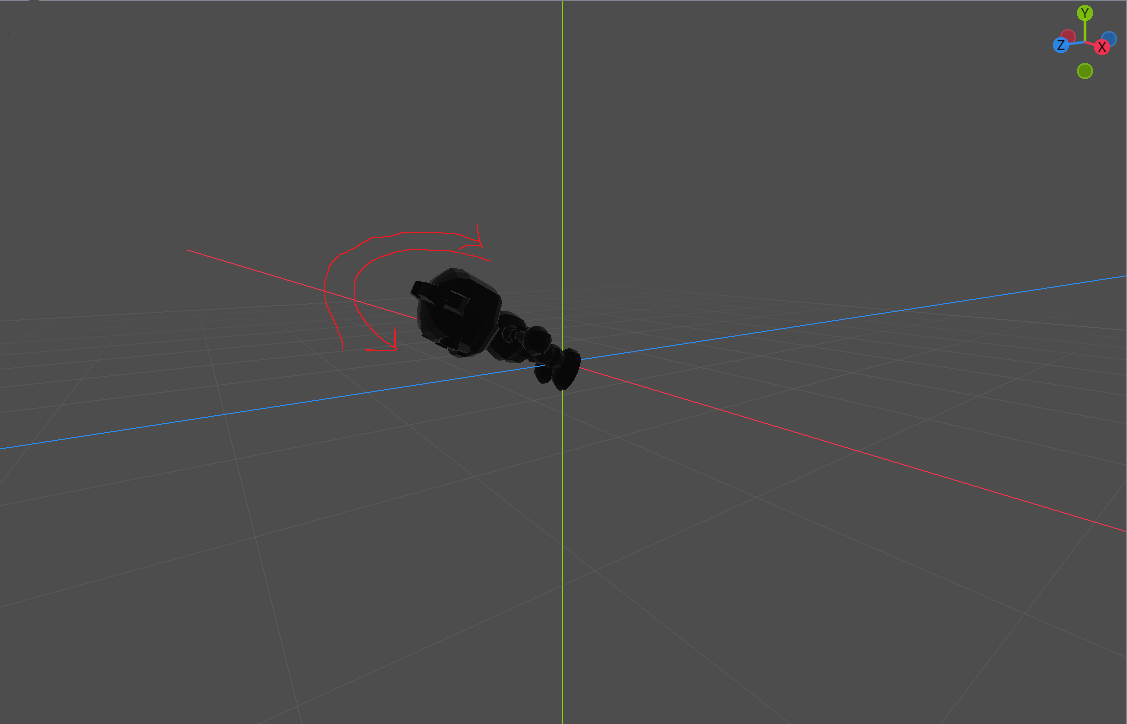
Yaw represents character’s movements along the Y axis.
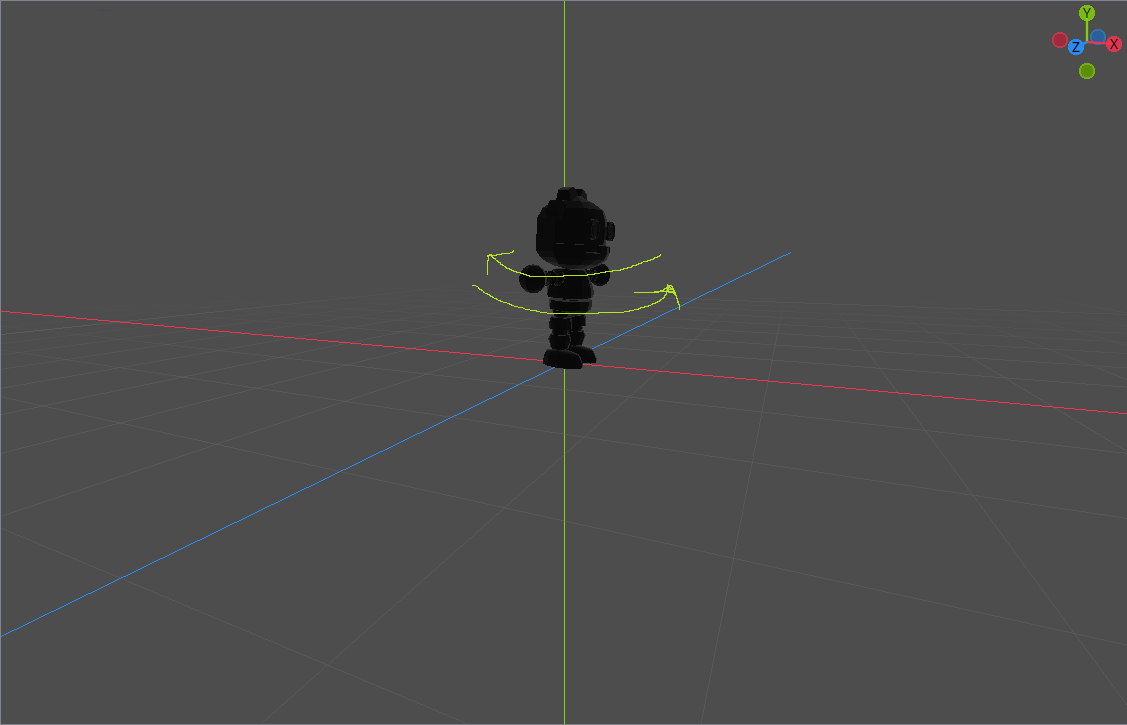
Roll represents character’s movements along the Z axis.
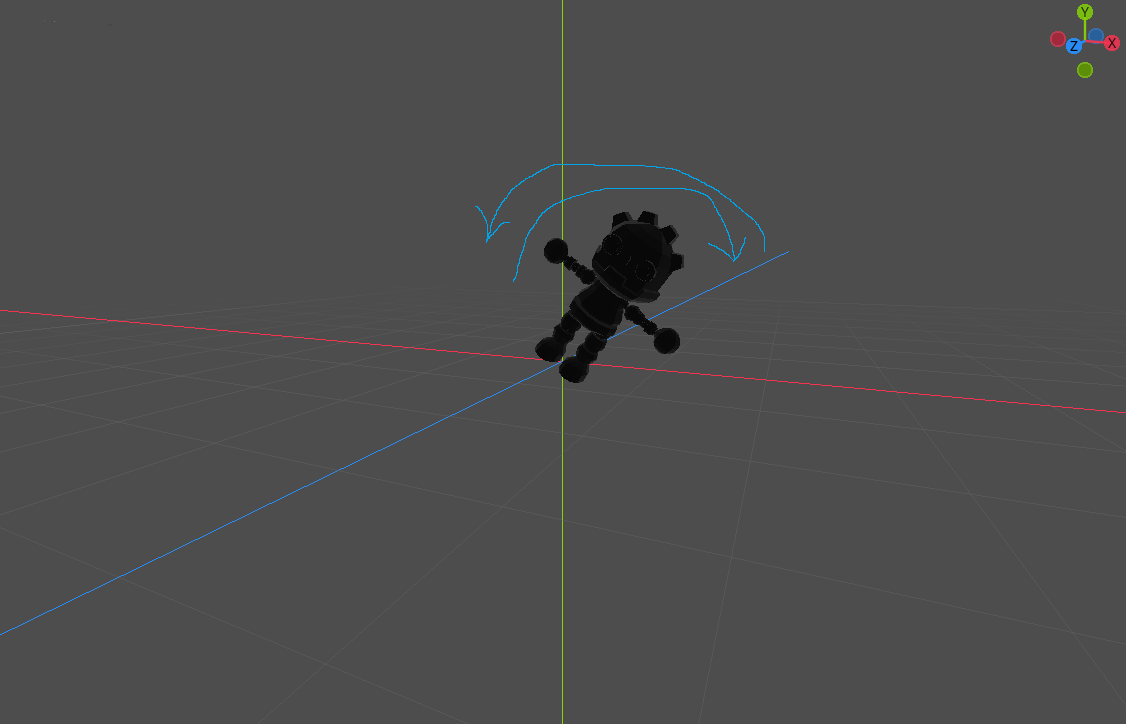
Searching for player coordinates
Now that you are armed with new knowledge, let’s go back to the game and the Cheat Engine window. Start moving around the map and concurrently move the mouse to and from, as well as up and down. In the Cheat Engine window, you can see three sequences of floating point values that change during your actions. This means that these sequences represent player coordinates, coordinates of the player’s head, and its rotation relative to the axes.
You can notice that two sets of values, out of the three, repeat each other in terms of X and Y; while their Z coordinates are different. This indicates that the first set represents player coordinates; while the second one, player’s head coordinates. Since OpenGL uses the Z coordinate as height, let’s try to change height for each set. After an attempt to change Z from -0.5 to another value in the first set, it returns to its initial value. This means that these are the head coordinates; the second set represents player coordinates; while the third set represents movements relative to the axes. But you still have to make certain of this.
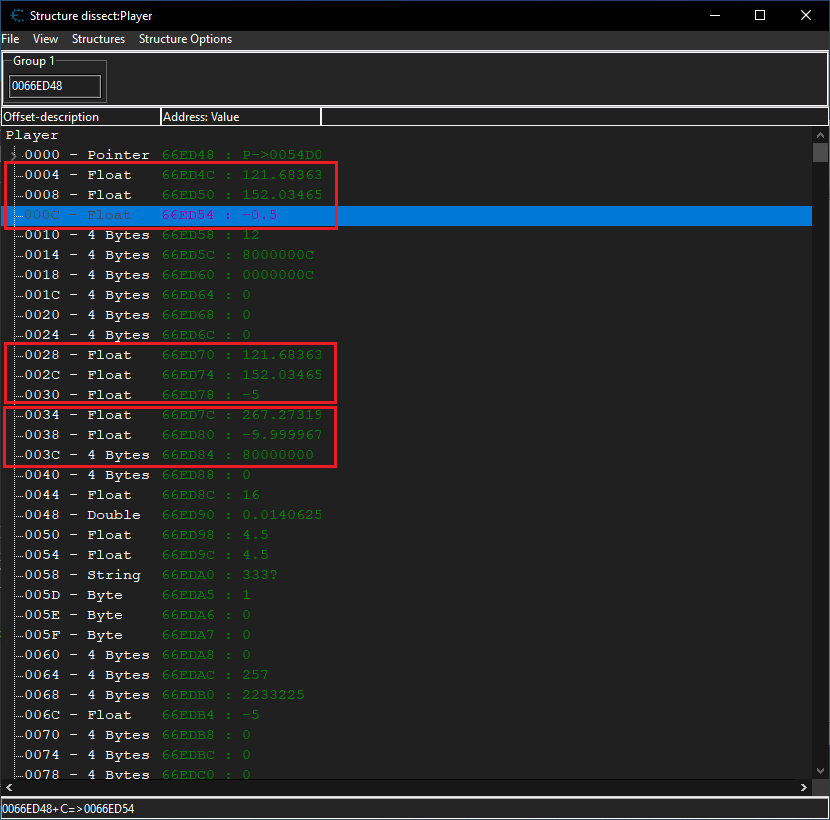
Now let’s perform the same operations for the second set.
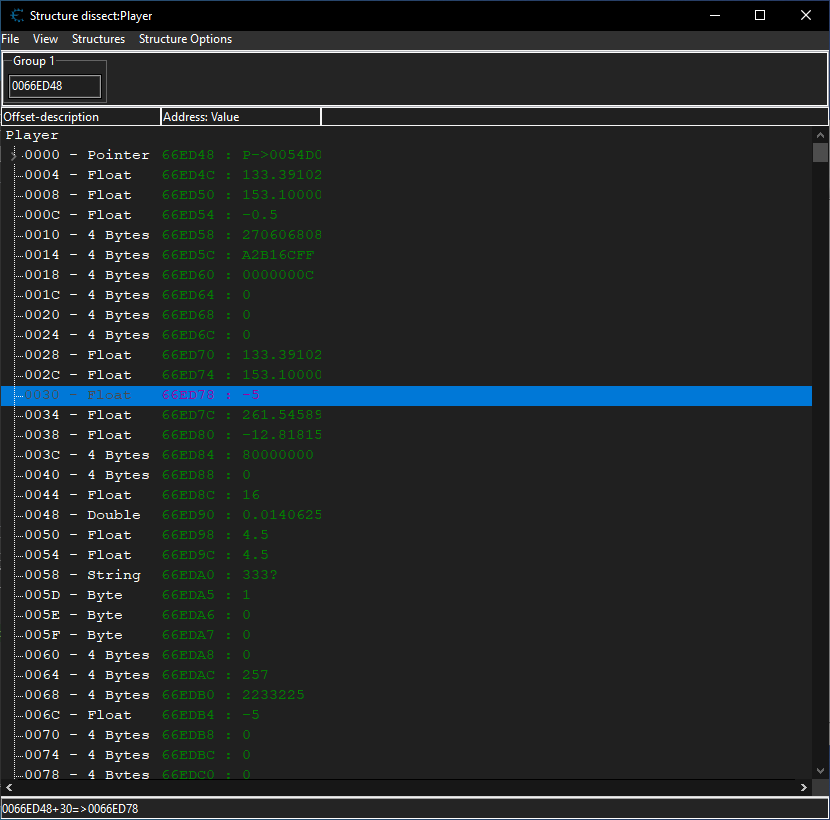
For demonstration purposes, let’s stand on a box and look at the value at offset 0x30 in Cheat Engine.
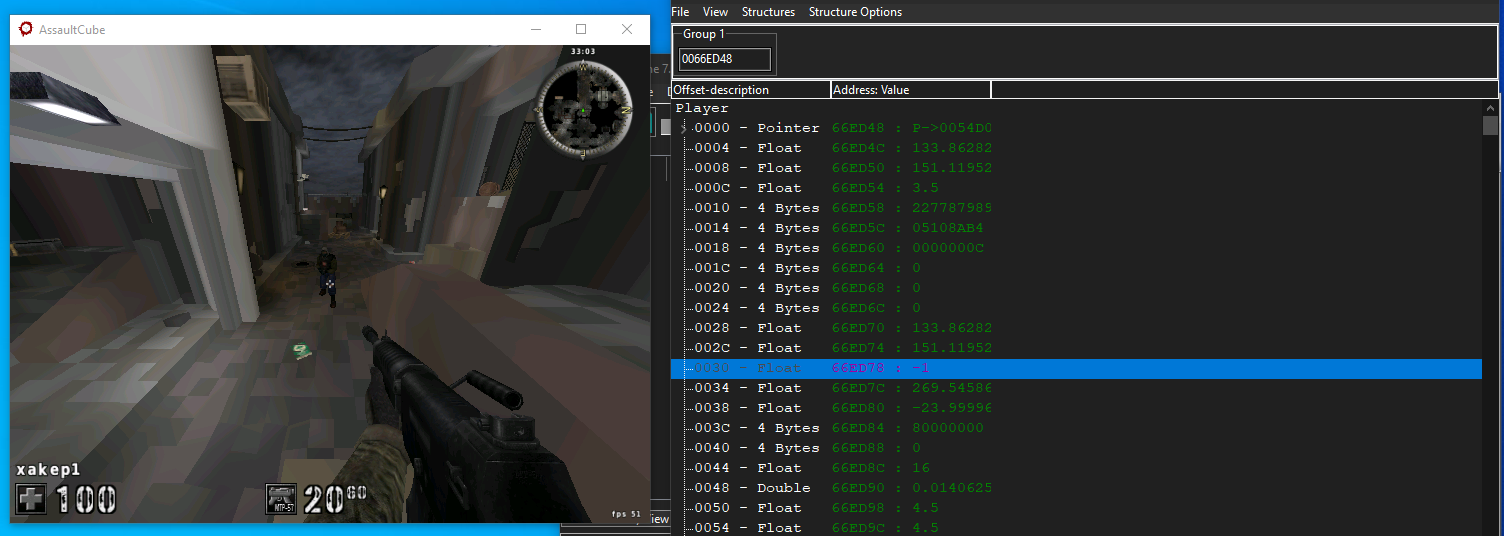
If you try to change this value, you’ll see that the character falls through the box.
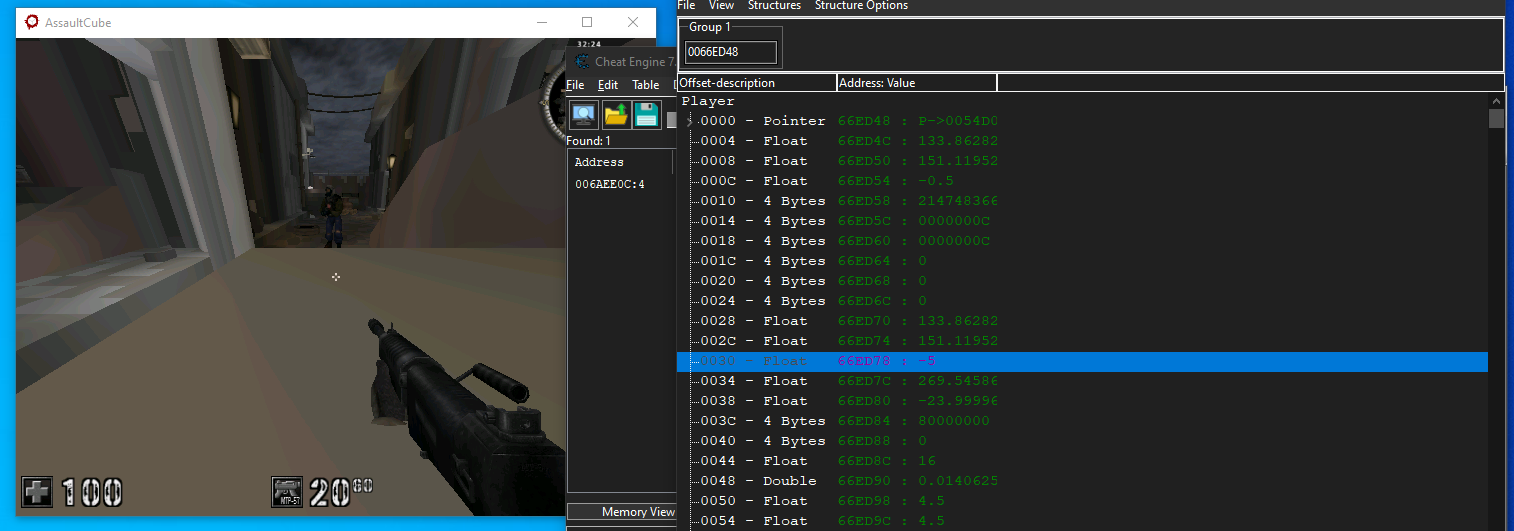
This means that your assumption is correct.

Let’s go back to the ReClass.NET window and select types for these offsets.

Searching for pitch, yaw, and roll values
Let’s perform the same check again. Move the mouse to and from and then up and down. Now try to change values, and it turns out that your assumptions were correct.

Go back to the ReClass.NET window and select types for these offsets.

Now your class looks as shown below. But what is VTable? Actually, this field isn’t required, and I added it as an eye candy. For more information, see the article Understanding Virtual Tables in C++.
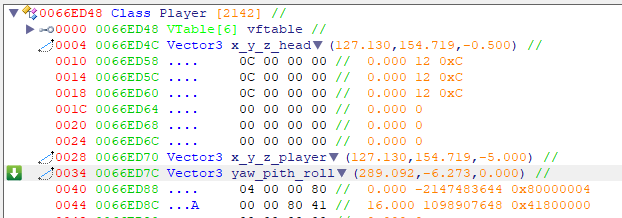
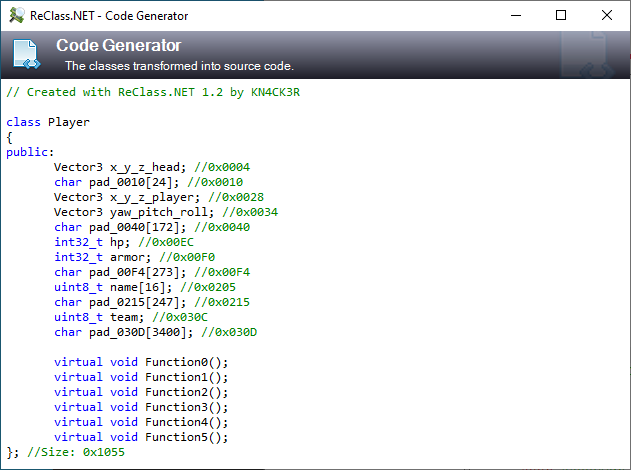
Now let’s export this class (right-click on it and select the respective menu item). As you can see, there are some fields that you didn’t look for: armor, team, etc. If you want, you can find them yourself.
Entity list
Done with your player, but what about other players? Normally, there should be a long list of all game entities, including player characters. It can also be assumed that the game code includes a loop that iterates through the players, and the game logic somehow interacts with their data. Let’s use the health variable as the basis and check what opcodes request it.
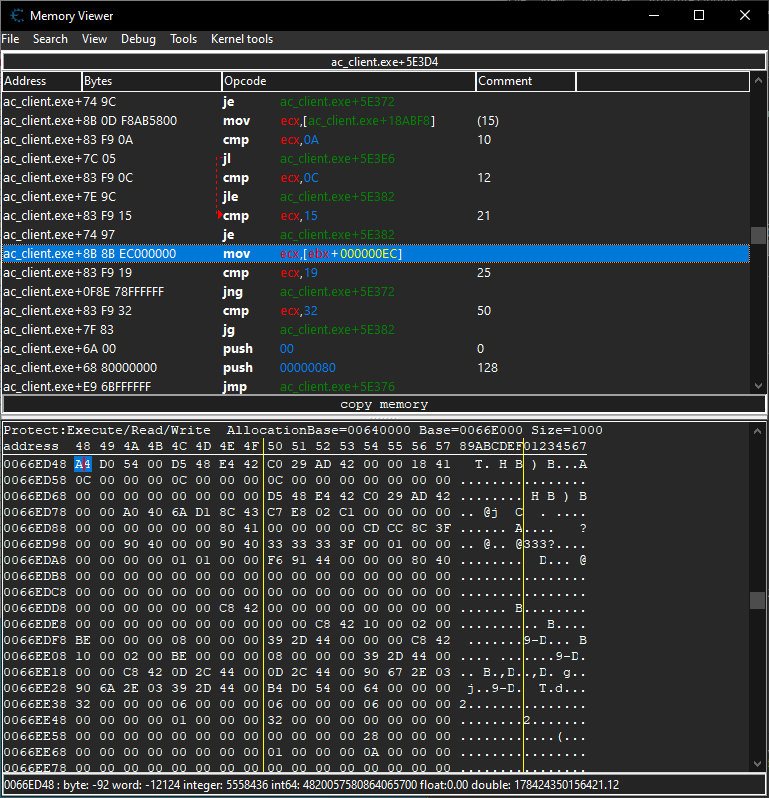
At first glance, it’s difficult to find something, but a trained eye can notice that access to your player’s health goes via some static address. Furthermore, it turns out that the address you have selected is wrong! The correct one is: "ac_client..
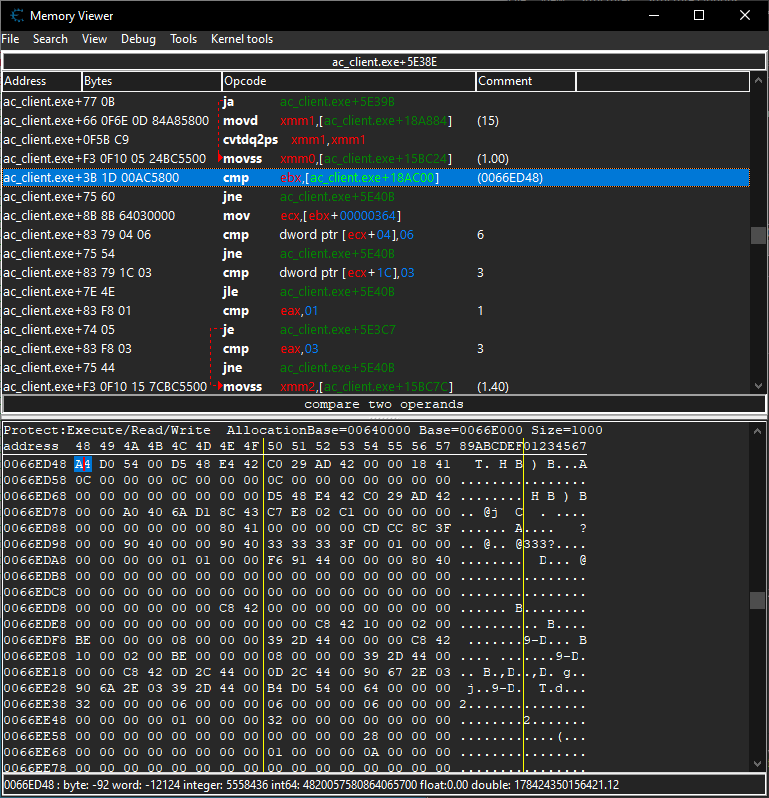
Now let’s search based on player’s name located at offset 0x205…

…and you get the list of instructions that access player’s name.

Iterate through the possible variants, and you’ll find one where access occurs in a loop.
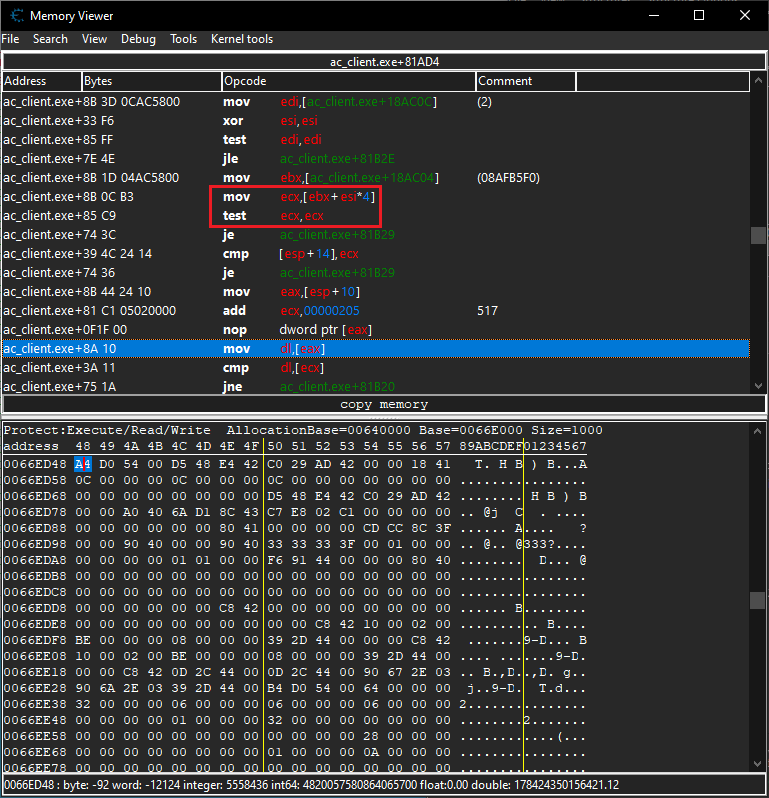
If you are familiar with the assembly language, you understand that the ebx register contains the address of the first element; esi is the index; while the multiplier after the index indicates the data type: in this particular case, it’s 4 (DWORD).
Accordingly, the static address of the entity list is:
"ac_client.exe"+0018AC04
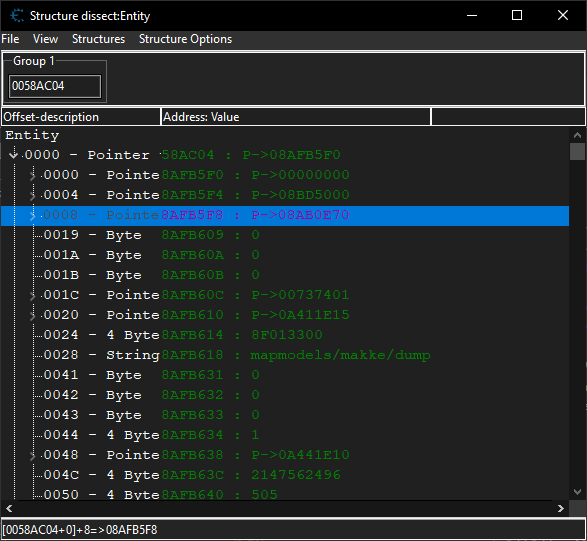
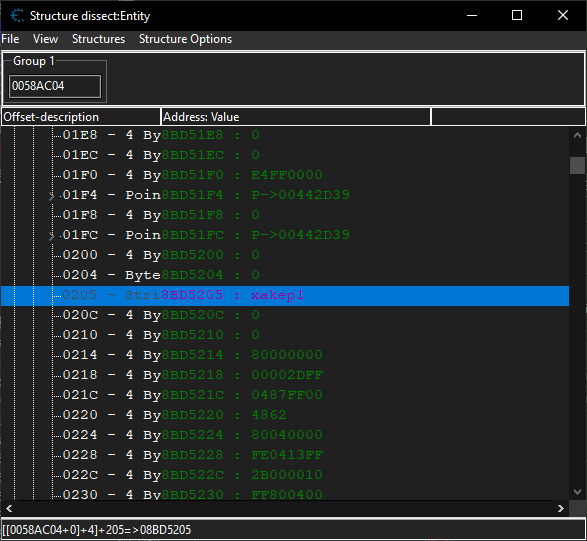
To verify this, you can check the other player’s name at offset 0x205.
You also need the total number of players. Browse through the disassembler output, and you’ll see a check at the end of the loop. The edi register stores the current number of players.
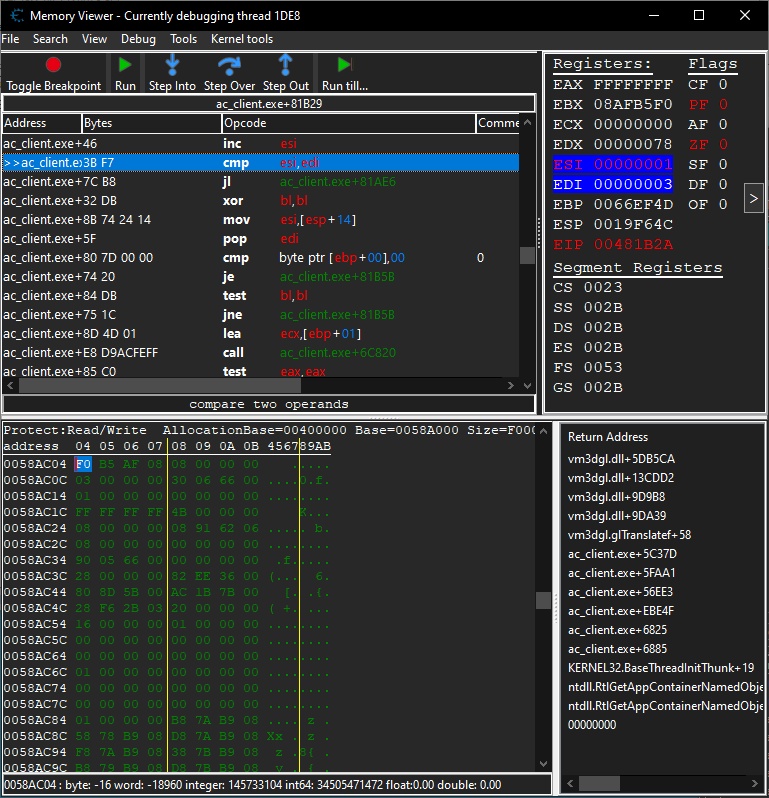
After some debugging, you can see that the static address for the number of players is located above the loop: "ac_client..

Let’s restart the game and check whether these addresses are correct.
Searching for view matrix
The view matrix is required for ESP to work correctly (for more information, see the OpenGL tutorial.
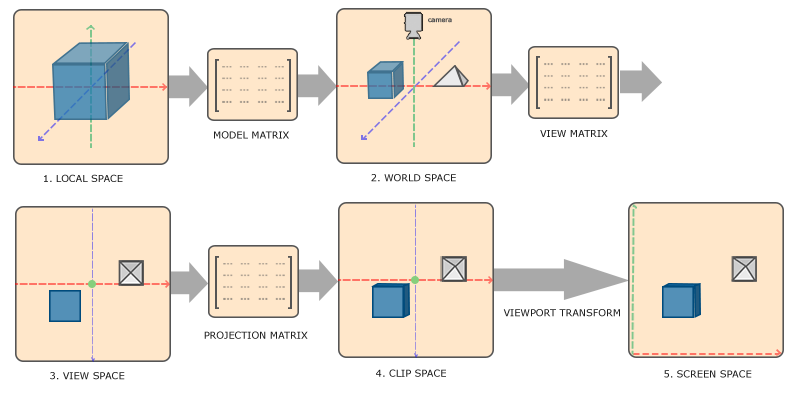
- Local coordinates are coordinates of an object measured relative to the point where the object is located;
- At the next step, local coordinates are converted to world space coordinates. They are plotted from some point that is universal for all other objects located in world space;
- Next, world coordinates are transformed into view space coordinates so that each vertex looks as if viewed from the camera or from the observer’s perspective;
- Once the coordinates are converted to view space, they are projected into clip coordinates. Clip coordinates range from -1.0 to 1.0 and determine which vertices appear on the screen; and
- Finally, a process called viewport transformation is used to transform clip coordinates ranging from -1.0 to 1.0 into the area of screen coordinates defined by the
glViewportfunction.
To search for the view matrix, use clip coordinates that vary in the range from -1.0 to 1.0 as the basis. Look straight up in the game and set search parameters in CE as shown below.
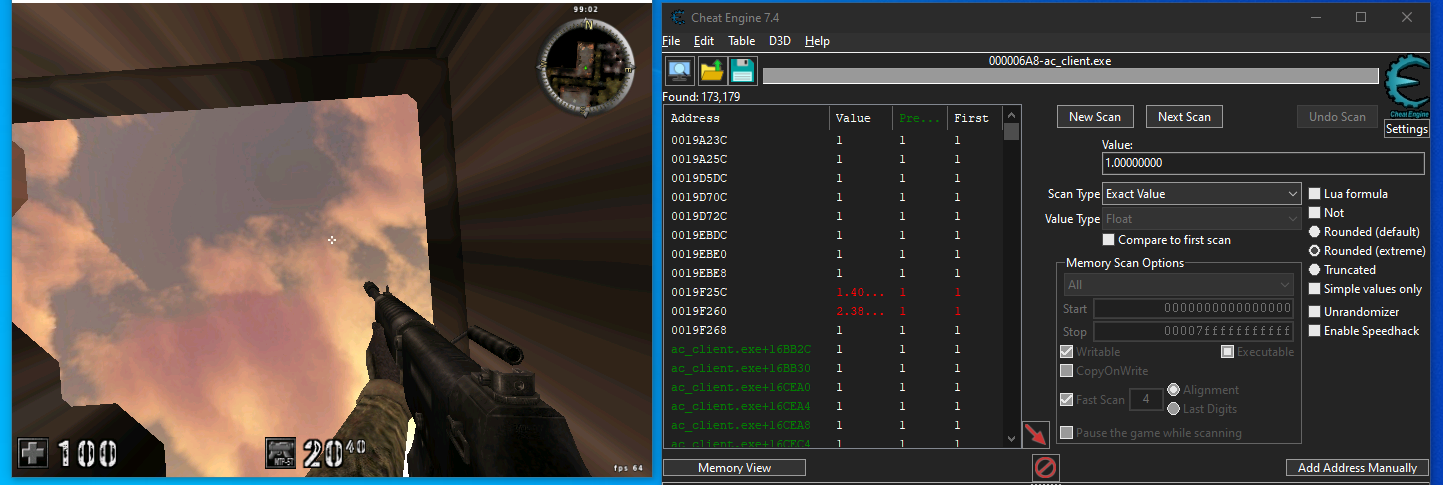
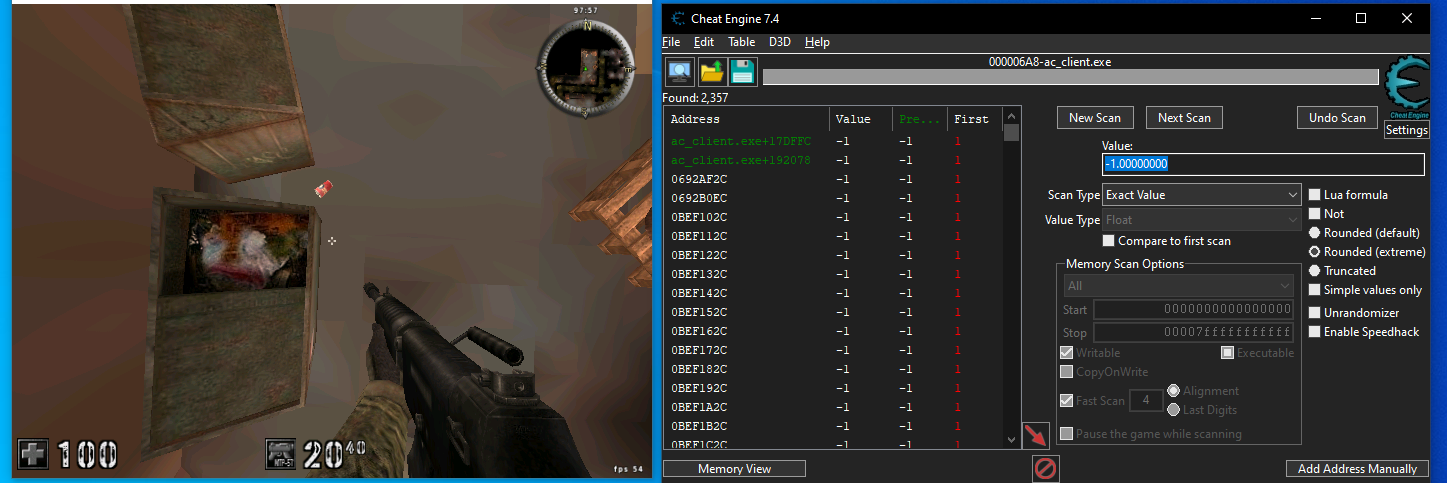
Now look straight down and set new search parameters. Alternate these steps until you get a sufficient number of results. In this particular case, it doesn’t take that many iterations to find two static addresses. Let’s verify them.
Open the first address in the dump (for convenience, change the type of displayed data from bytes to float.
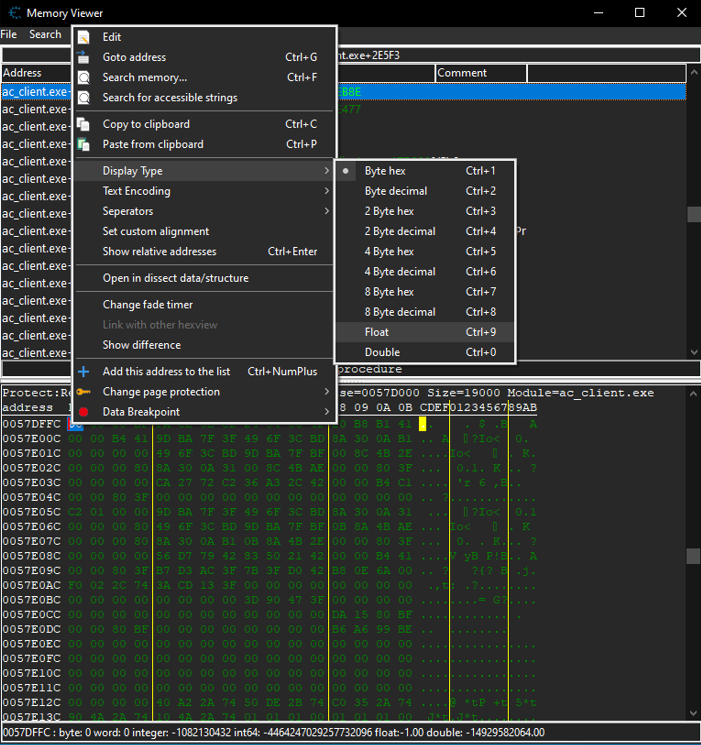
Now it looks as shown below.
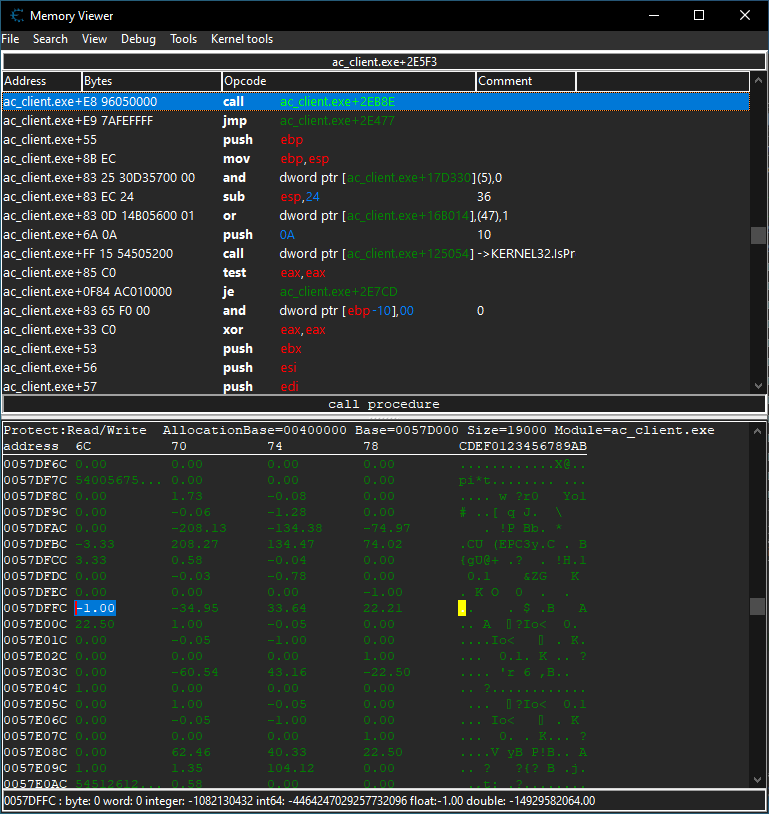
Now you have to point the weapon up and down and check how the values change. You can see that something has changed in the area marked in red. Interestingly, 1. and -1. occur only in the selected area; while the world matrix and the transformation matrix, respectively, are located prior to it (based on the size of these matrices). Therefore, the static address of the view matrix is "ac_client..
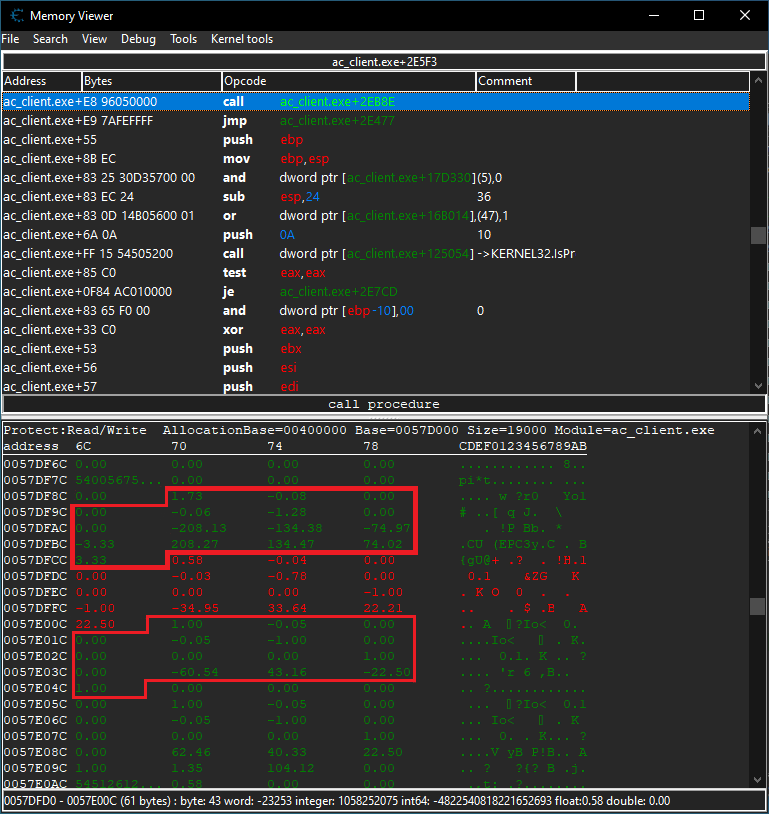
Don’t forget to restart the game and double-check whether your findings are correct.
Writing cheat
Since you are writing an internal cheat, you need not only the library, but also a special tool to inject it into the game process. This injector will retrieve the list of processes, find the game process, allocate memory in it, and write your internal cheat there. And then it will create a remote thread inside the game to execute the cheat code.
Injector
The injector code is as follows.
#include <windows.h>#include <tlhelp32.h>// Name of injected DLLconst char* dll_path = "internal_cheat_ac.dll";int main(void) { HANDLE process; void* alloc_base_addr; HMODULE kernel32_base; LPTHREAD_START_ROUTINE LoadLibraryA_addr; HANDLE thread; HANDLE snapshot = 0; PROCESSENTRY32 pe32 = { 0 }; DWORD exitCode = 0; pe32.dwSize = sizeof(PROCESSENTRY32); // Make snapshot of current processes snapshot = CreateToolhelp32Snapshot(TH32CS_SNAPPROCESS, 0); Process32First(snapshot, &pe32); do { // You will interact only with the AC process if (wcscmp(pe32.szExeFile, L"ac_client.exe") == 0) { // First, you need process handle to use it in subsequent calls process = OpenProcess(PROCESS_ALL_ACCESS, true, pe32.th32ProcessID); // To avoid memory corruption, allocate additional memory to store the path to your DLL alloc_base_addr = VirtualAllocEx(process, NULL, strlen(dll_path) + 1, MEM_COMMIT, PAGE_READWRITE); // Write path to your DLL into memory that was just allocated inside the game WriteProcessMemory(process, alloc_base_addr, dll_path, strlen(dll_path) + 1, NULL); // Create a remote thread inside the game; it will execute LoadLibraryA // Full path to your DLL injected into the game is passed to this LoadLibraryA call kernel32_base = GetModuleHandle(L"kernel32.dll"); LoadLibraryA_addr = (LPTHREAD_START_ROUTINE)GetProcAddress(kernel32_base, "LoadLibraryA"); thread = CreateRemoteThread(process, NULL, 0, LoadLibraryA_addr, alloc_base_addr, 0, NULL); // To make sure that your DLL has been successfully injected, the following two calls can be used for synchronization WaitForSingleObject(thread, INFINITE); GetExitCodeThread(thread, &exitCode); // Finally, the process memory and handles are released VirtualFreeEx(process, alloc_base_addr, 0, MEM_RELEASE); CloseHandle(thread); CloseHandle(process); break; } // Iterate processes contained in the snapshot } while (Process32Next(snapshot, &pe32)); return 0;}DLL
Your library will consist of the following modules:
- main module –
dllmain.;cpp - in-game offsets and game structures module –
structures.;h - hook module –
hook.andcpp hook.; andh - drawing module –
gl_draw.andcpp gl_draw..h
Main module
When your library is loaded using the LoadLibraryA function, a thread is created, and the main logic of your cheat will operate within this thread, including:
- getting pointers to fields you need;
- setting a hook to the scene rendering function;
- a loop making it possible to enable and disable the hacks and exit the cheat;
- a function that draws the cheat menu; and
- ESP and aimbot hacks.
Let’s begin!
include <iostream>#include <string>#include <tchar.h>#include <thread>#include <mutex>#define _USE_MATH_DEFINES#include <math.h>#include "hook.h"#include "structures.h"#include "gl_draw.h"// Player variablePlayer* player;// Synchronization variablestd::mutex hook_mutex;// Typedef for the wglSwapBuffers functiontypedef BOOL(__stdcall* twglSwapBuffers) (HDC hDc);Tramp_Hook* esp_hook;Player** player_list = nullptr;int* player_list_size = nullptr;static int list_size = 0;static Vector3 screen_position;static Vector3 world_position;static Vector3 player_position;static float* view_matrix;bool aimbot_enabled = false;// Menuvoid draw_menu(bool flag_esp) { std::string esp = "ESP is "; std::string aimbot = "Aimbot is "; if (flag_esp) { esp += "ON press F1 to OFF"; } else { esp += "OFF press F1 to ON"; } if (aimbot_enabled) { aimbot += "ON press F2 to OFF"; } else { aimbot += "OFF press F2 to ON"; } GL::print_gl(50, 1200, rgb::gray, esp.c_str()); GL::print_gl(50, 1300, rgb::gray, aimbot.c_str()); GL::print_gl(50, 1400, rgb::gray, "Exit cheat press F3");}// Your function called by the hook you've setBOOL _stdcall hooked_wglSwapBuffers(HDC hDc) { hook_mutex.lock(); draw_menu(esp_hook->is_enabled()); if (esp_hook->is_enabled()) { // Set up orthographic regime GL::setup_orthographic(); if (*player_list_size == list_size) { for (int i = 0; i < list_size; ++i) { // Check whether player address is valid if (!player_list[i]) { continue; } if (player_list[i]->hp > 0 && player_list[i]->hp < 200) { // Save positions of other players in Vector3 world_position.x = player_list[i]->x_y_z_player.x; world_position.y = player_list[i]->x_y_z_player.y; world_position.z = player_list[i]->x_y_z_player.z; // Save positions of other players' heads in Vector3 player_position.x = player->x_y_z_head.x; player_position.y = player->x_y_z_head.y; player_position.z = player->x_y_z_head.z; // Calculate distance to other player float distance = sqrtf((player_position.x - world_position.x) * (player_position.x - world_position.x) + (player_position.y - world_position.y) * (player_position.y - world_position.y) + (player_position.z - world_position.z) * (player_position.z - world_position.z)); // Check whether the player is visible if (distance > 5.0f && GL::world_to_screen(world_position, screen_position, view_matrix)) { // Check whether the other player is a member of your team if (player_list[i]->team != player->team) { // Opposing team GL::draw_esp_box(screen_position.x, screen_position.y, distance, rgb::red, player_list[i]->name, player_list[i]->hp, player_list[i]->armor); } else { // Your team GL::draw_esp_box(screen_position.x, screen_position.y, distance, rgb::green, player_list[i]->name, player_list[i]->hp, player_list[i]->armor); } } } } } else { list_size = *player_list_size; } GL::restore_gl(); // Restore initial regime } if (aimbot_enabled && GetAsyncKeyState(VK_RBUTTON)) { if (*player_list_size == list_size) { // These variables will be used to hold the closest enemy at gunpoint float closest_player = -1.0f; float closest_yaw = 0.0f; float closest_pitch = 0.0f; // Select closest enemy as target for (int i = 0; i < list_size; ++i) { // Check whether the player's address is valid; skip players from your team; and check HP if (!player_list[i] || (player_list[i]->team == player->team) || (player_list[i]->hp < 0)) { continue; } // Calculate the enemy's absolute position away from you (to ensure that your future calculations are correct and based on the initial zero point) float abspos_x = player_list[i]->x_y_z_player.x - player->x_y_z_player.x; float abspos_y = player_list[i]->x_y_z_player.y - player->x_y_z_player.y; float abspos_z = player_list[i]->x_y_z_player.z - player->x_y_z_player.z; // Calculate distance to the enemy float temp_distance = sqrtf((abspos_x * abspos_x) + (abspos_y * abspos_y)); // If this is the closest enemy, calculate yaw and pitch to aim at it if (closest_player == -1.0f || temp_distance < closest_player) { closest_player = temp_distance; // Calculate yaw float azimuth_xy = atan2f(abspos_y, abspos_x); // Convert to degrees float yaw = (float)(azimuth_xy * (180.0 / M_PI)); // Add 90 since the game believes that direct north is equal to 90 degrees closest_yaw = yaw + 90; // Calculate pitch // Since Z varies is a very narrow range, select a higher value between X and Y to make sure you're not looking directly at the sky when you're close to the enemy if (abspos_y < 0) { abspos_y *= -1; } if (abspos_y < 5) { if (abspos_x < 0) { abspos_x *= -1; } abspos_y = abspos_x; } float azimuth_z = atan2f(abspos_z, abspos_y); // Convert the value to degrees closest_pitch = (float)(azimuth_z * (180.0 / M_PI)); } } // When your loop ends, set yaw and pitch to the closest values player->yaw_pitch_roll.x = closest_yaw; player->yaw_pitch_roll.y = closest_pitch; } else { list_size = *player_list_size; } } // Call hooked function BOOL ret_value = ((twglSwapBuffers)esp_hook->get_gateway())(hDc); hook_mutex.unlock(); return ret_value;}DWORD WINAPI injected_thread(HMODULE hMod) { // Get address at which .exe was loaded inside your game process uintptr_t moduleBase = (uintptr_t)GetModuleHandle(0); // Address of pointer to your player player = *reinterpret_cast<Player**>(moduleBase + player_offset); // Pointer to player list player_list = *reinterpret_cast<Player***>(moduleBase + entity_offset); // Pointer to player list size player_list_size = reinterpret_cast<int*>(moduleBase + entity_count_offset); // Pointer to view matrix view_matrix = reinterpret_cast<float*>(moduleBase + view_matrix_offset); // Get handle to OpenGL module HMODULE open_gl = GetModuleHandleA("opengl32.dll"); if (!open_gl) { return -1; // OpenGL not loaded } // Get address of wglSwapBuffers void* orig_wglSwapBuffers = GetProcAddress(open_gl, "wglSwapBuffers"); // Set hook to wglSwapBuffers esp_hook = new Tramp_Hook(orig_wglSwapBuffers, hooked_wglSwapBuffers, 5); while (!GetAsyncKeyState(VK_F3)) { if (GetAsyncKeyState(VK_F1) & 1) { // Enable ESP esp_hook->is_enabled() ? esp_hook->disable() : esp_hook->enable(); } if (GetAsyncKeyState(VK_F2) & 1) { // Enable aimbot aimbot_enabled = !aimbot_enabled; } Sleep(50); } hook_mutex.lock(); // Delete hook delete esp_hook; hook_mutex.unlock(); // Release your library FreeLibraryAndExitThread(hMod, 0); return 0;}BOOL APIENTRY DllMain(HMODULE hModule, DWORD ul_reason_for_call, LPVOID lpReserved) { switch (ul_reason_for_call) { case DLL_PROCESS_ATTACH: CreateThread(0, 0, (LPTHREAD_START_ROUTINE)injected_thread, hModule, 0, 0); case DLL_THREAD_ATTACH: case DLL_THREAD_DETACH: case DLL_PROCESS_DETACH: break; } return TRUE;}In-game offsets and game structures module
This module contains all the required player fields, as well as offsets.
#pragma once#include "gl_draw.h"class Player {public: DWORD* vftable; // 0x00 Vector3 x_y_z_head; // 0x04 BYTE pad_0010[24]; // 0x10 Vector3 x_y_z_player; // 0x28 Vector3 yaw_pitch_roll; // 0x34 BYTE pad_0040[172]; // 0x40 DWORD hp; // 0xEC DWORD armor; // 0xF0 BYTE pad_00F4[273]; // 0xF4 BYTE name[16]; // 0x205 BYTE pad_0215[247]; // 0x215 BYTE team; // 0x30C};DWORD player_offset = 0x018AC00;DWORD entity_offset = 0x018AC04;DWORD entity_count_offset = 0x018AC0C;DWORD view_matrix_offset = 0x17DFD0;Hook module
The purpose of this module is to hook the wglSwapBuffers function responsible for scene rendering. It’s required to draw your menu and ESP boxes.
hook.h
#pragma once#include <windows.h>#include <memory>// Hook classclass Hook { // Pointer to hook void* this_to_hook; // Saved old opcodes std::unique_ptr<char[]> old_opcodes; // Length of overwritten instructions int this_len; // Hook enabled? bool enabled;public: // Constructor for hook Hook(void* to_hook, void* our_func, int len); // Destructor to restore initial code ~Hook(); // Enable hook void enable(); // Disable hook void disable(); // Hook enabled? bool is_enabled();};// Class that implements inline hookclass Tramp_Hook { void* gateway; Hook* managed_hook;public: Tramp_Hook(void* to_hook, void* our_func, int len); // Restores initial code ~Tramp_Hook(); void enable(); void disable(); bool is_enabled(); void* get_gateway();};hook.cpp
#include "hook.h"Hook::Hook(void* to_hook, void* our_func, int len) : this_to_hook{to_hook }, old_opcodes{ nullptr }, this_len{ len }, enabled{ false } { // Jmp instruction is 5 bytes in size. Memory area you are overwriting must be at least this size if (len < 5) { return; } DWORD curr_protection; // Make memory that stores code you want to overwrite writable VirtualProtect(to_hook, len, PAGE_EXECUTE_READWRITE, &curr_protection); // Save current bytes to character array old_opcodes = std::make_unique<char[]>(len); if (old_opcodes != nullptr) { for (int i = 0; i < len; ++i) { old_opcodes[i] = ((char*)to_hook)[i]; } } // Overwrite the area you want to hook with nop instructions memset(to_hook, 0x90, len); // Calculate relative address for the jump DWORD rva_addr = ((DWORD)our_func - (DWORD)to_hook) - 5; // Write opcode for the jmp instruction *(BYTE*)to_hook = 0xE9; // Write address to jump to *(DWORD*)((DWORD)to_hook + 1) = rva_addr; // Restore old code protection VirtualProtect(to_hook, len, curr_protection, &curr_protection);}Hook::~Hook() { if (old_opcodes != nullptr) { DWORD curr_protection; // Make memory writable VirtualProtect(this_to_hook, this_len, PAGE_EXECUTE_READWRITE, &curr_protection); // Write old opcodes back to the hooked location for (int i = 0; i < this_len; ++i) { ((char*)this_to_hook)[i] = Hook::old_opcodes[i]; } // Restore old memory protection VirtualProtect(this_to_hook, this_len, curr_protection, &curr_protection); }}void Hook::enable() { this->enabled = true;}void Hook::disable() { this->enabled = false;}bool Hook::is_enabled() { return enabled;}Tramp_Hook::Tramp_Hook(void* to_hook, void* our_func, int len) : gateway{ nullptr }, managed_hook{ nullptr } { // jmp is 5 bytes in size if (len < 5) { return; } // Allocate memory for your trampoline gateway = VirtualAlloc(0, len + 5, MEM_COMMIT | MEM_RESERVE, PAGE_EXECUTE_READWRITE); // Save bytes that will be overwritten in the trampoline memcpy_s(gateway, len, to_hook, len); // Get return address uintptr_t ret_addr = (BYTE*)to_hook - (BYTE*)gateway - 5; // Put jmp opcode at the end of the trampoline *(BYTE*)((uintptr_t)gateway + len) = 0xE9; // Put return address after jmp *(uintptr_t*)((uintptr_t)gateway + len + 1) = ret_addr; // Create hook managed_hook = new Hook(to_hook, our_func, len);}Tramp_Hook::~Tramp_Hook() { managed_hook->disable(); delete managed_hook; VirtualFree(gateway, 0, MEM_RELEASE);}void Tramp_Hook::enable() { managed_hook->enable();}void Tramp_Hook::disable() { managed_hook->disable();}bool Tramp_Hook::is_enabled() { return managed_hook->is_enabled();}void* Tramp_Hook::get_gateway() { return gateway;}Drawing module
This module contains functions that draw the cheat menu and ESP boxes.
gl_draw.h
#pragma once#pragma comment(lib, "OpenGL32.lib")#include <windows.h>#include<gl/GL.h>struct Vector3 { float x, y, z;};struct Vector4 { float x, y, z, w;};// Namespace for colors used in drawingnamespace rgb { const GLubyte red[3] = { 255,0,0 }; const GLubyte green[3] = { 0,255,0 }; const GLubyte blue[3] = { 0,0,255 }; const GLubyte gray[3] = { 55,55,55 }; const GLubyte light_gray[3] = { 192,192,192 }; const GLubyte yellow[3] = { 255, 255, 0 }; const GLubyte black[3] = { 0,0,0 };}// Namespace for functions used to draw cheat menu and ESP hacknamespace GL { void setup_orthographic(); void restore_gl(); void build_font(); void draw_filled_rectangle(float x, float y, float width, float height, const GLubyte color[3]); void draw_out_line(float x, float y, float width, float height, float line_width, const GLubyte color[3]); void draw_line(float fromX, float fromY, float toX, float toY, float line_width, const GLubyte color[3]); void draw_esp_box(float pos_x, float pos_y, float distance, const GLubyte color[3], const BYTE* text, const int health_percent = -1, const int armor_percent = -1); void print_gl(float x, float y, const GLubyte color[3], const char* fmt, ...); bool world_to_screen(Vector3 pos, Vector3& screen, float matrix[16]);}gl_draw.cpp
#include "gl_draw.h"#include <corecrt_math.h>#include <stdio.h>HDC h_DC;HFONT h_old_font;HFONT h_font;UINT font_base;bool b_font_build = 0;void GL::setup_orthographic() { // Save attributes glPushAttrib(GL_ALL_ATTRIB_BITS); // Save view matrix glPushMatrix(); // Screen dimensions GLint view_port[4]; // Get screen dimensions glGetIntegerv(GL_VIEWPORT, view_port); // Set screen dimensions glViewport(0, 0, view_port[2], view_port[3]); glMatrixMode(GL_PROJECTION); glLoadIdentity(); // Set up orthographic regime glOrtho(0, view_port[2], view_port[3], 0, -1, 1); glMatrixMode(GL_MODELVIEW); glLoadIdentity(); // Disable GL depth test glDisable(GL_DEPTH_TEST);}void GL::restore_gl() { // Restore view matrix glPopMatrix(); // Restore all attributes glPopAttrib();}void GL::draw_filled_rectangle(float x, float y, float width, float height, const GLubyte color[3]) { glColor3ub(color[0], color[1], color[2]); glBegin(GL_QUADS); glVertex2f(x, y); glVertex2f(x + width, y); glVertex2f(x + width, y + height); glVertex2f(x, y + height); glEnd();}void GL::draw_out_line(float x, float y, float width, float height, float line_width, const GLubyte color[3]) { glLineWidth(line_width); glBegin(GL_LINE_STRIP); glColor3ub(color[0], color[1], color[2]); glVertex2f(x - 0.5f, y - 0.5f); glVertex2f(x + width + 0.5f, y - 0.5f); glVertex2f(x + width + 0.5f, y + height + 0.5f); glVertex2f(x - 0.5f, y + height + 0.5f); glVertex2f(x - 0.5f, y - 0.5f); glEnd();}void GL::draw_line(float fromX, float fromY, float toX, float toY, float line_width, const GLubyte color[3]) { glLineWidth(line_width); glBegin(GL_LINES); glColor3ub(color[0], color[1], color[2]); glVertex2f(fromX, fromY); glVertex2f(toX, toY); glEnd();}void GL::build_font(){ h_DC = wglGetCurrentDC(); font_base = glGenLists(96); h_font = CreateFont(-12, 0, 0, 0, FW_NORMAL, FALSE, FALSE, FALSE, ANSI_CHARSET, OUT_TT_PRECIS, CLIP_DEFAULT_PRECIS, PROOF_QUALITY, FF_DONTCARE | DEFAULT_PITCH, L"Courier"); h_old_font = (HFONT)SelectObject(h_DC, h_font); wglUseFontBitmaps(h_DC, 32, 96, font_base); SelectObject(h_DC, h_old_font); DeleteObject(h_font); b_font_build = true;}void GL::print_gl(float x, float y, const GLubyte color[3], const char* fmt, ...){ if (!b_font_build) { GL::build_font(); } if (fmt == NULL) { return; } glColor3f(color[0], color[1], color[2]); glRasterPos2i(x, y); char text[256]; va_list ap; va_start(ap, fmt); vsprintf(text, fmt, ap); va_end(ap); glPushAttrib(GL_LIST_BIT); glListBase(font_base - 32); glCallLists(strlen(text), GL_UNSIGNED_BYTE, text); glPopAttrib();}void GL::draw_esp_box(float pos_x, float pos_y, float distance, const GLubyte color[3], const BYTE* text, const int health, const int armor) { float line_width = 0.5f; // Line width GLint view_port[4]; glGetIntegerv(GL_VIEWPORT, view_port); float height = (view_port[3] / distance) * 3; // Box height float width = (view_port[2] / distance); // Box width // Snap lines GL::draw_line(view_port[2] / 2.0f, (float)view_port[3], pos_x, pos_y, line_width + 2.0f, rgb::black); GL::draw_line(view_port[2] / 2.0f, (float)view_port[3], pos_x, pos_y, line_width, color); // Shape GL::draw_out_line(pos_x - (width / 2), pos_y - height, width, height, line_width + 2.0f, rgb::black); GL::draw_out_line(pos_x - (width / 2), pos_y - height, width, height, line_width, color); // Health if (health != -1) { float perc = (width / 100); float curr = perc * health; GL::draw_filled_rectangle(pos_x - (width / 2) - 1, ((pos_y - (height / 10)) - 1) - height, width + 2, (height / 15) + 2, rgb::black); GL::draw_filled_rectangle(pos_x - (width / 2), (pos_y - (height / 10)) - height, width, height / 15, rgb::light_gray); GLubyte Hcolor[3]{ static_cast<GLubyte>(255 - (2.5f * health)), static_cast<GLubyte>(health * 2.5f), 0 }; GL::draw_filled_rectangle(pos_x - (width / 2), (pos_y - (height / 10)) - height, curr, height / 15, Hcolor); } // Armor if (armor != -1) { float perc = (width / 100); float curr = perc * armor; GL::draw_filled_rectangle(pos_x - (width / 2) - 1, ((pos_y - (height / 5)) - 1) - height, width + 2, (height / 15) + 2, rgb::black); GL::draw_filled_rectangle(pos_x - (width / 2), (pos_y - (height / 5)) - height, width, height / 15, rgb::light_gray); GL::draw_filled_rectangle(pos_x - (width / 2), (pos_y - (height / 5)) - height, curr, height / 15, rgb::blue); } // Name GL::print_gl(pos_x - (width / 2), (pos_y - (height / 4)) - height, rgb::yellow,(char *)text);}bool GL::world_to_screen(Vector3 pos, Vector3& screen, float matrix[16]) { // Get screen height and weight GLint view_port[4]; glGetIntegerv(GL_VIEWPORT, view_port); int window_width = view_port[2]; int window_height = view_port[3]; // Matrix-vector result multiplying world (eye) coordinates by projection matrix (clip_coords) Vector4 clip_coords; clip_coords.x = pos.x * matrix[0] + pos.y * matrix[4] + pos.z * matrix[8] + matrix[12]; clip_coords.y = pos.x * matrix[1] + pos.y * matrix[5] + pos.z * matrix[9] + matrix[13]; clip_coords.z = pos.x * matrix[2] + pos.y * matrix[6] + pos.z * matrix[10] + matrix[14]; clip_coords.w = pos.x * matrix[3] + pos.y * matrix[7] + pos.z * matrix[11] + matrix[15]; // If coordinates not on the screen if (clip_coords.w < 0.1f) { return false; } // Perspective division, division by clip.W (i.e. normalized device coordinates) Vector3 NDC; NDC.x = clip_coords.x / clip_coords.w; NDC.y = clip_coords.y / clip_coords.w; NDC.z = clip_coords.z / clip_coords.w; // Convert to screen coordinates screen.x = (window_width / 2 * NDC.x) + (NDC.x + window_width / 2); screen.y = -(window_height / 2 * NDC.y) + (NDC.y + window_height / 2); return true;}Functional test
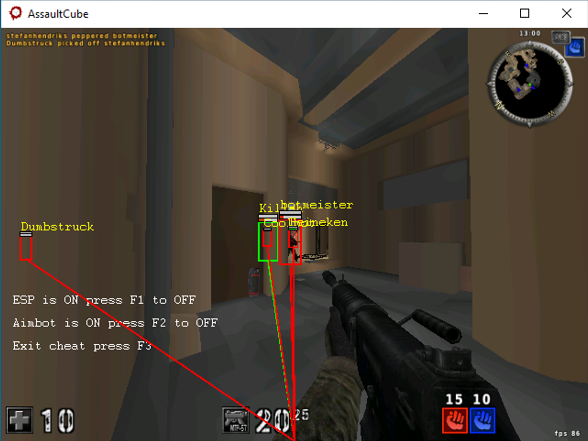
Time to run the cheat.
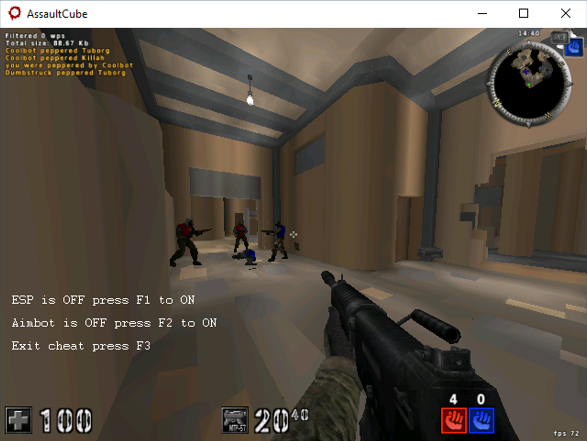
To enable the ESP hack, press F1; to disable it, press F1 again.
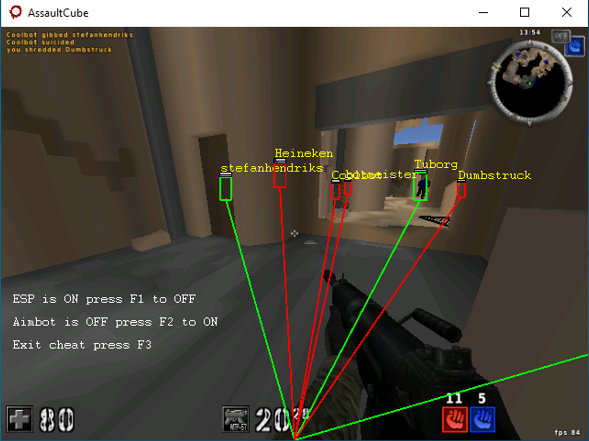
To enable aimbot, press F2; to activate it, hold down the right mouse button. To disable the hack, press F2 again.
Conclusions
Congrats! You’ve learned that Cheat Engine can be used not only to search for player class fields, but also for the player class per se, for the list of players, their number, and view matrix. You have also implemented basic hacks suitable for any online shooter. Your cheat is almost perfect. To become fully functional, it must be able to bypass anticheats. Next time, I will explain how to do this.
