
Nmap is an iconic scanner broadly used by hackers, and many of them are wondering how to expand its capacity. In most cases, Nmap is used in combination with other software tools. In this article, I’ll explain how to use it together with your favorite utilities. After all, it is much easier to push a button and get the result rather then endlessly repeat the same sequence. Nmap scripts enable hackers to hack networks in a more automated way and help system administrators identify and eliminate built-in vulnerabilities in their protected perimeters.
A few words about Nmap
I have no doubt that the majority or our readers know what Nmap is, and frequently use it to scan networks and collect information. For those who have never heard of Nmap, I am going to refresh the background.
- Nmap is a crossplatform tool designed for network scanning, security checking, identification of the OS version and active services, etc. Built-in Nmap Scripting Engine (NSE) makes this utility very flexible and easily extensible;
- NSE is a powerful Nmap component enabling users to write simple scripts automating a broad range of networking tasks, including the better use of existing Nmap functions, identification and exploitation of vulnerabilities, etc. The core of NSE is Lua language interpreter; and
- Lua is a lightweight scripting language resembling JavaScript.
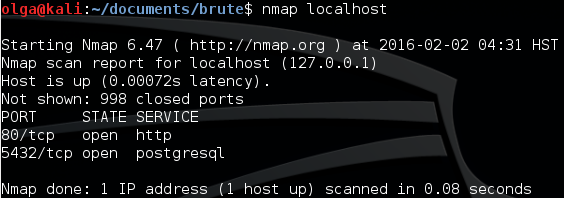
Fig. 1. Nmap table output
Task definition
As said above, you can expand the Nmap capacity by writing custom scripts. Any hacking attack or pentest begins with intelligence and data collection. One of the first steps is checking the tested host for open ports and identifying the running services. Nmap is the best tool in the world for that purpose. At the next step, you either search for an exploit to the vulnerability identified in the service or try to guess the login and password using the brute force method.
For instance, you frequently use THC Hydra, a brute-force password cracking utility, to recover passwords to a few of services (e.g. HTTP-Basic, SSH, and MySQL). By default, you have to set Hydra against each service separately and keep in mind their specific features and flags required to launch the cracking utility. But what if you have to brute-force more services, maybe five or ten? Why not automate this process?
Today, we are going to write together a simple script to automate the THC Hydra launch process. We need Hydra to guess logins and passwords to one of the services (e.g. PostgreSQL). The following tools are required:
- Nmap;
- THC Hydra; and
- any text editor.
If Nmap and/or Hydra are not installed on your machine, I suggest to fix this immediately:
$ sudo apt-get install nmap hydra
Nmap scripts are text files with *.nse extension. So, open your favorite text editor and create a new file. I am going to use Vim:
$ vim hydra.nse
NSE script structure
Every script has a certain structure. In addition to the code that automates some actions, it includes the following fields: script description (i.e. its purpose and user manual), information about the author, licenses, dependencies on other scripts, category, etc. Let’s examine each of these fields in more detail.
Script description
These fields expectedly contains the script description, as well as author’s comments, an example of the script output, and information on its additional features.
For our script that’s supposed to break logins and passwords to PostgeSQL, the description will look as follows:
description = [[
Brute force all services running on a target host. The results are returned in a table with each path, detected method, login and/or password.
]]

---
-- @usage
-- nmap --script hydra [--script-args "lpath=, ppath="]
--
-- @output
-- PORT     STATE SERVICE
-- 80/tcp   open  http
-- | hydra:
-- |   path                            method  login  password
-- |   127.0.0.1/private/index.html    Digest  log    pass
-- |_  127.0.0.1/simple/index.txt      Basic   user   qwerty
--
-- @args hydra.lpath: the path to the file with logins. For example,
--         nmap --script hydra --script-args="lpath=/home/my_logins.txt"
-- @args hydra.ppath: the path to the file with passwords. For example,
--         nmap --script hydra --script-args="ppath=/home/my_pass.txt"
Where
-- - comment;
--[[  ]] - multiline comment;
@usage, @output, @args - examples showing how to launch the script, what is its output, and what arguments are required to launch it.
The string starting with@usage presents the script launch format. In this particular case, only the script name (hydra) is provided. This is sufficient if the script is located in the directory /; otherwise, we have to specify the absolute or relative path to it. Later, we are going to enable the setting of arguments in the command launching the script. Arguments are set using the flag --script-args ". In this particular case, we will set paths to the file containing logins (lpath) and the file containing passwords (ppath). Generally speaking, these arguments are not mandatory: by default, the script will search for login.txt and password.txt in the current directory.
Script categories
The author may specify the category (or several categories) of an NSE script. This is helpful when an Nmap user wants to use a set of scripts belonging to the same category. Below are a few examples of script categories:
- auth: scripts of this category identify authentication data of the target host;
- brute: a category for scripts designed to retrieve logins and passwords to various services using the brute force method;
- default: a category containing basic scripts. Certain criteria determine whether a script belongs to this category: scanning speed, usefulness, reliability, privacy, output verbosity, etc.; and
- malware: scripts of this category test whether the target system is infected by malicious programs.
For instance, if we need to launch all scripts belonging to the auth category, the command will look as follows:
$ nmap --script=auth example.com
In that case, scripts of this category will be launched for the specified host one by one. Our script belongs to the brute-force (‘brute’) category. So, we add the following string to the text file:
categories = {"brute"}
Author
Every script contains information on its author. In my case, it will be:
author = "Olga Barinova"
License
Nmap encourages users to develop and share their creations, including NSE scripts. By specifying the license information, you confirm the right to share the script with the community. A standard Nmap license looks as follows:
license = "Same as Nmap--See http://nmap.org/book/man-legal.html"
Let’s add this line to the script.
Dependencies
This field contains the names of other NSE scripts that should be run before this script in order to retrieve the required information. For instance,
dependencies = {"smb-brute"}.
In our case, this is not required; accordingly, we won’t add the Dependencies field to the script.
Host and port
Nmap has to know for what services to run the script and on what ports. These aspects are regulated by special rules:
prerule(): the script is run once prior to scanning any hosts. This rule is used for some network operations;hostrule(host): the script is run for each host from the table that is used as an argument;portrule(host, port): the script is run for each host and each port from the tables that are used as arguments;postrule(): the script is run once after scanning any host. This rule is mostly used for processing of findings, statistics, etc.
Special libraries are used to create the above rules. In our script, we only have to set the port number (5432) and service name (postgresql), and it will work only with these port and service. NSE includes a popular library named shortport containing various methods. We are going to use the following method:
port_or_service (ports, services, protos, states)
where ports indicates port numbers, services define service names, protos represent protocols (e.g. udp), and states (as can be easily guessed) are the states.
This method returns true if a service mapped to a port from the ports list or included in the services list is being currently analyzed; in addition, the protocol and state are checked; otherwise, the method returns false.
To instruct the script to scan PostgreSQL, we have to add the port number and service name;
portrule = shortport.port_or_service({5432}, {"postgresql"})
Loading libraries
Let’s put aside the script structure for now and install some extension libraries whose capabilities are required for our purposes.
Similar to other programming languages, variables must be declared and initialized first. In Lua, this process is simple: all variables are declared using the local command:
local
But first, we have to install libraries. In Lua, this function is implemented through the keyword require. In the very beginning of the script, we add:
local nmap = require "nmap"
local shortport = require "shortport"
local stdnse = require "stdnse"
local string = require "string"
local table = require "table"
local tab = require "tab"
The above commands load the following libraries:
nmap: an NSE library containing external functions and Nmap data structures;shortport: an NSE library containing functions used to set services, ports, etc. the script will be dealing with;stdnse: an NSE library containing standard NSE functions;string: a Lua library containing functions for administering strings;table: a Lua library used for the creation and modification of tables (associative arrays); andtab: an NSE library used to arrange outputs into Nmap tables.
Nmap Libs
More information on the libraries can be found here in the Libraries section.
By calling up these global variables, we get access to the libraries’ functions.
Script instructions (action)
This is the most important part of the script. The action block describes instructions to be executed. As you remember, we are writing this script to be able to launch Hydra, view its output, extract the required information from it, process this information, and display as an Nmap table.
The structure of an action block looks as follows:
action = function (host, port)

end
First of all, let’s declare all required variables within the action block:
local str                      -- forms the string to launch Hydra;
local s                        -- an auxiliary variable used to store hydra's findings;
local login = ''               -- the identified login will be recorded here;
local pass = ''                -- the identified password will be recorded here;
local task = ''                -- will contain the number of threads for hydra's runtime; and
local serv = port.service      -- the serv variable will store the name of the service analyzed by the script (in our case, its value will be postgresql).
Names of some services may be different for Nmap and THC Hydra: for instance, in our situation. Nmap stores the postgresql value, while Hydra accepts the postgres value as one of the flags. Therefore, we have to correct this value using the following condition:
if  then               if (serv == "postgresql") then
                                         serv = "postgres"
    <...>                                      task = "-t 4"
end                                        end
In addition, we have specified the number of threads to parallelize this service (the task variable).
Now we have to create a table to store the findings obtained using the brute force method (i.e. logins and passwords) and add values to its first row (i.e. column headings).
local restab = tab.new(4) -- with four columns: path, method, login, password
tab.addrow(restab, "path", "method", "login", "password")
In the first row of the table, we have specified the column headings. The next step is to check whether the port is open and form a string containing flags required to launch Hydra.
if (port.state == "open") then
    str = "hydra -L login.txt -P password.txt " .. task .. " -e ns -s " .. port.number .. " " .. host.ip .. " " .. serv
    … … … -- here we have to add commands that will be described below
end
The following flags are required to launch Hydra:
-L (-l)  ()
-P (-p)  ()
-t  (default: 16)
-e ns - additional check: n - check for blank password, s - login is tried as a password
-s
In the end of the string, we specify the IP (or an IP range) and service name.
Hydra flags
More information on the flags and THC Hydra can be found here.
The .. (two dots) operator is used in Lua for string concatenation. To execute the command formed in str, we will use the io.popen(str) function. It launches the str program as a separate process and returns the file handler that can be used to read data from this program and write data into it.
local handler = io.popen(str)
s = handler:read('*a') -- '*a' means reading all data
handler:close()
Hydra’s findings are stored in the s variable (see Fig. 2).
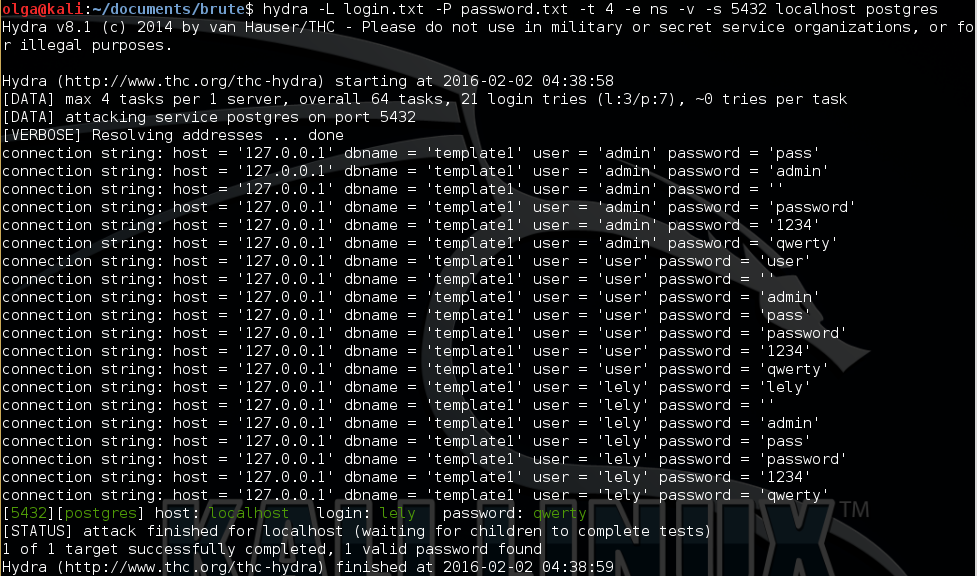
Fig. 2. Hydra post-run output
To understand whether the program managed to brute-force a login:password pair, we will use regex. The string library includes the match method; it will compare the string with the regular expression and place the respective values (if any) into the login and password variables.
local login, pass = string.match(s, 'login:%s([^%s]*)%s+password:%s([^%s]*)')
The values falling into ([^%s]*) are assigned to the variables sequentially (%s means a space). The identified login and password should be added to the table after checking whether they actually exist or not:
if (login) and (pass) then
    tab.addrow(restab, host.ip .. "/", serv, login, pass)
end
At this point, we finish the service scanning and complete the cycle ( if (port.state == "open") then … end ). Next, we check the table. If new rows have been added to it (aside from the first row with headings), the values contained in them should be exported to the Nmap table.
if ( #restab > 1 ) then
    local result = { tab.dump(restab) }
    return stdnse.format_output(true, result)
end
When dealing with tables, Lua uses the # operator that returns the length of a string or a table. Other examples of # operator usage are available in the documentation. Now we have to close the action block (i.e. put the missing end).
Lua Docs
More information on Lua is available here.
We save the script in the folder /. Now we can run it and see the results. However, prior to doing so, let’s install, set up, and add a PostgreSQL user.
Setting up PostgreSQL
-
Installing and running PostgreSQL. PostgreSQL must be in the repositories (if it is not there, download and install it as shown below):
-
$ sudo apt-get install postgresql - Checking the service status:
$ sudo service postgresql status -
If the service is not running:
$ sudo service postgresql start -
To add a Linux user with a login and a password (e.g. postgresql:qwerty), enter the following commands:
-
$ sudo su $ adduser postgresql(when the program prompts for a password, type qwerty)-
$ exit -
Then connect to the database and add the postgresql user:
$ su - postgres
$ psql template1
template1=# CREATE USER postgresql WITH PASSWORD 'qwerty';
template1=# CREATE DATABASE test_db;
template1=# GRANT ALL PRIVILEGES ON DATABASE test_db to postgresql;
template1=# q
Voila! The service has been launched, and we added a user with a login and a password.
Launching the script
Add the postgresql user to login.txt with a password qwerty, which goes to password.txt:
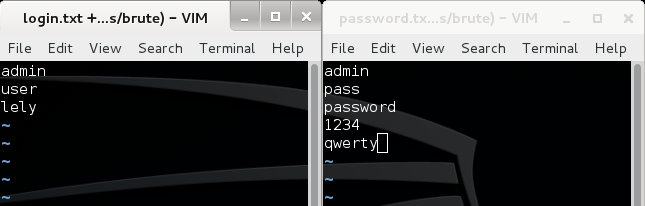
Fig. 3. Examples of files storing logins and passwords
Then launch the script:
$ nmap --script hydra localhost
The script performs its work, and we get a table shown on Fig. 4.
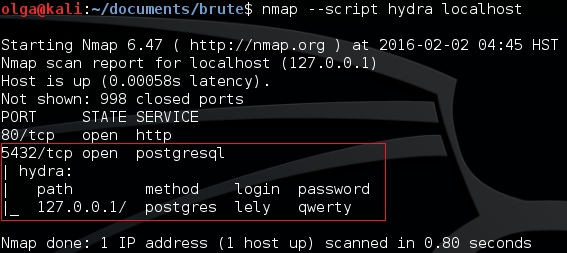
Fig. 4. The retrieved login and password are displayed in the Nmap table
Arguments
Earlier in the article, I noted that that by default, the files with logins and passwords should be named login.txt and password.txt, respectively, and located in the current directory. Some users may want to change this, so let's add the following input parameters to the script:lpath(path to the file with logins) andppath` (path to the file with passwords). The command launching the script will look as shown below:
$ nmap --script hydra --script-args "lpath=, ppath=" localhost
Accordingly, certain modifications should be made to the script. In the beginning of the action block, after the declaration of variables, add lpath and ppath as follows:
nmap.registry.args = {
    lpath = "login.txt",
    ppath = "password.txt"
}
local path_login = nmap.registry.args.lpath
local path_passwd = nmap.registry.args.ppath
We have registered the arguments and set their default values. The command launching Hydra now looks as shown below (because variables path_login and path_password are now used instead of the hardcoded values):
str = "hydra -L " .. path_login .." -P " .. path_password .. task .. " -e ns -s " .. port.number .. " " .. host.ip .. " " .. serv
Everything is ready, and the arguments are ready to use.
Expanding the scope
Our primary goal was to automate the work of Nmap and THC Hydra. The more services can be brute-forced using the same script, the better. So, let’s make a few simple steps and add more ports and services to the portrule:
portrule = shortport.port_or_service({5432, 3306, 21, 22}, {"postgresql", "mysql", "ftp", "ssh"})
Now the script can be applied to the newly-added services as well. You can always add more services, but some of them require further modifications. Normally, such modifications are minor and obvious (e.g. increasing or reducing the number of threads).
Hydra.nse
The full version of the script supporting an extended list of services is available in my repository on GitHub.
Script debugging
A new script may contain errors (e.g. ones related to the syntax or incorrect usage of some parameters). In such situations, Nmap warns us that the script cannot be executed and suggests to use -d flag (see Fig. 5). Accordingly, the command to launch it will look as follows:
$ nmap --script hydra localhost -d
The above command instructs Nmap to report errors. If the problem pertains not to the syntax, but to script logic, we can use the print operator to view the debugging output.

Fig. 5. Example of an error message
Conclusions
NSE is an excellent tool to extend the Nmap capacity. If you like this article and intend to create your own Nmap scripts, don’t forget to share them with the community. Good luck!

2022.01.12 — First contact. Attacks against contactless cards
Contactless payment cards are very convenient: you just tap the terminal with your card, and a few seconds later, your phone rings indicating that…
Full article →
2022.02.09 — F#ck da Antivirus! How to bypass antiviruses during pentest
Antiviruses are extremely useful tools - but not in situations when you need to remain unnoticed on an attacked network. Today, I will explain how…
Full article →
2023.02.13 — Ethernet Abyss. Network pentesting at the data link layer
When you attack a network at the data link layer, you can 'leapfrog' over all protection mechanisms set at higher levels. This article will walk…
Full article →
2022.01.01 — It's a trap! How to create honeypots for stupid bots
If you had ever administered a server, you definitely know that the password-based authentication must be disabled or restricted: either by a whitelist, or a VPN gateway, or in…
Full article →
2022.02.09 — First contact: An introduction to credit card security
I bet you have several cards issued by international payment systems (e.g. Visa or MasterCard) in your wallet. Do you know what algorithms are…
Full article →
2023.02.21 — SIGMAlarity jump. How to use Sigma rules in Timesketch
Information security specialists use multiple tools to detect and track system events. In 2016, a new utility called Sigma appeared in their arsenal. Its numerous functions will…
Full article →
2022.04.04 — Elephants and their vulnerabilities. Most epic CVEs in PostgreSQL
Once a quarter, PostgreSQL publishes minor releases containing vulnerabilities. Sometimes, such bugs make it possible to make an unprivileged user a local king superuser. To fix them,…
Full article →
2022.01.12 — Post-quantum VPN. Understanding quantum computers and installing OpenVPN to protect them against future threats
Quantum computers have been widely discussed since the 1980s. Even though very few people have dealt with them by now, such devices steadily…
Full article →
2022.06.01 — WinAFL in practice. Using fuzzer to identify security holes in software
WinAFL is a fork of the renowned AFL fuzzer developed to fuzz closed-source programs on Windows systems. All aspects of WinAFL operation are described in the official documentation,…
Full article →
2022.02.15 — EVE-NG: Building a cyberpolygon for hacking experiments
Virtualization tools are required in many situations: testing of security utilities, personnel training in attack scenarios or network infrastructure protection, etc. Some admins reinvent the wheel by…
Full article →