
The aspect of backup saving (and storage) is, certainly, one of the most important in the world of information: why would anyone want to lose his/her data as a result of the error (whether software or hardware error)? Since, there is a wide array of backup tools. I list the most necessary requirements, in my view, to these tools:
- Ease of automation and the very existence of such. However, this requirement is almost completely balanced by the presence of Cron in all the general purpose *nix distributives. Still, backing up is just the very case when you should not put all your eggs in one basket.
- Supported media and network backups. A backup tool can be arbitrarily remarkable, but if it supports only a limited set of media available for storing backups, then it is not worth a button. Creation of backups via network (including cloud) storages stands alone. Here appears the aspect of encryption and transmission of data and of backups themselves.
- Ease of recovery. I suppose, comments are needless here, because if the loss of data has occurred, its recovery should be as quick and painless as possible.
- Ease of initial configuration. This requirement is, of course, debatable since backup creation is configured only once. However, people often make a choice in favor of far less functional tools only because of their simplicity.
I did not make it a point to describe in details this or that tool — it is possible to write a separate book or at least an article almost about each of them. Here is just a brief overview of them.
rsync and rsnapshot
Although rsync was not originally intended for backing up (it is just a convenient tool to synchronize files/folders through the network), it is mostly used to create backups on the remote computer. I enumerate its capabilities:
- Work by SSH protocol (optional).
- Transmission of only delta files, i.e. if changes have been made, not the whole files are transmitted, but only the changed parts of them.
- Data compression during transmission.
- Continuation of file transmission after the connection break, starting from the point at which the break has occurred.
Here is the simplest example of its use:
$ rsync --progress -e ssh -avz /home/adminuser/Docs root@leopard:/home/adminuser/backup/
Keys:
- -r — recursion;
- -l — saves symbolic links;
- -p — saves the rights (standard rights, UGO, — to save ACL and extended attributes you need to use -A and -X options, respectively);
- -t — saves the mtime;
- -o — saves the file owner (on a remote machine only root is available, as well as two further options);
- -g — saves the group;
- -D — saves special files;
- -a — does the same thing as the combination of the above keys (without saving ACL and extended attributes);
- -v — outputs file names;
- -z — compression;
- -e ssh — the command called to access to the remote shell. Thus, if SSH is on the non-standard port you need to use -e ‘ssh -p3222’;
- –progress — outputs the progress indicator.
Additional attention should be paid to directories — if there is a slash at the end of the transmitted directory name, only its content, but not itself, will be transmitted to the destination directory.
But this command has one disadvantage. If a user on the destination side is unprivileged, some system attributes (such as the owner of the file/directory) will not be copied. To circumvent this problem, there is an option –fake-super, which saves such data in the extended attributes and which should be specified at the receiving side (and the support for extended attributes should be enabled at it, as well). In addition, by default rsync copies only user names but not their numeric IDs. To synchronize numeric IDs, use the option –numeric-ids. Accordingly, the command for the unprivileged user will look like this:
$ rsync --progress -e ssh -avz --rsync-path="rsync --fake-super" --numeric-ids /home/adminuser/Docs adminuser@leopard:/home/adminuser/backup/
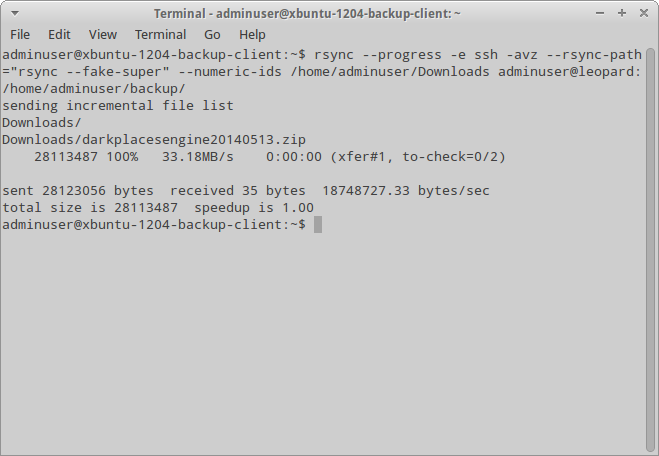
Synchronization using rsync
Rsnapshot in turn is a wrapper around rsync written in Perl. It is convenient because it has a configuration file and there is no need to worry about parameters. You can also set preexec- and postexec-scripts, which is useful, for example, for pre-archiving. Rsnapshot itself uses hard links whenever possible, which significantly reduces the size of copies on the remote server — the new files are transmitted only if they have been changed.
Rsync/rsnapshot are difficult to consider as tools designed specifically for backing up — they barely support anything that should be supported by normal tools of such kind. However, if you have two servers and you need to make occasional backups of configuration files, this tool will be quite enough.
Duplicity and Deja-Dup
Like almost all the tools of this kind, Duplicity implements a standard pattern of the full/incremental backup. However, it has its own features, one of which is the encryption of backups and the second one is the support of multiple protocols (SCP/SSH, FTP, WebDAV, rsync, HSI…).
Here is the example of using this tool:
$ duplicity full --encrypt-key 75E1A006 /home/adminuser sftp://adminuser@leopard//home/adminuser/backup
The only thing that needs to be commented here is the option –encrypt-key, that indicates which key from the GPG keychain will be used (the keychain itself has to exist, of course). Moreover, SSH also uses the key-based authentication, so the key has to be imported at a receiving side.
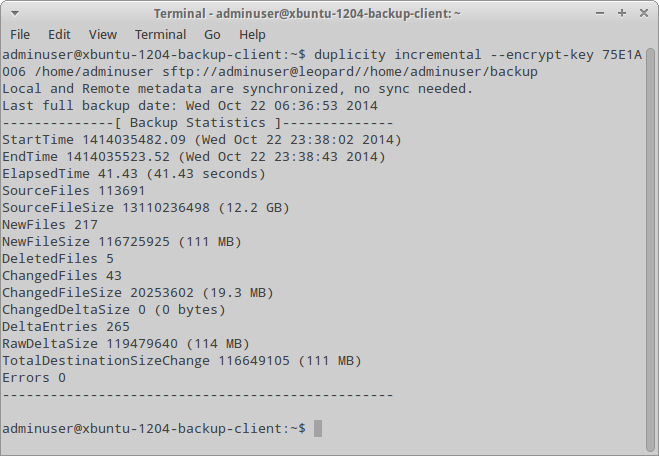
Incremental backup using Duplicity
To create an incremental backup, you can either specify the incremental argument, or specify nothing at all — in the latter case Duplicity will automatically determine the type of backup. You can also specify a list of files/directories to be included/not included in the backup using options –include and –exclude. In addition to these options, there are similar options for (not) including files by mask, but it is better to view them at the man page.
To make the full recovery it is necessary to use the restore argument. For example, as the following:
$ duplicity restore --encrypt-key 75E1A006 sftp://adminuser@leopard//home/adminuser/backup /home/adminuser/restore
Yet, sometimes you need to restore only a specific folder/file. To do this, firstly it is necessary to view the list of files in the current backup (list-current-files argument), and secondly to specify the files to recover with the restore argument — the parameter –file-to-restore. Example:
$ duplicity restore --encrypt-key 75E1A006 --file-to-restore 'Downloads' sftp://adminuser@leopard//home/adminuser/backup /home/adminuser/restore
Among other things, Duplicity also includes a graphical frontend called Deja-Dup. It really facilitates the work but it does not allow using the asymmetric encryption, which, by the way, is not so critical for home users.
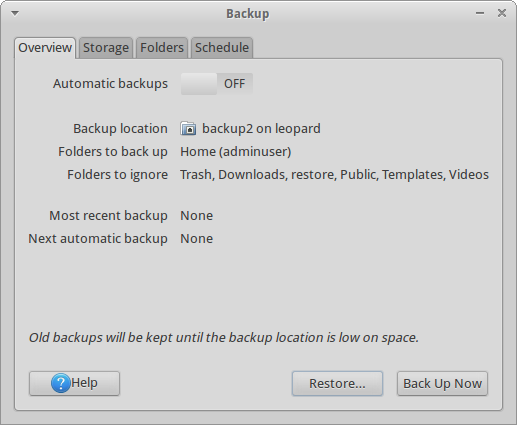
Duplicity frontend — Deja-Dup
In general, Duplicity appears to be much more a backup tool by now than rsync/rsnapshot does. There is already an encryption, a support of cloud storage, and a breakdown of the resulting archive (by the way, the archive format is a good old tar)… However, Duplicity has some disadvantages. Those include the inability to save ACL and extended attributes.
Cedar Backup
This tool was originally intended for backing up to CD/DVD, but now it maintains saving to Amazon S3 cloud, as well. Cedar Backup is able to save not only files from the file system, but also Subversion repositories, PostgreSQL/MySQL databases, and system information… Moreover, due to the current sizes of FS and files, it is just not designed to save everything and anything — unfortunately, CD/DVD drives have a limited capacity. Cedar Backup also supports the encryption using all the same GPG, hence, even if the backups are somehow compromised it will not be so easy to get them back.
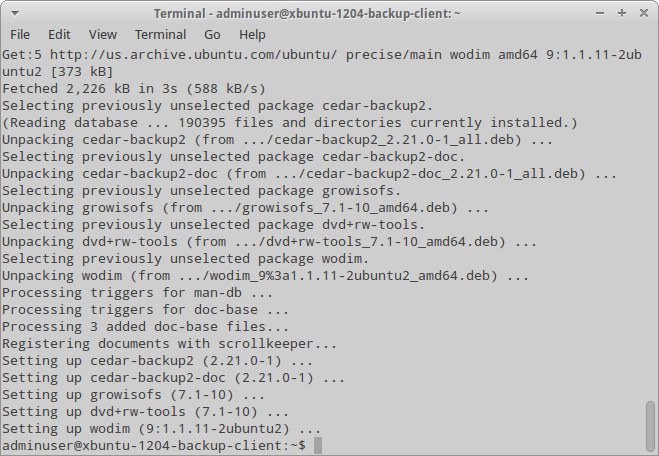
Cedar Backup installation
Additionally, it supports the pools, i.e. it is able to back up from multiple machines. The machines from which it collects data are called clients, and the machine on which it records data to CD/cloud is called the Master (hereinafter referred to as the “server”). Still, nothing prevents from collecting and recording on the same machine. Usually some part of the actions on the clients should be performed automatically using client Cron, but you can configure the server so as it is Cron that carries out these actions according to the schedule, accessing client machines using SSH.
Backup process is divided into four stages, the presence/absence of which can vary depending on the settings:
- Collection (Collect) — the first step which is executed at both the client side and the server side (the latter, however, is optional). Cedar Backup goes through directories and, depending on the mode, selects the files to be saved. After that it archives and compresses them.
- Reception (Stage) — the process of copying the backup from the client nodes to the server. If this stage has not been complete at some of the nodes for some reason, by default Cedar Backup moves to the next node. But this behavior is configurable. Moreover, it is also possible to receive data collected by another process: for this the directory should contain the cback.collect file.
- Saving (Store) — actual recording of backup to the media. Depending on the options and/or support of the recorder (if we write on the optical disc), either a new session is created or the disc is written “from scratch”.
- Cleanup (Purge) — deletion of temporary files that have been collected and prepared at previous stages.
Configuration file in XML format contains eight sections, most of which relate to the stages and therefore may vary:
- — all the fields can be left empty here solely for the user’s convenience.
- — here you can set basic configuration options, such as the first day of the week, the temporary directory, the user and the group on whose behalf the backup occurs, the commands executed before and after the backup, the used stages.
- — setting of nodes. For each node, there is a section which specifies the name of the node, its type (local, which, of course, can be only one, or remote), the directory which holds the collected data.
- — Collect stage configuration. Among other things, it specifies the collection mode (daily, weekly or incremental), the archive type obtained at the output (tar, tar.gz or tar.bz2), and listing and de-listing of collected files/directories.
- — reception stage setting. In the simplest case, it specifies only the option defining the directory which receives the data.
- —saving setting. Among other things, it allows setting the drive removal, verification and capacity.
- — cleanup setting. The only noteworthy parameter here is , which specifies the number of days after which the contents of the relevant directories can be deleted.
- — setting of extensions. It specifies subsections of actions in which, for example, the name of Python module, the name of the function called from it and, finally, the index that determines the order of the action execution are set. The stages are also considered as actions with a predetermined index, which allows defining actions to be performed before or after a certain stage.
Let’s consider a shortened example of the configuration file for a single node:
<cb_config>
    <reference>
    <...>
    </reference>
    <options>
        <starting_day>tuesday</starting_day>
        <working_dir>/home/adminuser/tmp</working_dir>
        <backup_user>adminuser</backup_user>
        <backup_group>adminuser</backup_group>
        <rcp_command>/usr/bin/scp -B</rcp_command>
    </options>
    <peers>
        <peer>
            <name>debian</name>
            <type>local</type>
            <collect_dir>/home/adminuser/cback/collect</collect_dir>
        </peer>
    </peers>
    <collect>
        <...>
        <collect_mode>daily</collect_mode>
        <archive_mode>targz</archive_mode>
        <ignore_file>.cbignore</ignore_file>
        <dir>
            <abs_path>/home/adminuser/Docs</abs_path>
            <collect_mode>daily</collect_mode>
        </dir>
        <file>
            <abs_path>/home/adminuser/Docs</abs_path>
            <collect_mode>weekly</collect_mode>
        </file>
    </collect>
    <stage>
        <staging_dir>/home/adminuser/backup/stage</staging_dir>
    </stage>
    <store>
        <...>
    </store>
    <purge>
        <dir>
            <abs_path>/home/adminuser/backup/stage</abs_path>
            <retain_days>7</retain_days>
        </dir>
        <dir>
        <...>
        </dir>
    </purge>
    <extensions>
        <action>
            <name>encrypt</name>
            <module>CedarBackup2.extend.encrypt</module>
            <function>executeAction</function>
            <index>301</index>
        </action>
    </extensions>
    <encrypt>
        <encrypt_mode>gpg</encrypt_mode>
        <encrypt_target>Backup User</encrypt_target>
    </encrypt>
</cb_config>
I should note that here, in connection with the use of the encryption extension (which is triggered immediately after the preparation step), the section appears. In this section only deserves attention. It specifies the alias of the key owner.
To perform backup, just type the cback command with the option –full, if necessary. Also, it makes sense to add it to Cron — this time without any options.
In general, for the declared purposes Cedar Backup appears to be quite good, although these days it is unclear what can now fit on one CD (or even DVD) drive: for large backups its capacity is too small nowadays, while using drives of standard capacity for storing only backups of configuration files seems to be extremely wasteful. In addition, the support of extensions allows adding functionality — on the whole, attachment of saving to cloud storage appears to be easy enough. However, Cedar Backup has a huge disadvantage: it has no means of restoration from backups. That is, in the case of the above mentioned configuration file, to restore the file it is necessary to remember the date of its change, to decrypt the relevant archive, to unpack it and then to extract this very file.
Bacula
Bacula is probably one of the most powerful backup tools. Designed for use in medium and large networks, it has a flexible architecture that consists of five components:
- Bacula Director — the main server, which manages all the procedures.
- Bacula Console — the control terminal. There are both text and graphic (including Web) versions.
- DBMS (MySQL, PostgreSQL or SQLite), which is necessary to store metadata.
- Storage Director — the server on which backups are stored / saved on physical media.
- File Daemon — the backup client which using Bacula Director commands transmits data to Storage Director.
Technically, all these components can be installed on the same machine, but in such a situation using Bacula makes no sense. The optimal configuration is the following: Bacula Director and Storage Director (together with the DBMS and the terminal) are installed on the same machine and backup data from the clients.
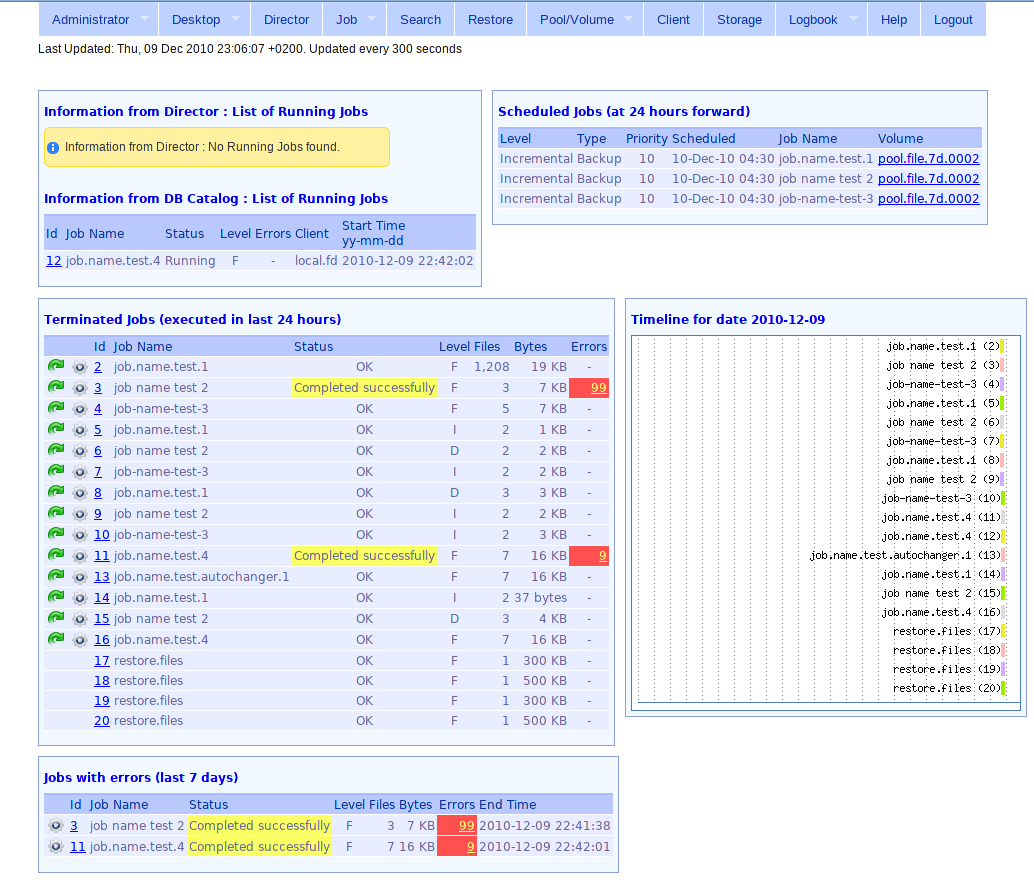
One of the web interfaces for Bacula
The central part of Bacula Director configuration is a job which specifies the necessary references (the schedule, the file set, the storage…). Here is an example of one of the jobs:
Job {
    Name = "home_backup" # Job name
    Type = Backup # Job type (backup, restore, verify...)
    Level = Full # Backup type (generally, it is overridden by a similar option in the appropriate schedule)
    Client = backup-client # Client name
    FileSet = "bc-home-set" # Name of the file set to be saved
    Schedule = "Weekly-schedule" # Schedule name
    Storage = backup-storage # Name of the section which describes the configuration of the file storage
    Messages = Daemon # Behavior of notifications
    Pool = backup-client-pool # Backup pool
    Priority = 10 # Priority. Specifying priorities from 1 to 10 you can control the order of task execution
    Write Bootstrap = "/var/db/bacula/home-backup.bsr" # File intended for recovery in case of DBMS failure
}
Now let’s look at the schedule:
Schedule {
    Name = "Weekly-schedule"
    Run = Level=Full mon at 18:00
    Run = Level=Incremental tue-fri at 17:00
}
This schedule describes that the full backup will be performed every week on Monday at six p.m. and the incremental backup will be performed from Tuesday to Friday at five p.m. In addition to the full and incremental backups, Bacula supports differential backups.
It is worth noting that Bacula works independently from the Cron demon, which distinguishes it from the most homegrown backup tools. Bacula also supports PKI-based encryption of backups. Apart from that, the restoration of backups is executed quite easily — there is no need to manually decrypt the backups.
But along with this Bacula has some disadvantages. If we talk about the enterprise sector, it is necessary to take into account the presence of a single point of failure. And Bacula does have it: in case of Bacula Director failure the entire infrastructure collapses. Moreover, its deployment takes nonzero time, as with other similar solutions, by the way. The free Bacula version does not include cloud backup, but is it really so necessary in the solutions of this class? And applying this solution in SOHO networks is just irrational.
Conclusion
The article reviewed five different backup tools that are suitable for both home and small networks and for the corporate sector, as well. The choice of tools is up to you, one can only give you some advice.
Thus, applying rsync/rsnapshot makes sense if you have only a couple of servers and you only want to save the /etc directory and other text configuration files from time to time. Cedar Backup is intended roughly for the same purposes — the only difference is that the latter does not synchronize data through the network but writes it to the drive and allows encryption of backups, restoration of which requires some efforts.
Duplicity and its graphical frontend Deja-Dup will undoubtedly appeal to fans of cloud solutions. It is really a simple and convenient solution for home users that allows not only to backup (and encrypt as an option), but if necessary to restore whole backups or separate files quite quickly.
In the same case, if you maintain a medium- or even large-scale network, it makes sense to pay attention to Bacula, which is intended for these purposes and which, among other things, is independent from the standard *nix scheduler and includes encryption of backups, that is includes two of three points mentioned in the introduction.
Whatever tool you choose, remember that it is better to save data somehow than not to save it at all.